Linux kernel release 4.x <http://kernel.org/> These are the release notes for Linux version 4. Read them carefully, as they tell you what this is all about, explain how to install the kernel, and what to do if something goes wrong. WHAT IS LINUX? Linux is a clone of the operating system Unix, written from scratch by Linus Torvalds with assistance from a loosely-knit team of hackers across the Net. It aims towards POSIX and Single UNIX Specification compliance. It has all the features you would expect in a modern fully-fledged Unix, including true multitasking, virtual memory, shared libraries, demand loading, shared copy-on-write executables, proper memory management, and multistack networking including IPv4 and IPv6. It is distributed under the GNU General Public License - see the accompanying COPYING file for more details. ON WHAT HARDWARE DOES IT RUN? Although originally developed first for 32-bit x86-based PCs (386 or higher), today Linux also runs on (at least) the Compaq Alpha AXP, Sun SPARC and UltraSPARC, Motorola 68000, PowerPC, PowerPC64, ARM, Hitachi SuperH, Cell, IBM S/390, MIPS, HP PA-RISC, Intel IA-64, DEC VAX, AMD x86-64, AXIS CRIS, Xtensa, Tilera TILE, AVR32, ARC and Renesas M32R architectures. Linux is easily portable to most general-purpose 32- or 64-bit architectures as long as they have a paged memory management unit (PMMU) and a port of the GNU C compiler (gcc) (part of The GNU Compiler Collection, GCC). Linux has also been ported to a number of architectures without a PMMU, although functionality is then obviously somewhat limited. Linux has also been ported to itself. You can now run the kernel as a userspace application - this is called UserMode Linux (UML). DOCUMENTATION: - There is a lot of documentation available both in electronic form on the Internet and in books, both Linux-specific and pertaining to general UNIX questions. I'd recommend looking into the documentation subdirectories on any Linux FTP site for the LDP (Linux Documentation Project) books. This README is not meant to be documentation on the system: there are much better sources available. - There are various README files in the Documentation/ subdirectory: these typically contain kernel-specific installation notes for some drivers for example. See Documentation/00-INDEX for a list of what is contained in each file. Please read the Changes file, as it contains information about the problems, which may result by upgrading your kernel. - The Documentation/DocBook/ subdirectory contains several guides for kernel developers and users. These guides can be rendered in a number of formats: PostScript (.ps), PDF, HTML, & man-pages, among others. After installation, "make psdocs", "make pdfdocs", "make htmldocs", or "make mandocs" will render the documentation in the requested format. INSTALLING the kernel source: - If you install the full sources, put the kernel tarball in a directory where you have permissions (e.g. your home directory) and unpack it: xz -cd linux-4.X.tar.xz | tar xvf - Replace "X" with the version number of the latest kernel. Do NOT use the /usr/src/linux area! This area has a (usually incomplete) set of kernel headers that are used by the library header files. They should match the library, and not get messed up by whatever the kernel-du-jour happens to be. - You can also upgrade between 4.x releases by patching. Patches are distributed in the xz format. To install by patching, get all the newer patch files, enter the top level directory of the kernel source (linux-4.X) and execute: xz -cd ../patch-4.x.xz | patch -p1 Replace "x" for all versions bigger than the version "X" of your current source tree, _in_order_, and you should be ok. You may want to remove the backup files (some-file-name~ or some-file-name.orig), and make sure that there are no failed patches (some-file-name# or some-file-name.rej). If there are, either you or I have made a mistake. Unlike patches for the 4.x kernels, patches for the 4.x.y kernels (also known as the -stable kernels) are not incremental but instead apply directly to the base 4.x kernel. For example, if your base kernel is 4.0 and you want to apply the 4.0.3 patch, you must not first apply the 4.0.1 and 4.0.2 patches. Similarly, if you are running kernel version 4.0.2 and want to jump to 4.0.3, you must first reverse the 4.0.2 patch (that is, patch -R) _before_ applying the 4.0.3 patch. You can read more on this in Documentation/applying-patches.txt Alternatively, the script patch-kernel can be used to automate this process. It determines the current kernel version and applies any patches found. linux/scripts/patch-kernel linux The first argument in the command above is the location of the kernel source. Patches are applied from the current directory, but an alternative directory can be specified as the second argument. - Make sure you have no stale .o files and dependencies lying around: cd linux make mrproper You should now have the sources correctly installed. SOFTWARE REQUIREMENTS Compiling and running the 4.x kernels requires up-to-date versions of various software packages. Consult Documentation/Changes for the minimum version numbers required and how to get updates for these packages. Beware that using excessively old versions of these packages can cause indirect errors that are very difficult to track down, so don't assume that you can just update packages when obvious problems arise during build or operation. BUILD directory for the kernel: When compiling the kernel, all output files will per default be stored together with the kernel source code. Using the option "make O=output/dir" allows you to specify an alternate place for the output files (including .config). Example: kernel source code: /usr/src/linux-4.X build directory: /home/name/build/kernel To configure and build the kernel, use: cd /usr/src/linux-4.X make O=/home/name/build/kernel menuconfig make O=/home/name/build/kernel sudo make O=/home/name/build/kernel modules_install install Please note: If the 'O=output/dir' option is used, then it must be used for all invocations of make. CONFIGURING the kernel: Do not skip this step even if you are only upgrading one minor version. New configuration options are added in each release, and odd problems will turn up if the configuration files are not set up as expected. If you want to carry your existing configuration to a new version with minimal work, use "make oldconfig", which will only ask you for the answers to new questions. - Alternative configuration commands are: "make config" Plain text interface. "make menuconfig" Text based color menus, radiolists & dialogs. "make nconfig" Enhanced text based color menus. "make xconfig" Qt based configuration tool. "make gconfig" GTK+ based configuration tool. "make oldconfig" Default all questions based on the contents of your existing ./.config file and asking about new config symbols. "make silentoldconfig" Like above, but avoids cluttering the screen with questions already answered. Additionally updates the dependencies. "make olddefconfig" Like above, but sets new symbols to their default values without prompting. "make defconfig" Create a ./.config file by using the default symbol values from either arch/$ARCH/defconfig or arch/$ARCH/configs/${PLATFORM}_defconfig, depending on the architecture. "make ${PLATFORM}_defconfig" Create a ./.config file by using the default symbol values from arch/$ARCH/configs/${PLATFORM}_defconfig. Use "make help" to get a list of all available platforms of your architecture. "make allyesconfig" Create a ./.config file by setting symbol values to 'y' as much as possible. "make allmodconfig" Create a ./.config file by setting symbol values to 'm' as much as possible. "make allnoconfig" Create a ./.config file by setting symbol values to 'n' as much as possible. "make randconfig" Create a ./.config file by setting symbol values to random values. "make localmodconfig" Create a config based on current config and loaded modules (lsmod). Disables any module option that is not needed for the loaded modules. To create a localmodconfig for another machine, store the lsmod of that machine into a file and pass it in as a LSMOD parameter. target$ lsmod > /tmp/mylsmod target$ scp /tmp/mylsmod host:/tmp host$ make LSMOD=/tmp/mylsmod localmodconfig The above also works when cross compiling. "make localyesconfig" Similar to localmodconfig, except it will convert all module options to built in (=y) options. You can find more information on using the Linux kernel config tools in Documentation/kbuild/kconfig.txt. - NOTES on "make config": - Having unnecessary drivers will make the kernel bigger, and can under some circumstances lead to problems: probing for a nonexistent controller card may confuse your other controllers - Compiling the kernel with "Processor type" set higher than 386 will result in a kernel that does NOT work on a 386. The kernel will detect this on bootup, and give up. - A kernel with math-emulation compiled in will still use the coprocessor if one is present: the math emulation will just never get used in that case. The kernel will be slightly larger, but will work on different machines regardless of whether they have a math coprocessor or not. - The "kernel hacking" configuration details usually result in a bigger or slower kernel (or both), and can even make the kernel less stable by configuring some routines to actively try to break bad code to find kernel problems (kmalloc()). Thus you should probably answer 'n' to the questions for "development", "experimental", or "debugging" features. COMPILING the kernel: - Make sure you have at least gcc 3.2 available. For more information, refer to Documentation/Changes. Please note that you can still run a.out user programs with this kernel. - Do a "make" to create a compressed kernel image. It is also possible to do "make install" if you have lilo installed to suit the kernel makefiles, but you may want to check your particular lilo setup first. To do the actual install, you have to be root, but none of the normal build should require that. Don't take the name of root in vain. - If you configured any of the parts of the kernel as `modules', you will also have to do "make modules_install". - Verbose kernel compile/build output: Normally, the kernel build system runs in a fairly quiet mode (but not totally silent). However, sometimes you or other kernel developers need to see compile, link, or other commands exactly as they are executed. For this, use "verbose" build mode. This is done by passing "V=1" to the "make" command, e.g. make V=1 all To have the build system also tell the reason for the rebuild of each target, use "V=2". The default is "V=0". - Keep a backup kernel handy in case something goes wrong. This is especially true for the development releases, since each new release contains new code which has not been debugged. Make sure you keep a backup of the modules corresponding to that kernel, as well. If you are installing a new kernel with the same version number as your working kernel, make a backup of your modules directory before you do a "make modules_install". Alternatively, before compiling, use the kernel config option "LOCALVERSION" to append a unique suffix to the regular kernel version. LOCALVERSION can be set in the "General Setup" menu. - In order to boot your new kernel, you'll need to copy the kernel image (e.g. .../linux/arch/i386/boot/bzImage after compilation) to the place where your regular bootable kernel is found. - Booting a kernel directly from a floppy without the assistance of a bootloader such as LILO, is no longer supported. If you boot Linux from the hard drive, chances are you use LILO, which uses the kernel image as specified in the file /etc/lilo.conf. The kernel image file is usually /vmlinuz, /boot/vmlinuz, /bzImage or /boot/bzImage. To use the new kernel, save a copy of the old image and copy the new image over the old one. Then, you MUST RERUN LILO to update the loading map! If you don't, you won't be able to boot the new kernel image. Reinstalling LILO is usually a matter of running /sbin/lilo. You may wish to edit /etc/lilo.conf to specify an entry for your old kernel image (say, /vmlinux.old) in case the new one does not work. See the LILO docs for more information. After reinstalling LILO, you should be all set. Shutdown the system, reboot, and enjoy! If you ever need to change the default root device, video mode, ramdisk size, etc. in the kernel image, use the 'rdev' program (or alternatively the LILO boot options when appropriate). No need to recompile the kernel to change these parameters. - Reboot with the new kernel and enjoy. IF SOMETHING GOES WRONG: - If you have problems that seem to be due to kernel bugs, please check the file MAINTAINERS to see if there is a particular person associated with the part of the kernel that you are having trouble with. If there isn't anyone listed there, then the second best thing is to mail them to me (torvalds@linux-foundation.org), and possibly to any other relevant mailing-list or to the newsgroup. - In all bug-reports, *please* tell what kernel you are talking about, how to duplicate the problem, and what your setup is (use your common sense). If the problem is new, tell me so, and if the problem is old, please try to tell me when you first noticed it. - If the bug results in a message like unable to handle kernel paging request at address C0000010 Oops: 0002 EIP: 0010:XXXXXXXX eax: xxxxxxxx ebx: xxxxxxxx ecx: xxxxxxxx edx: xxxxxxxx esi: xxxxxxxx edi: xxxxxxxx ebp: xxxxxxxx ds: xxxx es: xxxx fs: xxxx gs: xxxx Pid: xx, process nr: xx xx xx xx xx xx xx xx xx xx xx or similar kernel debugging information on your screen or in your system log, please duplicate it *exactly*. The dump may look incomprehensible to you, but it does contain information that may help debugging the problem. The text above the dump is also important: it tells something about why the kernel dumped code (in the above example, it's due to a bad kernel pointer). More information on making sense of the dump is in Documentation/oops-tracing.txt - If you compiled the kernel with CONFIG_KALLSYMS you can send the dump as is, otherwise you will have to use the "ksymoops" program to make sense of the dump (but compiling with CONFIG_KALLSYMS is usually preferred). This utility can be downloaded from ftp://ftp.<country>.kernel.org/pub/linux/utils/kernel/ksymoops/ . Alternatively, you can do the dump lookup by hand: - In debugging dumps like the above, it helps enormously if you can look up what the EIP value means. The hex value as such doesn't help me or anybody else very much: it will depend on your particular kernel setup. What you should do is take the hex value from the EIP line (ignore the "0010:"), and look it up in the kernel namelist to see which kernel function contains the offending address. To find out the kernel function name, you'll need to find the system binary associated with the kernel that exhibited the symptom. This is the file 'linux/vmlinux'. To extract the namelist and match it against the EIP from the kernel crash, do: nm vmlinux | sort | less This will give you a list of kernel addresses sorted in ascending order, from which it is simple to find the function that contains the offending address. Note that the address given by the kernel debugging messages will not necessarily match exactly with the function addresses (in fact, that is very unlikely), so you can't just 'grep' the list: the list will, however, give you the starting point of each kernel function, so by looking for the function that has a starting address lower than the one you are searching for but is followed by a function with a higher address you will find the one you want. In fact, it may be a good idea to include a bit of "context" in your problem report, giving a few lines around the interesting one. If you for some reason cannot do the above (you have a pre-compiled kernel image or similar), telling me as much about your setup as possible will help. Please read the REPORTING-BUGS document for details. - Alternatively, you can use gdb on a running kernel. (read-only; i.e. you cannot change values or set break points.) To do this, first compile the kernel with -g; edit arch/i386/Makefile appropriately, then do a "make clean". You'll also need to enable CONFIG_PROC_FS (via "make config"). After you've rebooted with the new kernel, do "gdb vmlinux /proc/kcore". You can now use all the usual gdb commands. The command to look up the point where your system crashed is "l *0xXXXXXXXX". (Replace the XXXes with the EIP value.) gdb'ing a non-running kernel currently fails because gdb (wrongly) disregards the starting offset for which the kernel is compiled.
PaddlePALM
English | 简体中文
PaddlePALM (PArallel Learning from Multi-tasks) is a fast, flexible, extensible and easy-to-use NLP large-scale pretraining and multi-task learning framework. PaddlePALM is a high level framework aiming at fastly developing high-performance NLP models.
With PaddlePALM, it is easy to achieve effecient exploration of robust learning of NLP models with multiple auxilary tasks. For example, based on PaddlePALM, the produced robust MRC model, D-Net, has achieved the 1st place in EMNLP2019 MRQA track.
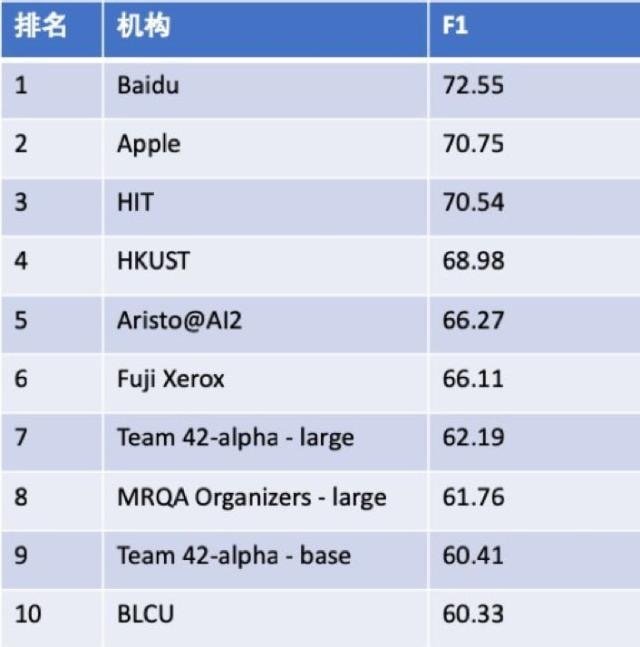
MRQA2019 Leaderboard
Beyond the research scope, PaddlePALM has been applied on Baidu Search Engine to seek for more accurate user query understanding and answer mining, which implies the high reliability and performance of PaddlePALM.
Features:
- Easy-to-use: with PALM, 8 steps to achieve a typical NLP task. Moreover, all basic components (e.g., the model backbone, dataset reader, task output head, optimizer...) have been decoupled, which allows the replacement of any component to other candidates with quite minor changes of your code.
- Built-in Popular NLP Backbones and Pre-trained models: multiple state-of-the-art general purpose model architectures and pretrained models (e.g., BERT,ERNIE,RoBERTa,...) are built-in.
- Easy to play Multi-task Learning: only one API is needed for jointly training of several tasks with parameters reusement.
- Support train/eval with Multi-GPUs: automatically recognize and adapt to multiple gpus mode to accelerate training and inference.
- Pre-training friendly: self-supervised tasks (e.g., mask language model) are built-in to facilitate pre-training. Easy to train from scratch.
- Easy to Customize: support customized development of any component (e.g, backbone, task head, reader and optimizer) with reusement of pre-defined ones, which gives developers high flexibility and effeciency to adapt for diverse NLP scenes.
You can easily re-produce following competitive results with minor codes, which covers most of NLP tasks such as classification, matching, sequence labeling, reading comprehension, dialogue understanding and so on. More details can be found in examples
.
Dataset
|
chnsenticorp | Quora Question Pairs matching | MSRA-NER (SIGHAN2006) |
CMRC2018 | |||
---|---|---|---|---|---|---|---|
Metric
|
accuracy
|
f1-score
|
accuracy
|
f1-score
|
f1-score
|
em
|
f1-score
|
test
|
test
|
test
|
dev
|
||||
ERNIE Base | 95.8 | 95.8 | 86.2 | 82.2 | 99.2 | 64.3 | 85.2 |
Overview
Architecture Diagram
PaddlePALM is a well-designed high-level NLP framework. You can efficiently achieve supervised learning, unsupervised/self-supervised learning, multi-task learning and transfer learning with minor codes based on PaddlePALM. There are three layers in PaddlePALM architecture, i.e., component layer, trainer layer and high-level trainer layer from bottom to top.
In component layer, PaddlePALM supplies 6 decoupled components to achieve a NLP task. Each component contains rich pre-defined
classes and a Base
class. Pre-defined classes are aiming at typical NLP tasks, and the base class is to help users develop a new Class (based on pre-defined ones or from the base).
The trainer layer is to establish a computation graph with selected components and do training and predicting. The training strategy, model saving and loading, evaluation and predicting procedures are described in this layer. Noted a trainer can only process one task.
The high-level trainer layer is for complicated learning and inference strategy, e.g., multi-task learning. You can add auxilary tasks to train robust NLP models (improve test set and out-of-domain performance of a model), or jointly training multiple related tasks to gain more performance for each task.
module | illustration |
---|---|
paddlepalm | an open source NLP pretraining and multitask learning framework, built on paddlepaddle. |
paddlepalm.reader | a collection of elastic task-specific dataset readers. |
paddlepalm.backbone | a collection of classic NLP representation models, e.g., BERT, ERNIE, RoBERTa. |
paddlepalm.head | a collection of task-specific output layers. |
paddlepalm.lr_sched | a collection of learning rate schedualers. |
paddlepalm.optimizer | a collection of optimizers. |
paddlepalm.downloader | a download module for pretrained models with configure and vocab files. |
paddlepalm.Trainer | the core unit to start a single task training/predicting session. A trainer is to build computation graph, manage training and evaluation process, achieve model/checkpoint saving and pretrain_model/checkpoint loading. |
paddlepalm.MultiHeadTrainer | the core unit to start a multi-task training/predicting session. A MultiHeadTrainer is built based on several Trainers. Beyond the inheritance of Trainer, it additionally achieves model backbone reuse across tasks, trainer sampling for multi-task learning, and multi-head inference for effective evaluation and prediction. |
Installation
PaddlePALM support both python2 and python3, linux and windows, CPU and GPU. The preferred way to install PaddlePALM is via pip
. Just run following commands in your shell.
pip install paddlepalm
Installing via source
git clone https://github.com/PaddlePaddle/PALM.git
cd PALM && python setup.py install
Library Dependencies
- Python >= 2.7
- cuda >= 9.0
- cudnn >= 7.0
- PaddlePaddle >= 1.7.0 (Please refer to this to install)
Downloading pretrain models
We incorporate many pretrained models to initialize model backbone parameters. Training big NLP model, e.g., 12-layer transformers, with pretrained models is practically much more effective than that with randomly initialized parameters. To see all the available pretrained models and download, run following code in python interpreter (input command python
in shell):
>>> from paddlepalm import downloader
>>> downloader.ls('pretrain')
Available pretrain items:
=> RoBERTa-zh-base
=> RoBERTa-zh-large
=> ERNIE-v2-en-base
=> ERNIE-v2-en-large
=> XLNet-cased-base
=> XLNet-cased-large
=> ERNIE-v1-zh-base
=> ERNIE-v1-zh-base-max-len-512
=> BERT-en-uncased-large-whole-word-masking
=> BERT-en-cased-large-whole-word-masking
=> BERT-en-uncased-base
=> BERT-en-uncased-large
=> BERT-en-cased-base
=> BERT-en-cased-large
=> BERT-multilingual-uncased-base
=> BERT-multilingual-cased-base
=> BERT-zh-base
>>> downloader.download('pretrain', 'BERT-en-uncased-base', './pretrain_models')
...
Usage
Quick Start
8 steps to start a typical NLP training task.
- use
paddlepalm.reader
to create a reader for dataset loading and input features generation, then callreader.load_data
method to load your training data. - use
paddlepalm.backbone
to create a model backbone to extract text features (e.g., contextual word embedding, sentence embedding). - register your reader with your backbone through
reader.register_with
method. After this step, your reader is able to yield input features used by backbone. - use
paddlepalm.head
to create a task output head. This head can provide task loss for training and predicting results for model inference. - create a task trainer with
paddlepalm.Trainer
, then build forward graph with backbone and task head (created in step 2 and 4) throughtrainer.build_forward
. - use
paddlepalm.optimizer
(andpaddlepalm.lr_sched
if is necessary) to create a optimizer, then build backward throughtrainer.build_backward
. - fit prepared reader and data (achieved in step 1) to trainer with
trainer.fit_reader
method. - load pretrain model with
trainer.load_pretrain
, or load checkpoint withtrainer.load_ckpt
or nothing to do for training from scratch, then do training withtrainer.train
.
For more implementation details, see following demos:
- Sentiment Classification
- Question Pairs matching
- Named Entity Recognition
- SQuAD-like Machine Reading Comprehension.
Multi-task Learning
To run with multi-task learning mode:
- repeatedly create components (i.e., reader, backbone and head) for each task followed with step 1~5 above.
- create empty trainers (each trainer is corresponded to one task) and pass them to create a
MultiHeadTrainer
. - build multi-task forward graph with
multi_head_trainer.build_forward
method. - use
paddlepalm.optimizer
(andpaddlepalm.lr_sched
if is necessary) to create a optimizer, then build backward throughmulti_head_trainer.build_backward
. - fit all prepared readers and data to multi_head_trainer with
multi_head_trainer.fit_readers
method. - load pretrain model with
multi_head_trainer.load_pretrain
, or load checkpoint withmulti_head_trainer.load_ckpt
or nothing to do for training from scratch, then do training withmulti_head_trainer.train
.
The save/load and predict operations of a multi_head_trainer is the same as a trainer.
For more implementation details with multi_head_trainer
, see
Save models
To save models/checkpoints and logs during training, just call trainer.set_saver
method. More implementation details see this.
Evaluation/Inference
To do predict/evaluation after a training stage, just create another three reader, backbone and head instance with phase='predict'
(repeat step 1~4 above). Then do predicting with predict
method in trainer (no need to create another trainer). More implementation details see this.
If you want to do evaluation during training process, use trainer.train_one_step()
instead of trainer.train()
. The trainer.train_one_step(batch)
achieves to train only one step, thus you can insert evaluation code into any point of training process. The argument batch
can be fetched from trainer.get_one_batch
.
PaddlePALM also supports multi-head inference, please reference examples/multi-task/joint_predict.py
.
Play with Multiple GPUs
If there exists multiple GPUs in your environment, you can control the number and index of these GPUs through the environment variable CUDA_VISIBLE_DEVICES. For example, if 4 GPUs in your enviroment, indexed with 0,1,2,3, you can run with GPU2 only with following commands
CUDA_VISIBLE_DEVICES=2 python run.py
Multiple GPUs should be seperated with ,
. For example, running with GPU2 and GPU3, following commands is refered:
CUDA_VISIBLE_DEVICES=2,3 python run.py
On multi-gpu mode, PaddlePALM will automatically split each batch onto the available cards. For example, if the batch_size
is set 64, and there are 4 cards visible for PaddlePALM, then the batch_size in each card is actually 64/4=16. Therefore, when running with multiple cards, you need to ensure that the set batch_size can be divided by the number of cards.
License
This tutorial is contributed by PaddlePaddle and licensed under the Apache-2.0 license.