# 表单登录
Spring 安全性为正在通过 HTML 表单提供的用户名和密码提供支持。本节详细介绍了 Spring 安全性中基于表单的身份验证的工作方式。
让我们来看看基于表单的登录在 Spring 安全性中是如何工作的。首先,我们来看看用户是如何被重定向到 Log In 表单的。
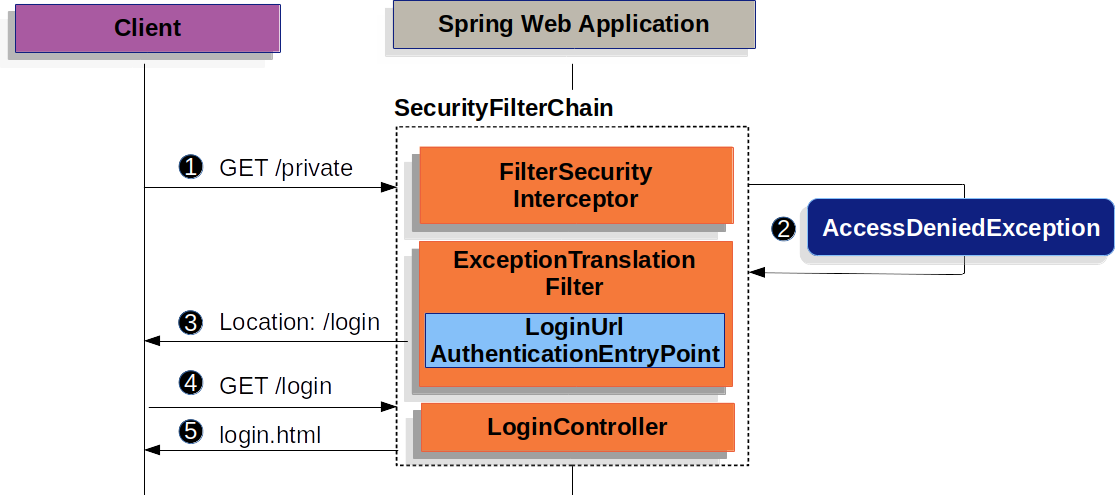
图 1。重定向到登录页面
该图构建于我们的[`SecurityFilterChain`](../../architecture.html# Servlet-SecurityFilterchain)图。
首先,用户向资源`/private`发出未经授权的请求。
 Spring security 的[`FilterSecurityInterceptor`](.../授权/authorization/authorization/authorization-requests.html# Servlet-authorization-filtersecurityinterceptor)通过抛出`AccessDeniedException`表示未经验证的请求是*拒绝*。
由于未对用户进行身份验证,[`ExceptionTranslationFilter`](..../architecture.html# Servlet-ExceptionTranslationFilter)启动*启动身份验证*,并用配置的[`AuthenticationEntryPoint`](../architecture.html# Servlet-authentication-authentrationEntryPoint)向登录页面发送重定向。在大多数情况下,`AuthenticationEntryPoint`是[`LoginUrlAuthenticationEntryPoint`](https://DOCS. Spring.io/ Spring-security/site/DOCS/5.6.2/api/org/springframework/security/web/authentication/loginurlauthenticationentrypoint.html)的一个实例。
然后浏览器将请求重定向到的登录页面。
应用程序中的某个内容,必须[呈现登录页面](#servlet-authentication-form-custom)。
当提交用户名和密码时,`UsernamePasswordAuthenticationFilter`将对用户名和密码进行身份验证。`UsernamePasswordAuthenticationFilter`扩展了[抽象处理过滤器](../architecture.html#servlet-authentication-abstractprocessingfilter),所以这个图看起来应该很相似。
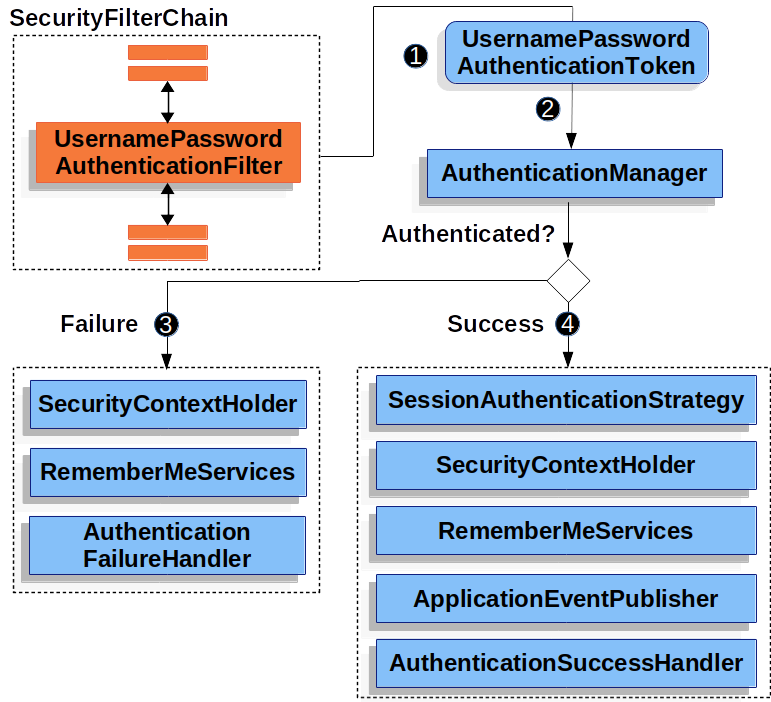
图 2。验证用户名和密码
该图构建于我们的[`SecurityFilterChain`](../../architecture.html# Servlet-SecurityFilterchain)图。
当用户提交他们的用户名和密码时,`UsernamePasswordAuthenticationFilter`通过从`HttpServletRequest`中提取用户名和密码,创建一个`UsernamePasswordAuthenticationToken`,这是一种[`Authentication`](../architecture.html# Servlet-authentication-authentication)的类型。
接下来,将`UsernamePasswordAuthenticationToken`传递到`AuthenticationManager`中以进行身份验证。`AuthenticationManager`的详细内容取决于[用户信息被存储](index.html#servlet-authentication-unpwd-storage)的方式。
如果身份验证失败,则*失败*
* [SecurityContextholder ](../architecture.html#servlet-authentication-securitycontextholder)被清除。
* 调用`RememberMeServices.loginFail`。如果 Remember Me 没有配置,这是一个禁止操作。
* 调用`AuthenticationFailureHandler`。
如果身份验证成功,则*成功*。
* `SessionAuthenticationStrategy`被通知有一个新的登录。
* [认证](../architecture.html#servlet-authentication-authentication)设置在[SecurityContextholder ](../architecture.html#servlet-authentication-securitycontextholder)上。
* 调用`RememberMeServices.loginSuccess`。如果 Remember Me 没有配置,这是一个禁止操作。
* `ApplicationEventPublisher`发布`InteractiveAuthenticationSuccessEvent`。
* 调用`AuthenticationSuccessHandler`。通常这是一个`SimpleUrlAuthenticationSuccessHandler`,当我们重定向到登录页面时,它将重定向到由[`ExceptionTranslationFilter`](../../architecture.html# Servlet-ExceptionTranslationFilter)保存的请求。
Spring 默认情况下启用安全表单登录。然而,只要提供了任何基于 Servlet 的配置,就必须显式地提供基于表单的登录。可以在下面找到最小的、显式的 Java 配置:
例 1。表单登录
Java
```
protected void configure(HttpSecurity http) {
http
// ...
.formLogin(withDefaults());
}
```
XML
```
```
Kotlin
```
fun configure(http: HttpSecurity) {
http {
// ...
formLogin { }
}
}
```
在这种配置 Spring 中,Security 将呈现一个默认的登录页面。大多数生产应用程序将需要一个自定义日志的形式。
下面的配置演示了如何在表单中提供自定义日志。
例 2。自定义登录表单配置
Java
```
protected void configure(HttpSecurity http) throws Exception {
http
// ...
.formLogin(form -> form
.loginPage("/login")
.permitAll()
);
}
```
XML
```
```
Kotlin
```
fun configure(http: HttpSecurity) {
http {
// ...
formLogin {
loginPage = "/login"
permitAll()
}
}
}
```
当登录页面在 Spring 安全配置中指定时,你负责呈现该页面。下面是一个[Thymeleaf](https://www.thymeleaf.org/)模板,该模板生成符合`/login`登录页面的 HTML 登录表单:
例 3。登录表单
SRC/main/resources/templates/login.html
```
Please Log In
Please Log In
Invalid username and password.
You have been logged out.
```
关于默认的 HTML 表单,有几个关键点:
* 表单应该执行`post`到`/login`
* 表单将需要包含一个[CSRF Token](../../exploits/csrf.html#servlet-csrf),由 ThymeLeaf 表示为[自动包含](../../exploits/csrf.html#servlet-csrf-include-form-auto)。
* 表单应该在名为`username`的参数中指定用户名。
* 表单应该在名为`password`的参数中指定密码。
* 如果发现 HTTP 参数错误,则表示用户未能提供有效的用户名/密码。
* 如果找到了 HTTP 参数注销,则表示用户已成功注销。
许多用户只需要定制登录页面就可以了。然而,如果需要的话,上面的所有内容都可以通过额外的配置进行定制。
如果你正在使用 Spring MVC,你将需要一个控制器,该控制器将`GET /login`映射到我们创建的登录模板。下面可以看到最小样本`LoginController`:
例 4。登录控制器
Java
```
@Controller
class LoginController {
@GetMapping("/login")
String login() {
return "login";
}
}
```
Kotlin
```
@Controller
class LoginController {
@GetMapping("/login")
fun login(): String {
return "login"
}
}
```
[读取用户名/密码](input.html)[Basic](basic.html)