# Spring Cloud 任务参考指南
# [](#preface)[Preface](#preface)
本节提供了 Spring Cloud任务参考文档的简要概述。把它看作是文档其余部分的一张地图。你可以以线性方式阅读此参考指南,或者如果你对某些内容不感兴趣,可以跳过部分。
## [](#about-the-documentation)[1.关于文档](#about-the-documentation)
Spring Cloud任务参考指南在[html](https://docs.spring.io/spring-cloud-task/docs/current/reference)和[pdf](https://docs.spring.io/spring-cloud-task/docs/current/reference/index.pdf),[epub](https://docs.spring.io/spring-cloud-task/docs/current/reference/index.epub)中可用。最新版本可在[docs.spring.io/spring-cloud-task/docs/current-SNAPSHOT/reference/html/](https://docs.spring.io/spring-cloud-task/docs/current-SNAPSHOT/reference/html/)处获得。
本文件的副本可供你自己使用并分发给他人,但前提是你不对此类副本收取任何费用,并且还需每一份副本均包含本版权声明,无论是以印刷形式还是以电子方式分发。
## [](#task-documentation-getting-help)[2.获得帮助](#task-documentation-getting-help)
云任务有问题吗?我们愿意提供帮助!
* 问一个问题。我们监视[stackoverflow.com](https://stackoverflow.com)中带有[`spring-cloud-task`]标记的问题(https://stackoverflow.com/tags/ Spring-cloud-task)。
* 使用 Spring Cloud任务在[github.com/spring-cloud/spring-cloud-task/issues](https://github.com/spring-cloud/spring-cloud-task/issues)上报告错误。
| |所有的云任务都是开源的,包括文档。如果你发现
是 DOCS 的问题,或者你只是想改进它们,请[get
involved](https://github.com/spring-cloud/spring-cloud-task/tree/master)。|
|---|--------------------------------------------------------------------------------------------------------------------------------------------------------------------------------------------------------------------------------------------|
## [](#task-documentation-first-steps)[3.第一步](#task-documentation-first-steps)
如果你刚刚开始使用 Spring Cloud任务或一般的“ Spring”,我们建议你阅读[开始](#getting-started)章节。
要从头开始,请阅读以下部分:
* [Introducing Spring Cloud Task](#getting-started-introducing-spring-cloud-task)
* [系统要求](#getting-started-system-requirements)
要遵循本教程,请阅读[Developing Your First Spring Cloud Task Application](#getting-started-developing-first-task)以运行你的示例,请阅读[运行示例](#getting-started-running-the-example)
# [](#getting-started)[开始](#getting-started)
如果你刚刚开始使用 Spring Cloud Task,那么你应该阅读这一部分。在这里,我们回答基本的“什么?”、“怎么做?”和“为什么?”的问题。我们从温和地介绍云任务开始。然后,我们构建了一个 Spring Cloud任务应用程序,讨论了一些核心原则。
## [](#getting-started-introducing-spring-cloud-task)[4. Introducing Spring Cloud Task](#getting-started-introducing-spring-cloud-task)
Spring Cloud任务使创建短期微服务变得容易。它提供了允许在生产环境中按需执行短期 JVM 流程的功能。
## [](#getting-started-system-requirements)[5.系统要求](#getting-started-system-requirements)
你需要安装 Java(Java8 或更好)。要进行构建,还需要安装 Maven。
### [](#database-requirements)[5.1.数据库需求](#database-requirements)
Spring Cloud任务使用关系数据库来存储已执行任务的结果。虽然可以在没有数据库的情况下开始开发任务(任务的状态作为任务存储库更新的一部分记录),但对于生产环境,你希望使用受支持的数据库。 Spring Cloud任务当前支持以下数据库:
* DB2
* H2
* HSQLDB
* MySQL
* 甲骨文
* Postgres
* SQLServer
## [](#getting-started-developing-first-task)[6. Developing Your First Spring Cloud Task Application](#getting-started-developing-first-task)
一个很好的起点是使用一个简单的“你好,世界!”应用程序,因此我们创建了相当于突出该框架功能的 Spring Cloud 任务。大多数 IDE 都对 Apache Maven 有很好的支持,因此我们将它用作这个项目的构建工具。
| |Spring.io 网站包含许多使用 Spring boot 的[`Getting Started`“
guides](https:// Spring.io/guides)。如果你需要解决某个特定的问题,请先在此进行检查。
你可以通过执行[Spring Initializr](https://start.spring.io/)并创建一个新项目来快捷执行以下步骤。这样做
会自动生成一个新的项目结构,这样你就可以立即开始编码。
我们建议你尝试使用 Spring initializr 来熟悉它。|
|---|---------------------------------------------------------------------------------------------------------------------------------------------------------------------------------------------------------------------------------------------------------------------------------------------------------------------------------------------------------------------------------------------------------------------------------------------------------------------------------------------------------------|
### [](#getting-started-creating-project)[6.1. Creating the Spring Task Project using Spring Initializr](#getting-started-creating-project)
现在,我们可以创建并测试一个将`Hello, World!`打印到控制台的应用程序。
这样做:
1. 访问[Spring Initialzr](https://start.spring.io/)网站。
1. 创建一个新的 Maven 项目,其**集团**的名称为`io.spring.demo`,而**人工制品**的名称为`helloworld`。
2. 在“依赖关系”文本框中,键入`task`,然后选择`Cloud Task`依赖关系。
3. 在“依赖关系”文本框中,键入`jdbc`,然后选择`JDBC`依赖关系。
4. 在“依赖关系”文本框中,键入`h2`,然后选择`H2`。(或者你最喜欢的数据库)
5. 点击**生成项目**按钮
2. 解压 helloworld.zip 文件并将项目导入到你最喜欢的 IDE 中。
### [](#getting-started-writing-the-code)[6.2.编写代码](#getting-started-writing-the-code)
要完成我们的应用程序,我们需要用以下内容更新生成的`HelloworldApplication`,以便它启动一个任务。
```
package io.spring.demo.helloworld;
import org.springframework.boot.CommandLineRunner;
import org.springframework.boot.SpringApplication;
import org.springframework.boot.autoconfigure.SpringBootApplication;
import org.springframework.context.annotation.Bean;
@SpringBootApplication
@EnableTask
public class HelloworldApplication {
@Bean
public CommandLineRunner commandLineRunner() {
return new HelloWorldCommandLineRunner();
}
public static void main(String[] args) {
SpringApplication.run(HelloworldApplication.class, args);
}
public static class HelloWorldCommandLineRunner implements CommandLineRunner {
@Override
public void run(String... strings) throws Exception {
System.out.println("Hello, World!");
}
}
}
```
虽然它看起来很小,但相当多的事情正在发生。有关 Spring 引导细节的更多信息,请参见[Spring Boot reference documentation](https://docs.spring.io/spring-boot/docs/current/reference/html/)。
现在我们可以在`src/main/resources`中打开`application.properties`文件。我们需要在`application.properties`中配置两个属性:
* `application.name`:设置应用程序名(已转换为任务名)
* `logging.level`:将 Spring Cloud任务的日志设置为`DEBUG`,以便查看正在发生的事情。
下面的示例展示了如何同时做到这两点:
```
logging.level.org.springframework.cloud.task=DEBUG
spring.application.name=helloWorld
```
#### [](#getting-started-at-task)[6.2.1.任务自动配置](#getting-started-at-task)
当包含 Spring Cloud Task Starter 依赖项时,Task Auto 会配置所有 bean 以引导其功能。此配置的一部分注册了`TaskRepository`及其使用的基础结构。
在我们的演示中,`TaskRepository`使用嵌入式 H2 数据库来记录任务的结果。这种 H2 嵌入式数据库对于生产环境不是一种实用的解决方案,因为一旦任务结束,H2DB 就会消失。然而,为了获得快速的入门体验,我们可以在示例中使用它,也可以将存储库中正在更新的内容与日志相呼应。在[配置](#features-configuration)小节(在本文档的后面)中,我们介绍了如何定制 Spring Cloud Task 提供的组件的配置。
当我们的示例应用程序运行时, Spring 启动我们的`HelloWorldCommandLineRunner`,并将我们的“你好,世界!”消息输出为标准输出。`TaskLifecycleListener`在存储库中记录任务的开始和结束。
#### [](#getting-started-main-method)[6.2.2.主要方法](#getting-started-main-method)
Main 方法是任何 Java 应用程序的入口点。我们的主方法将委托给 Spring Boot 的[SpringApplication](https://docs.spring.io/spring-boot/docs/current/reference/html/boot-features-spring-application.html)类。
#### [](#getting-started-clr)[6.2.3.The CommandlineRunner](#getting-started-clr)
Spring 包括引导应用程序逻辑的许多方法。 Spring Boot 通过其`*Runner`接口(`CommandLineRunner`或`ApplicationRunner`)以有组织的方式提供了这样做的方便方法。一个表现良好的任务可以通过使用这两个运行器中的一个来引导任何逻辑。
任务的生命周期是从`*Runner#run`方法被执行到它们全部完成之前考虑的。 Spring 引导让应用程序使用多个`*Runner`实现,就像 Spring Cloud任务一样。
| |除`CommandLineRunner`或`ApplicationRunner`(例如通过使用`InitializingBean#afterPropertiesSet`)以外的机制引导的任何处理都不是由 Spring Cloud任务记录的
。|
|---|---------------------------------------------------------------------------------------------------------------------------------------------------------------------------------------------------------|
### [](#getting-started-running-the-example)[6.3.运行示例](#getting-started-running-the-example)
在这一点上,我们的应用程序应该可以工作。由于此应用程序是基于 Spring 引导的,因此我们可以从应用程序的根使用`$ mvn spring-boot:run`从命令行运行它,如下例所示(其输出):
```
$ mvn clean spring-boot:run
....... . . .
....... . . . (Maven log output here)
....... . . .
. ____ _ __ _ _
/\\ / ___'_ __ _ _(_)_ __ __ _ \ \ \ \
( ( )\___ | '_ | '_| | '_ \/ _` | \ \ \ \
\\/ ___)| |_)| | | | | || (_| | ) ) ) )
' |____| .__|_| |_|_| |_\__, | / / / /
=========|_|==============|___/=/_/_/_/
:: Spring Boot :: (v2.0.3.RELEASE)
2018-07-23 17:44:34.426 INFO 1978 --- [ main] i.s.d.helloworld.HelloworldApplication : Starting HelloworldApplication on Glenns-MBP-2.attlocal.net with PID 1978 (/Users/glennrenfro/project/helloworld/target/classes started by glennrenfro in /Users/glennrenfro/project/helloworld)
2018-07-23 17:44:34.430 INFO 1978 --- [ main] i.s.d.helloworld.HelloworldApplication : No active profile set, falling back to default profiles: default
2018-07-23 17:44:34.472 INFO 1978 --- [ main] s.c.a.AnnotationConfigApplicationContext : Refreshing org.spring[email protected]1d24f32d: startup date [Mon Jul 23 17:44:34 EDT 2018]; root of context hierarchy
2018-07-23 17:44:35.280 INFO 1978 --- [ main] com.zaxxer.hikari.HikariDataSource : HikariPool-1 - Starting...
2018-07-23 17:44:35.410 INFO 1978 --- [ main] com.zaxxer.hikari.HikariDataSource : HikariPool-1 - Start completed.
2018-07-23 17:44:35.419 DEBUG 1978 --- [ main] o.s.c.t.c.SimpleTaskConfiguration : Using org.springframework.cloud.task.configuration.DefaultTaskConfigurer TaskConfigurer
2018-07-23 17:44:35.420 DEBUG 1978 --- [ main] o.s.c.t.c.DefaultTaskConfigurer : No EntityManager was found, using DataSourceTransactionManager
2018-07-23 17:44:35.522 DEBUG 1978 --- [ main] o.s.c.t.r.s.TaskRepositoryInitializer : Initializing task schema for h2 database
2018-07-23 17:44:35.525 INFO 1978 --- [ main] o.s.jdbc.datasource.init.ScriptUtils : Executing SQL script from class path resource [org/springframework/cloud/task/schema-h2.sql]
2018-07-23 17:44:35.558 INFO 1978 --- [ main] o.s.jdbc.datasource.init.ScriptUtils : Executed SQL script from class path resource [org/springframework/cloud/task/schema-h2.sql] in 33 ms.
2018-07-23 17:44:35.728 INFO 1978 --- [ main] o.s.j.e.a.AnnotationMBeanExporter : Registering beans for JMX exposure on startup
2018-07-23 17:44:35.730 INFO 1978 --- [ main] o.s.j.e.a.AnnotationMBeanExporter : Bean with name 'dataSource' has been autodetected for JMX exposure
2018-07-23 17:44:35.733 INFO 1978 --- [ main] o.s.j.e.a.AnnotationMBeanExporter : Located MBean 'dataSource': registering with JMX server as MBean [com.zaxxer.hikari:name=dataSource,type=HikariDataSource]
2018-07-23 17:44:35.738 INFO 1978 --- [ main] o.s.c.support.DefaultLifecycleProcessor : Starting beans in phase 0
2018-07-23 17:44:35.762 DEBUG 1978 --- [ main] o.s.c.t.r.support.SimpleTaskRepository : Creating: TaskExecution{executionId=0, parentExecutionId=null, exitCode=null, taskName='application', startTime=Mon Jul 23 17:44:35 EDT 2018, endTime=null, exitMessage='null', externalExecutionId='null', errorMessage='null', arguments=[]}
2018-07-23 17:44:35.772 INFO 1978 --- [ main] i.s.d.helloworld.HelloworldApplication : Started HelloworldApplication in 1.625 seconds (JVM running for 4.764)
Hello, World!
2018-07-23 17:44:35.782 DEBUG 1978 --- [ main] o.s.c.t.r.support.SimpleTaskRepository : Updating: TaskExecution with executionId=1 with the following {exitCode=0, endTime=Mon Jul 23 17:44:35 EDT 2018, exitMessage='null', errorMessage='null'}
```
前面的输出有三行我们感兴趣的内容:
* `SimpleTaskRepository`在`TaskRepository`中记录了条目的创建。
* 我们的`CommandLineRunner`的执行,通过输出“Hello,World!”进行了演示。
* `SimpleTaskRepository`在`TaskRepository`中记录任务的完成情况。
| |一个简单的任务应用程序可以在 Spring Cloud
任务项目[here](https://github.com/spring-cloud/spring-cloud-task/tree/master/spring-cloud-task-samples/timestamp)的样例模块中找到。|
|---|-----------------------------------------------------------------------------------------------------------------------------------------------------------------------------------------------------------|
# [](#features)[Features](#features)
本节将更详细地介绍 Spring Cloud任务,包括如何使用它,如何配置它,以及适当的扩展点。
## [](#features-lifecycle)[7. The lifecycle of a Spring Cloud Task](#features-lifecycle)
在大多数情况下,现代云环境是围绕预期不会结束的流程的执行而设计的。如果它们结束了,它们通常会重新启动。虽然大多数平台确实有某种方式来运行一个在结束时不会重新启动的流程,但该运行的结果通常不会以可消耗的方式维护。 Spring Cloud任务提供了在环境中执行短期过程并记录结果的能力。这样做允许围绕短期流程的微服务架构,以及通过消息集成任务来运行较长时间的服务。
虽然这种功能在云环境中很有用,但在传统的部署模型中也可能出现同样的问题。 Spring 当启动应用程序与诸如 CRON 的调度程序一起运行时,能够在其完成后监视应用程序的结果是有用的。
Spring Cloud任务采取的方法是, Spring 引导应用程序可以有一个开始和一个结束,并且仍然是成功的。批处理应用程序就是一个例子,它说明了预期结束的过程(通常是短暂的)是如何有用的。
Spring Cloud任务记录给定任务的生命周期事件。以大多数 Web 应用程序为代表的大多数长时间运行的进程都不保存其生命周期事件。 Spring Cloud任务的核心任务就是这样做的。
生命周期由单个任务执行组成。这是一个 Spring 引导应用程序的物理执行,该应用程序被配置为一个任务(即,它具有 Sprint 云任务的依赖性)。
在任务开始时,在运行任何`CommandLineRunner`或`ApplicationRunner`实现之前,将在`TaskRepository`中创建一个记录开始事件的条目。此事件是通过由 Spring 框架触发的`SmartLifecycle#start`触发的。这向系统指示,所有 bean 都已准备好使用,并且在运行 Spring boot 提供的`CommandLineRunner`或`ApplicationRunner`实现之前就会出现。
| |只有在成功引导`ApplicationContext`时,才会记录任务。如果上下文根本无法引导,则不会记录任务的运行
。|
|---|------------------------------------------------------------------------------------------------------------------------------------------------------------------------------|
在完成来自 Spring 引导的所有`*Runner#run`调用或`ApplicationContext`失败(由`ApplicationFailedEvent`表示)后,将在存储库中使用结果更新任务执行。
| |如果应用程序要求在
处关闭`ApplicationContext`任务的完成(所有`*Runner#run`方法都已调用,并且任务
存储库已更新),则将属性`spring.cloud.task.closecontextEnabled`设置为 true。|
|---|-------------------------------------------------------------------------------------------------------------------------------------------------------------------------------------------------------------------------------------------------------------|
### [](#features-task-execution-details)[7.1.任务执行](#features-task-execution-details)
存储在`TaskRepository`中的信息在`TaskExecution`类中建模,并由以下信息组成:
| Field |说明|
|--------------|-----------------------------------------------------------------------------------------------------------------------------------------------------------------------------------------------------------|
|`executionid` |任务运行的唯一 ID。|
| `exitCode` |从`ExitCodeExceptionMapper`实现生成的退出代码。如果没有生成
退出代码,但抛出了`ApplicationFailedEvent`,则设置 1。否则,它是
假定为 0。|
| `taskName` |任务的名称,由配置的`TaskNameResolver`确定。|
| `startTime` |任务启动的时间,如`SmartLifecycle#start`调用所示。|
| `endTime` |任务完成的时间,如`ApplicationReadyEvent`所示。|
|`exitMessage` |退出时可获得的任何信息。这可以通过`TaskExecutionListener`以编程方式设置。|
|`errorMessage`|如果异常是任务结束的原因(如`ApplicationFailedEvent`所示),则该异常的堆栈跟踪存储在此。|
| `arguments` |一个`List`的字符串命令行参数,因为它们被传递到可执行的
引导应用程序中。|
### [](#features-lifecycle-exit-codes)[7.2.映射退出代码](#features-lifecycle-exit-codes)
当任务完成时,它会尝试将退出代码返回到操作系统。如果我们看一下我们的[原始示例](#getting-started-developing-first-task),我们可以看到,我们并没有控制我们应用程序的那个方面。因此,如果抛出了异常,JVM 将返回一段代码,该代码在调试中可能对你有任何用处,也可能对你没有任何用处。
因此, Spring Boot 提供了一个接口`ExitCodeExceptionMapper`,它允许你将未捕获的异常映射到退出代码。这样做可以让你在退出代码的层面上指出出了什么问题。另外,通过以这种方式映射退出代码, Spring Cloud任务记录返回的退出代码。
如果任务以 SIG-INT 或 SIG-项结束,则除非代码中另有指定,否则退出代码为零。
| |在任务运行时,退出代码以空的形式存储在存储库中。
一旦任务完成,相应的退出代码将根据本节前面描述的
准则进行存储。|
|---|---------------------------------------------------------------------------------------------------------------------------------------------------------------------------------------------------------------|
## [](#features-configuration)[8.配置](#features-configuration)
Spring Cloud任务提供了一种现成的配置,如在`DefaultTaskConfigurer`和`SimpleTaskConfiguration`类中所定义的那样。本节将介绍默认值以及如何根据你的需要定制 Spring Cloud任务。
### [](#features-data-source)[8.1.数据源](#features-data-source)
Spring Cloud任务使用数据源来存储任务执行的结果。默认情况下,我们提供了一个 H2 的内存实例,以提供一种简单的引导开发方法。但是,在生产环境中,你可能希望配置自己的`DataSource`。
如果你的应用程序只使用一个`DataSource`并同时作为你的业务模式和任务存储库,那么你所需要做的就是提供任何`DataSource`(这样做的最简单方法是通过 Spring Boot 的配置约定)。 Spring Cloud Task 为存储库自动使用这个`DataSource`。
如果应用程序使用多个`DataSource`,则需要使用适当的`DataSource`配置任务存储库。这种定制可以通过`TaskConfigurer`的实现来完成。
### [](#features-table-prefix)[8.2.表格前缀](#features-table-prefix)
`TaskRepository`的一个可修改的属性是任务表的表前缀。默认情况下,它们都以`TASK_`开头。`TASK_EXECUTION`和`TASK_EXECUTION_PARAMS`是两个例子。然而,有潜在的理由修改这个前缀。如果需要将模式名前置到表名,或者如果同一模式中需要一组以上的任务表,则必须更改表前缀。可以将`spring.cloud.task.tablePrefix`设置为所需的前缀,如下所示:
`spring.cloud.task.tablePrefix=yourPrefix`
通过使用`spring.cloud.task.tablePrefix`,用户承担了创建任务表的责任,这些任务表满足任务表模式的两个标准,但需要进行用户业务需求所需的修改。在创建你自己的任务 DDL 时,可以使用 Spring Cloud任务模式 DDL 作为指导,如[here](https://github.com/spring-cloud/spring-cloud-task/tree/master/spring-cloud-task-core/src/main/resources/org/springframework/cloud/task)所示。
### [](#features-table-initialization)[8.3.启用/禁用表初始化](#features-table-initialization)
如果你正在创建任务表,并且不希望 Spring Cloud Task 在任务启动时创建它们,请将`spring.cloud.task.initialize-enabled`属性设置为`false`,如下所示:
`spring.cloud.task.initialize-enabled=false`
它的默认值为`true`。
| |属性`spring.cloud.task.initialize.enable`已被弃用。|
|---|-----------------------------------------------------------------------|
### [](#features-generated_task_id)[8.4.外部生成的任务 ID](#features-generated_task_id)
在某些情况下,你可能希望在请求任务和基础设施实际启动任务之间留出时间差。 Spring Cloud任务允许你在任务被请求时创建`TaskExecution`。然后将生成的`TaskExecution`的执行 ID 传递给任务,以便它可以在任务的生命周期中更新`TaskExecution`。
可以通过在`TaskRepository`的实现上调用`createTaskExecution`方法来创建`TaskExecution`,该实现引用了保存`TaskExecution`对象的数据存储。
为了将任务配置为使用生成的`TaskExecutionId`,请添加以下属性:
`spring.cloud.task.executionid=yourtaskId`
### [](#features-external_task_id)[8.5.外部任务 ID](#features-external_task_id)
Spring Cloud Task 允许你为每个`TaskExecution`存储一个外部任务 ID。这方面的一个例子是,当一个任务在平台上启动时,Cloud Foundry 提供了一个任务 ID。为了将任务配置为使用生成的`TaskExecutionId`,请添加以下属性:
`spring.cloud.task.external-execution-id=`
### [](#features-parent_task_id)[8.6.父任务 ID](#features-parent_task_id)
Spring Cloud Task 允许你为每个`TaskExecution`存储父任务 ID。这方面的一个例子是一个执行另一个或多个任务的任务,你希望记录每个子任务启动了哪个任务。为了将任务配置为设置父`TaskExecutionId`,在子任务上添加以下属性:
`spring.cloud.task.parent-execution-id=`
### [](#features-task-configurer)[8.7.任务配置器](#features-task-configurer)
`TaskConfigurer`是一个策略接口,它允许你定制 Spring Cloud任务组件的配置方式。默认情况下,我们提供了提供逻辑默认值的`DefaultTaskConfigurer`:基于`Map`的内存中组件(如果不提供`DataSource`,则对开发有用)和基于 JDBC 的组件(如果有`DataSource`可用,则很有用)。
`TaskConfigurer`允许你配置三个主要组件:
| Component |说明| Default (provided by `DefaultTaskConfigurer`) |
|----------------------------|------------------------------------------------------------------------------------------------------------------|-------------------------------------------------------------------------------------------------------|
| `TaskRepository` |实现`TaskRepository`所要使用的。| `SimpleTaskRepository` |
| `TaskExplorer` |要使用的`TaskExplorer`(用于对任务
存储库进行只读访问的组件)的实现。| `SimpleTaskExplorer` |
|`PlatformTransactionManager`|运行任务更新时使用的事务管理器。|`DataSourceTransactionManager` if a `DataSource` is used.`ResourcelessTransactionManager` if it is not.|
你可以通过创建`TaskConfigurer`接口的自定义实现来定制上表中描述的任何组件。通常,扩展`DefaultTaskConfigurer`(如果没有找到`TaskConfigurer`,则提供该扩展)并重写所需的吸气器就足够了。然而,可能需要从头开始实现你自己的功能。
| |用户不应该直接使用来自`TaskConfigurer`的 getter 方法直接
,除非他们正在使用它来提供将被公开为 Spring bean 的实现。|
|---|-------------------------------------------------------------------------------------------------------------------------------------------------------------------|
### [](#features-task-name)[8.8.任务名称](#features-task-name)
在大多数情况下,任务的名称是在 Spring 引导中配置的应用程序名称。但是,在某些情况下,你可能希望将任务的运行映射到不同的名称。 Spring Cloud数据流就是这方面的一个例子(因为你可能希望以任务定义的名称运行该任务)。因此,我们提供了通过`TaskNameResolver`接口定制任务命名方式的能力。
默认情况下, Spring Cloud Task 提供`SimpleTaskNameResolver`,它使用以下选项(按优先顺序排列):
1. Spring 引导属性(以 Spring 引导允许的任何方式配置)称为`spring.cloud.task.name`。
2. 使用 Spring 引导规则解析的应用程序名称(通过`ApplicationContext#getId`获得)。
### [](#features-task-execution-listener)[8.9.任务执行监听器](#features-task-execution-listener)
`TaskExecutionListener`允许你为任务生命周期中发生的特定事件注册侦听器。为此,创建一个实现`TaskExecutionListener`接口的类。实现`TaskExecutionListener`接口的类将收到以下事件的通知:
* `onTaskStartup`:在将`TaskExecution`存储到`TaskRepository`之前。
* `onTaskEnd`:在更新`TaskExecution`中的`TaskExecution`条目并标记任务的最终状态之前。
* `onTaskFailed`:在任务抛出未处理的异常时调用`onTaskEnd`方法之前。
Spring Cloud Task 还允许你通过使用以下方法注释将`TaskExecution`侦听器添加到 Bean 内的方法:
* `@BeforeTask`:将之前的`TaskExecution`存储到`TaskRepository`中
* `@AfterTask`:在更新`TaskExecution`条目之前,在`TaskRepository`中标记任务的最终状态。
* `@FailedTask`:在任务抛出未处理的异常时调用`@AfterTask`方法之前。
下面的示例显示了正在使用的三种注释:
```
public class MyBean {
@BeforeTask
public void methodA(TaskExecution taskExecution) {
}
@AfterTask
public void methodB(TaskExecution taskExecution) {
}
@FailedTask
public void methodC(TaskExecution taskExecution, Throwable throwable) {
}
}
```
| |在链中比`TaskLifecycleListener`存在更早地插入`ApplicationListener`可能会导致意外的影响。|
|---|-------------------------------------------------------------------------------------------------------------------------|
#### [](#features-task-execution-listener-Exceptions)[8.9.1.任务执行侦听器抛出的异常](#features-task-execution-listener-Exceptions)
如果`TaskExecutionListener`事件处理程序引发异常,则该事件处理程序的所有侦听器处理都将停止。例如,如果三个`onTaskStartup`侦听器已经启动,并且第一个`onTaskStartup`事件处理程序抛出一个异常,则不调用另外两个`onTaskStartup`方法。但是,调用`TaskExecutionListeners`的其他事件处理程序(`onTaskEnd`和`onTaskFailed`)。
当`TaskExecutionListener`事件处理程序抛出异常时返回的退出代码是[exitcodeevent](https://docs.spring.io/spring-boot/docs/current/api/org/springframework/boot/ExitCodeEvent.html)报告的退出代码。如果没有`ExitCodeEvent`发出,则对抛出的异常进行评估,以查看它是否为[exitcodegenerator](https://docs.spring.io/spring-boot/docs/current/reference/htmlsingle/#boot-features-application-exit)类型。如果是,则返回来自`ExitCodeGenerator`的退出代码。否则,将返回`1`。
在`onTaskStartup`方法中抛出异常的情况下,应用程序的退出代码将是`1`。如果在`onTaskEnd`或`onTaskFailed`方法中抛出异常,则应用程序的退出代码将是使用上面列举的规则建立的代码。
| |在`onTaskStartup`、`onTaskEnd`或`onTaskFailed`中抛出异常的情况下,你无法使用`ExitCodeExceptionMapper`覆盖应用程序的退出代码。|
|---|------------------------------------------------------------------------------------------------------------------------------------------------------------------------------------|
#### [](#features-task-execution-listener-exit-messages)[8.9.2.退出消息](#features-task-execution-listener-exit-messages)
可以通过使用`TaskExecutionListener`以编程方式设置任务的退出消息。这是通过设置`TaskExecution’s``exitMessage`来完成的,然后将其传递到`TaskExecutionListener`中。下面的示例显示了一个用`@AfterTask``ExecutionListener`进行注释的方法:
```
@AfterTask
public void afterMe(TaskExecution taskExecution) {
taskExecution.setExitMessage("AFTER EXIT MESSAGE");
}
```
可以在任何侦听器事件(`onTaskStartup`、`onTaskFailed`和`onTaskEnd`)上设置`ExitMessage`。这三个侦听器的优先顺序如下:
1. `onTaskEnd`
2. `onTaskFailed`
3. `onTaskStartup`
例如,如果你为`onTaskStartup`和`onTaskFailed`侦听器设置了`exitMessage`,并且任务没有失败就结束了,则来自`onTaskStartup`的`exitMessage`将存储在存储库中。否则,如果发生故障,则存储来自`onTaskFailed`的`exitMessage`。同样,如果你使用`onTaskEnd`侦听器设置`exitMessage`,则来自`onTaskEnd`的`exitMessage`将取代来自`onTaskStartup`和`onTaskFailed`的退出消息。
### [](#features-single-instance-enabled)[8.10. Restricting Spring Cloud Task Instances](#features-single-instance-enabled)
Spring Cloud任务允许你确定一次只能运行一个具有给定任务名的任务。要做到这一点,你需要为每个任务执行建立[task name](#features-task-name)并设置`spring.cloud.task.single-instance-enabled=true`。当第一个任务执行正在运行时,当你尝试运行具有相同[task name](#features-task-name)和`spring.cloud.task.single-instance-enabled=true`的任务时,该任务将失败,并出现以下错误消息:`Task with name "application" is already running.``spring.cloud.task.single-instance-enabled`的默认值为`false`。下面的示例展示了如何将`spring.cloud.task.single-instance-enabled`设置为`true`:
`spring.cloud.task.single-instance-enabled=true or false`
要使用此功能,你必须向应用程序添加以下 Spring 集成依赖项:
```
org.springframework.integration
spring-integration-core
org.springframework.integration
spring-integration-jdbc
```
| |如果任务失败,则应用程序的退出代码将为 1,因为启用了此功能
,并且另一个任务正在以相同的任务名运行。|
|---|------------------------------------------------------------------------------------------------------------------------------------------------------|
### [](#disabling-spring-cloud-task-auto-configuration)[8.11. Disabling Spring Cloud Task Auto Configuration](#disabling-spring-cloud-task-auto-configuration)
在不应该为某个实现自动配置 Spring Cloud任务的情况下,你可以禁用 Task 的自动配置。这可以通过向任务应用程序添加以下注释来完成:
```
@EnableAutoConfiguration(exclude={SimpleTaskAutoConfiguration.class})
```
还可以通过将`spring.cloud.task.autoconfiguration.enabled`属性设置为`false`来禁用任务自动配置。
### [](#closing-the-context)[8.12.结束上下文](#closing-the-context)
如果应用程序要求在任务完成时关闭`ApplicationContext`(所有`*Runner#run`方法都已被调用,并且任务存储库已更新),则将属性`spring.cloud.task.closecontextEnabled`设置为`true`。
关闭上下文的另一种情况是当任务执行完成但应用程序没有终止时。在这些情况下,上下文是开放的,因为已经分配了一个线程(例如:如果你正在使用 TaskExecutor)。在这些情况下,在启动任务时将`spring.cloud.task.closecontextEnabled`属性设置为`true`。一旦任务完成,这将关闭应用程序的上下文。从而允许应用程序终止。
# [](#batch)[Batch](#batch)
本节将更详细地介绍 Spring Cloud Task 与 Spring Batch 的集成。跟踪作业执行与其执行的任务之间的关联,以及通过 Spring Cloud Deployer 进行远程分区,将在本节中介绍。
## [](#batch-association)[9.将作业执行与其执行的任务关联起来](#batch-association)
Spring Boot 为在 anüber- jar 内执行批处理作业提供了便利。 Spring Boot 对该功能的支持使开发人员能够在该执行中执行多个批处理任务。 Spring Cloud任务提供了将作业(作业执行)的执行与任务的执行相关联的能力,以便一个可以追溯到另一个。
Spring Cloud任务通过使用`TaskBatchExecutionListener`来实现这一功能。默认情况下,此侦听器在任何同时配置了 Spring 批作业(通过在上下文中定义了类型`Job`的 Bean)和 Classpath 上的`spring-cloud-task-batch` jar 的上下文中自动配置。所有符合这些条件的工作都会被注入监听器。
### [](#batch-association-override)[9.1.覆盖 TaskBatchExecutionListener](#batch-association-override)
为了防止侦听器被注入到当前上下文中的任何批处理作业中,你可以使用标准的 Spring 引导机制禁用自动配置。
要仅将侦听器注入到上下文中的特定作业中,请覆盖`batchTaskExecutionListenerBeanPostProcessor`并提供作业 Bean ID 的列表,如以下示例所示:
```
public TaskBatchExecutionListenerBeanPostProcessor batchTaskExecutionListenerBeanPostProcessor() {
TaskBatchExecutionListenerBeanPostProcessor postProcessor =
new TaskBatchExecutionListenerBeanPostProcessor();
postProcessor.setJobNames(Arrays.asList(new String[] {"job1", "job2"}));
return postProcessor;
}
```
| |你可以在 Spring Cloud
任务项目的样例模块中找到样例批处理应用程序,[here](https://github.com/spring-cloud/spring-cloud-task/tree/master/spring-cloud-task-samples/batch-job)。|
|---|-------------------------------------------------------------------------------------------------------------------------------------------------------------------------------------------------------------|
## [](#batch-partitioning)[10.远程分区](#batch-partitioning)
Spring Cloud Deployer 提供了用于在大多数云基础设施上启动 Spring 基于引导的应用程序的设施。`DeployerPartitionHandler`和`DeployerStepExecutionHandler`将工人步骤执行的启动委托给 Spring Cloud Deployer。
要配置`DeployerStepExecutionHandler`,必须提供表示要执行的 Spring bootüber- jar 的`Resource`、`TaskLauncher`和`JobExplorer`。你可以配置任何环境属性,以及一次执行的工作人员的最大数量、轮询结果的间隔(默认为 10 秒)和超时(默认为-1 或无超时)。下面的示例显示了如何配置`PartitionHandler`:
```
@Bean
public PartitionHandler partitionHandler(TaskLauncher taskLauncher,
JobExplorer jobExplorer) throws Exception {
MavenProperties mavenProperties = new MavenProperties();
mavenProperties.setRemoteRepositories(new HashMap<>(Collections.singletonMap("springRepo",
new MavenProperties.RemoteRepository(repository))));
Resource resource =
MavenResource.parse(String.format("%s:%s:%s",
"io.spring.cloud",
"partitioned-batch-job",
"1.1.0.RELEASE"), mavenProperties);
DeployerPartitionHandler partitionHandler =
new DeployerPartitionHandler(taskLauncher, jobExplorer, resource, "workerStep");
List commandLineArgs = new ArrayList<>(3);
commandLineArgs.add("--spring.profiles.active=worker");
commandLineArgs.add("--spring.cloud.task.initialize.enable=false");
commandLineArgs.add("--spring.batch.initializer.enabled=false");
partitionHandler.setCommandLineArgsProvider(
new PassThroughCommandLineArgsProvider(commandLineArgs));
partitionHandler.setEnvironmentVariablesProvider(new NoOpEnvironmentVariablesProvider());
partitionHandler.setMaxWorkers(2);
partitionHandler.setApplicationName("PartitionedBatchJobTask");
return partitionHandler;
}
```
| |当将环境变量传递给分区时,每个分区可能
位于具有不同环境设置的不同机器上。因此,你应该仅传递所需的那些环境变量。|
|---|-----------------------------------------------------------------------------------------------------------------------------------------------------------------------------------------------------------------------------|
请注意,在上面的示例中,我们将工人的最大数量设置为 2。设置工人的最大值可以确定一次应该运行的分区的最大数量。
要执行的`Resource`预计是一个 Spring Bootüber- jar,其`DeployerStepExecutionHandler`在当前上下文中被配置为`CommandLineRunner`。前面示例中列举的存储库应该是 über- jar 所在的远程存储库。Manager 和 Worker 都应该对作为作业存储库和任务存储库使用的同一数据存储具有可见性。一旦底层基础结构引导了 Spring boot jar,并且 Spring boot 启动了`DeployerStepExecutionHandler`,步骤处理程序将执行请求的`Step`。下面的示例展示了如何配置`DeployerStepExecutionHandler`:
```
@Bean
public DeployerStepExecutionHandler stepExecutionHandler(JobExplorer jobExplorer) {
DeployerStepExecutionHandler handler =
new DeployerStepExecutionHandler(this.context, jobExplorer, this.jobRepository);
return handler;
}
```
| |你可以在
Spring Cloud任务项目的样例模块[here](https://github.com/spring-cloud/spring-cloud-task/tree/master/spring-cloud-task-samples/partitioned-batch-job)中找到一个样例远程分区应用程序。|
|---|------------------------------------------------------------------------------------------------------------------------------------------------------------------------------------------------------------------------------------|
### [](#notes-on-developing-a-batch-partitioned-application-for-the-kubernetes-platform)[10.1.关于为 Kubernetes 平台开发批处理分区应用程序的说明](#notes-on-developing-a-batch-partitioned-application-for-the-kubernetes-platform)
* 在 Kubernetes 平台上部署分区应用程序时,对于 Spring Cloud Kubernetes 部署程序,必须使用以下依赖项:
```
org.springframework.cloud
spring-cloud-starter-deployer-kubernetes
```
* 任务应用程序及其分区的应用程序名称需要遵循以下正则表达式模式:`[a-z0-9]([-a-z0-9]*[a-z0-9])`。否则,将抛出异常。
### [](#notes-on-developing-a-batch-partitioned-application-for-the-cloud-foundry-platform)[10.2.为 Cloud Foundry 平台开发批处理分区应用程序的注意事项](#notes-on-developing-a-batch-partitioned-application-for-the-cloud-foundry-platform)
* 在 Cloud Foundry 平台上部署分区应用程序时,对于 Spring Cloud Foundry 部署人员,你必须使用以下依赖关系:
```
org.springframework.cloud
spring-cloud-deployer-cloudfoundry
io.projectreactor
reactor-core
3.1.5.RELEASE
io.projectreactor.ipc
reactor-netty
0.7.5.RELEASE
```
* 在配置分区处理程序时,需要建立 Cloud Foundry 部署环境变量,以便分区处理程序可以启动分区。下面的列表显示了所需的环境变量:
* `spring_cloud_deployer_cloudfoundry_url`
* `spring_cloud_deployer_cloudfoundry_org`
* `spring_cloud_deployer_cloudfoundry_space`
* `spring_cloud_deployer_cloudfoundry_domain`
* `spring_cloud_deployer_cloudfoundry_username`
* `spring_cloud_deployer_cloudfoundry_password`
* `spring_cloud_deployer_cloudfoundry_services`
* `spring_cloud_deployer_cloudfoundry_taskTimeout`
使用`mysql`数据库服务的分区任务的部署环境变量示例集可能类似于以下内容:
```
spring_cloud_deployer_cloudfoundry_url=https://api.local.pcfdev.io
spring_cloud_deployer_cloudfoundry_org=pcfdev-org
spring_cloud_deployer_cloudfoundry_space=pcfdev-space
spring_cloud_deployer_cloudfoundry_domain=local.pcfdev.io
spring_cloud_deployer_cloudfoundry_username=admin
spring_cloud_deployer_cloudfoundry_password=admin
spring_cloud_deployer_cloudfoundry_services=mysql
spring_cloud_deployer_cloudfoundry_taskTimeout=300
```
| |当使用 PCF-Dev 时,还需要以下环境变量:`spring_cloud_deployer_cloudfoundry_skipSslValidation=true`|
|---|-----------------------------------------------------------------------------------------------------------------------------------|
## [](#batch-informational-messages)[11.批处理信息消息](#batch-informational-messages)
Spring Cloud任务提供了批处理作业发送信息消息的能力。“[Spring Batch Events](#stream-integration-batch-events)”部分详细介绍了此功能。
## [](#batch-failures-and-tasks)[12.批处理作业退出代码](#batch-failures-and-tasks)
正如[earlier](#features-lifecycle-exit-codes)所讨论的, Spring Cloud任务应用程序支持记录任务执行的退出代码的能力。然而,在任务中运行 Spring 批处理作业的情况下,无论批处理作业如何执行,当使用默认的批处理/引导行为时,任务的结果始终为零。请记住,任务是一个引导应用程序,从该任务返回的退出代码与引导应用程序相同。要重写此行为并允许任务在批处理作业返回`FAILED`的[BatchStatus](https://docs.spring.io/spring-batch/4.0.x/reference/html/step.html#batchStatusVsExitStatus)时返回除零以外的退出代码,请将`spring.cloud.task.batch.fail-on-job-failure`设置为`true`。然后退出代码可以是 1(默认)或基于[指定的`ExitCodeGenerator`](https://DOCS. Spring.io/ Spring-boot/DOCS/current/reference/html/boot-features- Spring-application.html#boot-features-application-exit))))
这个功能使用了一个新的`CommandLineRunner`,它取代了 Spring boot 提供的功能。默认情况下,它的配置顺序相同。但是,如果你希望自定义运行`CommandLineRunner`的顺序,则可以通过设置`spring.cloud.task.batch.commandLineRunnerOrder`属性来设置其顺序。要让你的任务返回基于批处理作业执行结果的退出代码,你需要编写自己的`CommandLineRunner`。
# [](#batch-job-starter)[单步批处理作业启动器](#batch-job-starter)
本节将讨论如何通过使用 Spring Cloud任务中包含的启动器来开发具有单个`Step`的 Spring 批处理`Job`。这个启动器允许你使用配置来定义`ItemReader`、`ItemWriter`或完整的单步 Spring 批处理`Job`。有关 Spring 批处理及其功能的更多信息,请参见[Spring Batch documentation](https://spring.io/projects/spring-batch)。
要获得 Maven 的启动器,请在构建中添加以下内容:
```
org.springframework.cloud
spring-cloud-starter-single-step-batch-job
2.3.0
```
要获得 Gradle 的启动器,请在构建中添加以下内容:
```
compile "org.springframework.cloud:spring-cloud-starter-single-step-batch-job:2.3.0"
```
## [](#job-definition)[13.定义工作](#job-definition)
你可以使用 starter 来定义很少的`ItemReader`或`ItemWriter`,也可以定义很多的`Job`。在本节中,我们将定义需要定义哪些属性来配置`Job`。
### [](#job-definition-properties)[13.1.属性](#job-definition-properties)
首先,Starter 提供了一组属性,让你只需一步就可以配置作业的基本知识:
| Property | Type |Default Value|说明|
|----------------------------|---------|-------------|----------------------------------------------------|
| `spring.batch.job.jobName` |`String` | `null` |工作的名字。|
|`spring.batch.job.stepName` |`String` | `null` |步骤的名称。|
|`spring.batch.job.chunkSize`|`Integer`| `null` |每笔交易要处理的项目数量。|
配置了上述属性后,你就可以使用一个基于块的步骤来执行作业了。这个基于块的步骤读取、处理和写入`Map`实例作为项。然而,这一步还没有起到任何作用。你需要配置一个`ItemReader`、一个可选的`ItemProcessor`和一个`ItemWriter`,以便让它做一些事情。要配置其中之一,你可以使用属性并配置已提供自动配置的选项之一,也可以使用标准 Spring 配置机制配置你自己的选项。
| |如果你配置自己的,则输入和输出类型必须与步骤中的其他类型匹配。
在此启动器中的`ItemReader`实现和`ItemWriter`实现都使用
a`Map`作为输入和输出项。|
|---|----------------------------------------------------------------------------------------------------------------------------------------------------------------------------------------------------------------------------------------------------|
## [](#item-readers)[14.ItemReader 实现的自动配置](#item-readers)
此启动器为四种不同的`ItemReader`实现提供自动配置:`AmqpItemReader`、`FlatFileItemReader`、`JdbcCursorItemReader`和`KafkaItemReader`。在本节中,我们将概述如何通过使用提供的自动配置来配置其中的每一个。
### [](#amqpitemreader)[14.1.AMQPitemReader](#amqpitemreader)
你可以使用`AmqpItemReader`使用 AMQP 读取队列或主题。这个`ItemReader`实现的自动配置依赖于两组配置。第一个是`AmqpTemplate`的配置。你可以自己对此进行配置,也可以使用 Spring Boot 提供的自动配置。参见[Spring Boot AMQP documentation](https://docs.spring.io/spring-boot/docs/2.4.x/reference/htmlsingle/#boot-features-amqp)。一旦配置了`AmqpTemplate`,就可以通过设置以下属性来启用批处理功能来支持它:
| Property | Type |Default Value|说明|
|------------------------------------------------------|---------|-------------|---------------------------------------------------------------------------------------|
| `spring.batch.job.amqpitemreader.enabled` |`boolean`| `false` |如果`true`,则自动配置将执行。|
|`spring.batch.job.amqpitemreader.jsonConverterEnabled`|`boolean`| `true` |指示是否应注册`Jackson2JsonMessageConverter`以解析消息。|
有关更多信息,请参见[`AmqpItemReader`文档](https://DOCS. Spring.io/ Spring-batch/DOCS/4.3.x/api/org/springframework/batch/item/amqp/amqpitemreader.html)。
### [](#flatfileitemreader)[14.2.平板文件阅读器](#flatfileitemreader)
`FlatFileItemReader`允许你从平面文件(例如 CSV 和其他文件格式)进行读取。要从文件中读取,你可以通过正常的 Spring 配置(`LineTokenizer`,`RecordSeparatorPolicy`,`FieldSetMapper`,`LineMapper`,或`SkippedLinesCallback`)自己提供一些组件。你还可以使用以下属性来配置阅读器:
| Property | Type | Default Value |说明|
|------------------------------------------------------|---------------|------------------------------------------------|---------------------------------------------------------------------------------------------------------------------------------------------------------------------------------------------------------|
| `spring.batch.job.flatfileitemreader.saveState` | `boolean` | `true` |确定是否应将状态保存以重新启动。|
| `spring.batch.job.flatfileitemreader.name` | `String` | `null` |用于在`ExecutionContext`中提供唯一键的名称。|
| `spring.batch.job.flatfileitemreader.maxItemcount` | `int` | `Integer.MAX_VALUE` |从文件中读取的项目的最大数量。|
|`spring.batch.job.flatfileitemreader.currentItemCount`| `int` | 0 |已读项目的数量。用于重启。|
| `spring.batch.job.flatfileitemreader.comments` |`List` | empty List |指示文件中已注释的行(要忽略的行)的字符串列表。|
| `spring.batch.job.flatfileitemreader.resource` | `Resource` | `null` |要读取的资源。|
| `spring.batch.job.flatfileitemreader.strict` | `boolean` | `true` |如果设置为`true`,则在未找到资源的情况下,读取器将抛出一个异常。|
| `spring.batch.job.flatfileitemreader.encoding` | `String` | `FlatFileItemReader.DEFAULT_CHARSET` |读取文件时使用的编码。|
| `spring.batch.job.flatfileitemreader.linesToSkip` | `int` | 0 |指示文件开始时要跳过的行数。|
| `spring.batch.job.flatfileitemreader.delimited` | `boolean` | `false` |指示该文件是否为分隔文件(CSV 和其他格式)。此属性中只有一个或`spring.batch.job.flatfileitemreader.fixedLength`可以同时是`true`。|
| `spring.batch.job.flatfileitemreader.delimiter` | `String` | `DelimitedLineTokenizer.DELIMITER_COMMA` |如果读取分隔符文件,则指示要解析的分隔符。|
| `spring.batch.job.flatfileitemreader.quoteCharacter` | `char` |`DelimitedLineTokenizer.DEFAULT_QUOTE_CHARACTER`|用于确定用于引用值的字符。|
| `spring.batch.job.flatfileitemreader.includedFields` |`List`| empty list |一个索引列表,用于确定记录中的哪些字段要包含在项中。|
| `spring.batch.job.flatfileitemreader.fixedLength` | `boolean` | `false` |表示文件的记录是否由列号解析。此属性中只有一个或`spring.batch.job.flatfileitemreader.delimited`可以同时是`true`。|
| `spring.batch.job.flatfileitemreader.ranges` | `List` | empty list |用于解析固定宽度记录的列范围列表。参见[范围文档](https://docs.spring.io/spring-batch/docs/4.3.x/api/org/springframework/batch/item/file/transform/Range.html)。|
| `spring.batch.job.flatfileitemreader.names` | `String []` | `null` |从记录中解析的每个字段的名称列表。这些名称是从这个`ItemReader`返回的项中的`Map`中的键。|
| `spring.batch.job.flatfileitemreader.parsingStrict` | `boolean` | `true` |如果设置为`true`,则如果无法映射字段,则映射失败。|
参见[`FlatFileItemReader`文档](https://DOCS. Spring.io/ Spring-batch/DOCS/4.3.x/api/org/springframework/batch/item/file/flatfileitemreader.html)。
### [](#jdbcCursorItemReader)[14.3.JDBCCursoritemReader](#jdbcCursorItemReader)
`JdbcCursorItemReader`对关系数据库运行查询,并在结果游标(`ResultSet`)上进行迭代,以提供结果项。此自动配置允许你提供`PreparedStatementSetter`、`RowMapper`或两者。你还可以使用以下属性来配置`JdbcCursorItemReader`:
| Property | Type | Default Value |说明|
|-------------------------------------------------------------------|---------|-------------------|------------------------------------------------------------------------------------------------------------------------------------------------------------------------|
| `spring.batch.job.jdbccursoritemreader.saveState` |`boolean`| `true` |确定是否应将状态保存以重新启动。|
| `spring.batch.job.jdbccursoritemreader.name` |`String` | `null` |用于在`ExecutionContext`中提供唯一密钥的名称。|
| `spring.batch.job.jdbccursoritemreader.maxItemcount` | `int` |`Integer.MAX_VALUE`|从文件中读取的项目的最大数量。|
| `spring.batch.job.jdbccursoritemreader.currentItemCount` | `int` | 0 |已读项目的数量。用于重启。|
| `spring.batch.job.jdbccursoritemreader.fetchSize` | `int` | |给驱动程序的一个提示,指示每次调用数据库系统要检索多少记录。为了获得最佳性能,你通常希望将其设置为与块大小匹配。|
| `spring.batch.job.jdbccursoritemreader.maxRows` | `int` | |从数据库中读取的项数的最大值。|
| `spring.batch.job.jdbccursoritemreader.queryTimeout` | `int` | |查询超时的毫秒数。|
| `spring.batch.job.jdbccursoritemreader.ignoreWarnings` |`boolean`| `true` |确定读取器在处理时是否应忽略 SQL 警告。|
| `spring.batch.job.jdbccursoritemreader.verifyCursorPosition` |`boolean`| `true` |指示是否应在每次读取后验证光标的位置,以验证`RowMapper`没有使光标前进。|
| `spring.batch.job.jdbccursoritemreader.driverSupportsAbsolute` |`boolean`| `false` |指示驱动程序是否支持光标的绝对定位。|
|`spring.batch.job.jdbccursoritemreader.useSharedExtendedConnection`|`boolean`| `false` |指示连接是否与其他处理共享(因此是事务的一部分)。|
| `spring.batch.job.jdbccursoritemreader.sql` |`String` | `null` |要读取的 SQL 查询。|
参见[`JdbcCursorItemReader`文档](https://DOCS. Spring.io/ Spring-batch/DOCS/4.3.x/api/org/springframework/batch/item/database/jdbcccursoritemreader.html)。
### [](#kafkaItemReader)[14.4.Kafkaitemreader](#kafkaItemReader)
从 Kafka 主题中获取数据分区是有用的,也正是`KafkaItemReader`所能做的。要配置`KafkaItemReader`,需要进行两部分配置。首先,需要使用 Spring Boot 的 Kafka 自动配置来配置 Kafka(参见[Spring Boot Kafka documentation](https://docs.spring.io/spring-boot/docs/2.4.x/reference/htmlsingle/#boot-features-kafka))。在配置了 Spring boot 中的 Kafka 属性之后,可以通过设置以下属性来配置`KafkaItemReader`本身:
| Property | Type |Default Value|说明|
|-------------------------------------------------------|---------------|-------------|-----------------------------------------------------------|
| `spring.batch.job.kafkaitemreader.name` | `String` | `null` |用于在`ExecutionContext`中提供唯一键的名称。|
| `spring.batch.job.kafkaitemreader.topic` | `String` | `null` |阅读主题的名称。|
| `spring.batch.job.kafkaitemreader.partitions` |`List`| empty list |要读取的分区索引的列表。|
|`spring.batch.job.kafkaitemreader.pollTimeOutInSeconds`| `long` | 30 |`poll()`操作的超时。|
| `spring.batch.job.kafkaitemreader.saveState` | `boolean` | `true` |确定是否应将状态保存以重新启动。|
参见[`KafkaItemReader`文档](https://DOCS. Spring.io/ Spring-batch/DOCS/4.3.x/api/org/springframework/batch/item/kafka/kafkaitemreader.html)。
## [](#item-processors)[15.项目处理器配置](#item-processors)
如果`ApplicationContext`中有一个选项可用,那么单步批处理作业自动配置接受`ItemProcessor`。如果找到了正确的类型(`ItemProcessor, Map>`),则自动连接到该步骤中。
## [](#item-writers)[16.ItemWriter 实现的自动配置](#item-writers)
此启动器为`ItemWriter`实现提供自动配置,这些实现匹配所支持的`ItemReader`实现:`AmqpItemWriter`、`FlatFileItemWriter`、`JdbcItemWriter`和`KafkaItemWriter`。本节介绍如何使用自动配置来配置受支持的`ItemWriter`。
### [](#amqpitemwriter)[16.1.AMQPitemWriter](#amqpitemwriter)
要写入 RabbitMQ 队列,需要两组配置。首先,你需要一个`AmqpTemplate`。实现这一点的最简单方法是使用 Spring Boot 的 RabbitMQ 自动配置。参见[Spring Boot RabbitMQ documentation](https://docs.spring.io/spring-boot/docs/2.4.x/reference/htmlsingle/#boot-features-amqp)。一旦配置了`AmqpTemplate`,就可以通过设置以下属性来配置`AmqpItemWriter`:
| Property | Type |Default Value|说明|
|------------------------------------------------------|---------|-------------|------------------------------------------------------------------------------------------|
| `spring.batch.job.amqpitemwriter.enabled` |`boolean`| `false` |如果`true`,则自动配置运行。|
|`spring.batch.job.amqpitemwriter.jsonConverterEnabled`|`boolean`| `true` |指示是否应注册`Jackson2JsonMessageConverter`以转换消息。|
### [](#flatfileitemwriter)[16.2.平板电容机](#flatfileitemwriter)
要编写一个文件作为该步骤的输出,你可以配置`FlatFileItemWriter`。自动配置接受已显式配置的组件(例如`LineAggregator`,`FieldExtractor`,`FlatFileHeaderCallback`,或`FlatFileFooterCallback`)和通过设置指定的以下属性已配置的组件:
| Property | Type | Default Value |说明|
|----------------------------------------------------------|-----------|-------------------------------------------|-----------------------------------------------------------------------------------------------------------------------------------------------------|
| `spring.batch.job.flatfileitemwriter.resource` |`Resource` | `null` |要读取的资源。|
| `spring.batch.job.flatfileitemwriter.delimited` | `boolean` | `false` |指示输出文件是否为带分隔符的文件。如果`true`,则`spring.batch.job.flatfileitemwriter.formatted`必须是`false`。|
| `spring.batch.job.flatfileitemwriter.formatted` | `boolean` | `false` |指示输出文件是否为格式化的文件.如果`true`,则`spring.batch.job.flatfileitemwriter.delimited`必须是`false`。|
| `spring.batch.job.flatfileitemwriter.format` | `String` | `null` |用于为格式化的文件生成输出的格式。格式化是通过使用`String.format`来执行的。|
| `spring.batch.job.flatfileitemwriter.locale` | `Locale` | `Locale.getDefault()` |生成文件时要使用的`Locale`。|
| `spring.batch.job.flatfileitemwriter.maximumLength` | `int` | 0 |记录的最大长度。如果为 0,则大小是无界的。|
| `spring.batch.job.flatfileitemwriter.minimumLength` | `int` | 0 |记录的最小长度。|
| `spring.batch.job.flatfileitemwriter.delimiter` | `String` | `,` |`String`用于在分隔的文件中分隔字段。|
| `spring.batch.job.flatfileitemwriter.encoding` | `String` | `FlatFileItemReader.DEFAULT_CHARSET` |编写文件时使用的编码。|
| `spring.batch.job.flatfileitemwriter.forceSync` | `boolean` | `false` |指示是否应将文件强制同步到 Flush 上的磁盘。|
| `spring.batch.job.flatfileitemwriter.names` |`String []`| `null` |从记录中解析的每个字段的名称列表。这些名称是`Map`中由此`ItemWriter`接收的项的键。|
| `spring.batch.job.flatfileitemwriter.append` | `boolean` | `false` |指示如果找到输出文件,是否应将文件追加到该文件。|
| `spring.batch.job.flatfileitemwriter.lineSeparator` | `String` |`FlatFileItemWriter.DEFAULT_LINE_SEPARATOR`|用什么`String`来分隔输出文件中的行。|
| `spring.batch.job.flatfileitemwriter.name` | `String` | `null` |用于在`ExecutionContext`中提供唯一键的名称。|
| `spring.batch.job.flatfileitemwriter.saveState` | `boolean` | `true` |确定是否应将状态保存以重新启动。|
|`spring.batch.job.flatfileitemwriter.shouldDeleteIfEmpty` | `boolean` | `false` |如果设置为`true`,则在作业完成时将删除一个空文件(没有输出)。|
|`spring.batch.job.flatfileitemwriter.shouldDeleteIfExists`| `boolean` | `true` |如果设置为`true`,并且在输出文件应该在的位置找到一个文件,则在步骤开始之前将其删除。|
| `spring.batch.job.flatfileitemwriter.transactional` | `boolean` |`FlatFileItemWriter.DEFAULT_TRANSACTIONAL` |指示读取器是否为事务性队列(表示读取的项在出现故障时返回到队列中)。|
参见[`FlatFileItemWriter`文档](https://DOCS. Spring.io/ Spring-batch/DOCS/4.3.x/api/org/springframework/batch/item/file/flatfileitemwriter.html)。
### [](#jdbcitemwriter)[16.3.JDBCBatchitemwriter](#jdbcitemwriter)
要将一个步骤的输出写到关系数据库中,此启动器提供了自动配置`JdbcBatchItemWriter`的功能。自动配置允许你通过设置以下属性来提供自己的`ItemPreparedStatementSetter`或`ItemSqlParameterSourceProvider`和配置选项:
| Property | Type |Default Value|说明|
|----------------------------------------------------|---------|-------------|---------------------------------------------------------------------------------|
| `spring.batch.job.jdbcbatchitemwriter.name` |`String` | `null` |用于在`ExecutionContext`中提供唯一键的名称。|
| `spring.batch.job.jdbcbatchitemwriter.sql` |`String` | `null` |用于插入每个项的 SQL。|
|`spring.batch.job.jdbcbatchitemwriter.assertUpdates`|`boolean`| `true` |是否要验证每个插入都会导致至少一条记录的更新。|
参见[`JdbcBatchItemWriter`文档](https://DOCS. Spring.io/ Spring-batch/DOCS/4.3.x/api/org/springframework/batch/item/database/jdbcbatchitemwriter.html)。
### [](#kafkaitemwriter)[16.4.KafkaitemWriter](#kafkaitemwriter)
要将步骤输出写入 Kafka 主题,你需要`KafkaItemWriter`。这个启动器通过使用来自两个地方的设备为`KafkaItemWriter`提供自动配置。第一个是 Spring Boot 的 Kafka 自动配置。(参见[Spring Boot Kafka documentation](https://docs.spring.io/spring-boot/docs/2.4.x/reference/htmlsingle/#boot-features-kafka)。)其次,这个启动器允许你在 Writer 上配置两个属性。
| Property | Type |Default Value|说明|
|-----------------------------------------|---------|-------------|----------------------------------------------------------------------------------------------|
|`spring.batch.job.kafkaitemwriter.topic` |`String` | `null` |写卡夫卡的主题。|
|`spring.batch.job.kafkaitemwriter.delete`|`boolean`| `false` |被传递给 Writer 的项目是否都将作为删除事件发送到主题。|
有关`KafkaItemWriter`的配置选项的更多信息,请参见[`KafkaItemWiter`文档](https://DOCS. Spring.io/ Spring-batch/DOCS/4.3.x/api/org/springframework/batch/item/kafkaitemwriter.html)。
# [](#stream-integration)[Spring Cloud Stream Integration](#stream-integration)
任务本身可能是有用的,但是将任务集成到一个更大的生态系统中,可以使它对更复杂的处理和编排非常有用。本节介绍了 Spring Cloud任务与 Spring Cloud流的集成选项。
## [](#stream-integration-launching-sink)[17. Launching a Task from a Spring Cloud Stream](#stream-integration-launching-sink)
你可以从流启动任务。为此,创建一个接收器,该接收器监听包含`TaskLaunchRequest`作为其有效负载的消息。`TaskLaunchRequest`包含:
* `uri`:到要执行的任务工件。
* `applicationName`:与任务关联的名称。如果未设置应用程序名,`TaskLaunchRequest`将生成一个由以下内容组成的任务名:`Task-`。
* `commandLineArguments`:包含任务的命令行参数的列表。
* `environmentProperties`:包含任务要使用的环境变量的映射。
* `deploymentProperties`:包含部署人员用于部署任务的属性的映射。
| |如果有效载荷的类型不同,则接收器将抛出一个异常。|
|---|--------------------------------------------------------------------|
例如,可以创建一个流,该流具有一个处理器,该处理器从 HTTP 源接收数据,并创建一个`GenericMessage`,其中包含`TaskLaunchRequest`,并将消息发送到其输出通道。然后,任务接收器将从其输入通道接收消息,然后启动任务。
要创建 TaskSink,你只需要创建一个包含`EnableTaskLauncher`注释的 Spring 引导应用程序,如下例所示:
```
@SpringBootApplication
@EnableTaskLauncher
public class TaskSinkApplication {
public static void main(String[] args) {
SpringApplication.run(TaskSinkApplication.class, args);
}
}
```
Spring Cloud任务项目的[样本模块](https://github.com/spring-cloud/spring-cloud-task/tree/master/spring-cloud-task-samples)包含一个样例接收器和处理器。要将这些示例安装到本地 Maven 存储库中,请从`spring-cloud-task-samples`目录运行 Maven 构建,并将`skipInstall`属性设置为`false`,如以下示例所示:
`mvn clean install`
| |必须将`maven.remoteRepositories.springRepo.url`属性设置为 über- jar 所在的远程存储库的位置
。如果未设置,则不存在远程
存储库,因此它仅依赖于本地存储库。|
|---|---------------------------------------------------------------------------------------------------------------------------------------------------------------------------------------------------------------------------------------------|
### [](#stream-integration-launching-sink-dataflow)[17.1. Spring Cloud Data Flow](#stream-integration-launching-sink-dataflow)
要在 Spring Cloud数据流中创建流,你必须首先注册我们创建的任务接收应用程序。在下面的示例中,我们使用 Spring Cloud数据流壳来注册处理器和接收器示例应用程序:
```
app register --name taskSink --type sink --uri maven://io.spring.cloud:tasksink:
app register --name taskProcessor --type processor --uri maven:io.spring.cloud:taskprocessor:
```
下面的示例展示了如何从 Spring Cloud数据流壳层创建流:
```
stream create foo --definition "http --server.port=9000|taskProcessor|taskSink" --deploy
```
## [](#stream-integration-events)[18. Spring Cloud Task Events](#stream-integration-events)
Spring Cloud任务提供了当该任务通过 Spring Cloud流通道运行时通过 Spring Cloud流通道发出事件的能力。任务侦听器用于在名为`task-events`的消息通道上发布`TaskExecution`。此功能可自动连接到任何具有`spring-cloud-stream`、`spring-cloud-stream-`以及在其 Classpath 上定义的任务的任务中。
| |要禁用事件发送侦听器,请将`spring.cloud.task.events.enabled`属性设置为`false`。|
|---|------------------------------------------------------------------------------------------------------|
在定义了适当的 Classpath 之后,以下任务在`task-events`通道上(在任务的开始和结束时)作为事件发射`TaskExecution`:
```
@SpringBootApplication
public class TaskEventsApplication {
public static void main(String[] args) {
SpringApplication.run(TaskEventsApplication.class, args);
}
@Configuration
public static class TaskConfiguration {
@Bean
public CommandLineRunner commandLineRunner() {
return new CommandLineRunner() {
@Override
public void run(String... args) throws Exception {
System.out.println("The CommandLineRunner was executed");
}
};
}
}
}
```
| |Classpath 上还需要一个粘结器实现方式。|
|---|----------------------------------------------------------------|
| |一个示例任务事件应用程序可以在 Spring Cloud任务项目的示例模块
中找到,[here](https://github.com/spring-cloud/spring-cloud-task/tree/master/spring-cloud-task-samples/task-events)。|
|---|--------------------------------------------------------------------------------------------------------------------------------------------------------------------------------------------------------------------|
### [](#stream-integration-disable-task-events)[18.1.禁用特定的任务事件](#stream-integration-disable-task-events)
要禁用任务事件,可以将`spring.cloud.task.events.enabled`属性设置为`false`。
## [](#stream-integration-batch-events)[19. Spring Batch Events](#stream-integration-batch-events)
当通过任务执行 Spring 批处理作业时, Spring Cloud任务可以被配置为基于 Spring 批处理中可用的 Spring 批处理侦听器发出信息消息。具体地,以下 Spring 批处理侦听器被自动配置到每个批处理作业中并且在通过 Spring Cloud任务运行时在相关联的 Spring Cloud流通道上发出消息:
* `JobExecutionListener`监听`job-execution-events`
* `StepExecutionListener`监听`step-execution-events`
* `ChunkListener`监听`chunk-events`
* `ItemReadListener`监听`item-read-events`
* `ItemProcessListener`监听`item-process-events`
* `ItemWriteListener`监听`item-write-events`
* `SkipListener`监听`skip-events`
当上下文中存在适当的 bean(a`Job`和 a`TaskLifecycleListener`)时,这些侦听器将自动配置为任意`AbstractJob`。用于侦听这些事件的配置的处理方式与绑定到任何其他 Spring Cloud流通道的处理方式相同。我们的任务(运行批处理作业的任务)充当`Source`,监听应用程序充当`Processor`或`Sink`。
例如,可以让一个应用程序监听`job-execution-events`用于作业开始和停止的通道。要配置监听应用程序,你可以将输入配置为`job-execution-events`,如下所示:
`spring.cloud.stream.bindings.input.destination=job-execution-events`
| |Classpath 上的粘合剂实现方式也是必需的。|
|---|----------------------------------------------------------------|
| |一个样例批处理事件应用程序可以在 Spring Cloud任务项目的样例模块
中找到,[here](https://github.com/spring-cloud/spring-cloud-task/tree/master/spring-cloud-task-samples/batch-events)。|
|---|----------------------------------------------------------------------------------------------------------------------------------------------------------------------------------------------------------------------|
### [](#sending-batch-events-to-different-channels)[19.1.将批处理事件发送到不同的通道](#sending-batch-events-to-different-channels)
Spring Cloud Task 为批处理事件提供的选项之一是能够更改特定侦听器可以向其发送消息的通道。要做到这一点,请使用以下配置:`spring.cloud.stream.bindings..destination=`。例如,如果`StepExecutionListener`需要将其消息发送到另一个名为`my-step-execution-events`的通道,而不是默认的`step-execution-events`,则可以添加以下配置:
`spring.cloud.stream.bindings.step-execution-events.destination=my-step-execution-events`
### [](#disabling-batch-events)[19.2.禁用批处理事件](#disabling-batch-events)
要禁用所有批处理事件的侦听器功能,请使用以下配置:
`spring.cloud.task.batch.events.enabled=false`
要禁用特定的批处理事件,请使用以下配置:
`spring.cloud.task.batch.events..enabled=false`:
下面的清单显示了你可以禁用的各个侦听器:
```
spring.cloud.task.batch.events.job-execution.enabled=false
spring.cloud.task.batch.events.step-execution.enabled=false
spring.cloud.task.batch.events.chunk.enabled=false
spring.cloud.task.batch.events.item-read.enabled=false
spring.cloud.task.batch.events.item-process.enabled=false
spring.cloud.task.batch.events.item-write.enabled=false
spring.cloud.task.batch.events.skip.enabled=false
```
### [](#emit-order-for-batch-events)[19.3.为批处理事件发出命令](#emit-order-for-batch-events)
默认情况下,批处理事件具有`Ordered.LOWEST_PRECEDENCE`。要更改该值(例如,为 5),请使用以下配置:
```
spring.cloud.task.batch.events.job-execution-order=5
spring.cloud.task.batch.events.step-execution-order=5
spring.cloud.task.batch.events.chunk-order=5
spring.cloud.task.batch.events.item-read-order=5
spring.cloud.task.batch.events.item-process-order=5
spring.cloud.task.batch.events.item-write-order=5
spring.cloud.task.batch.events.skip-order=5
```
# [](#appendix)[Appendices](#appendix)
## [](#appendix-task-repository-schema)[20.任务存储库模式](#appendix-task-repository-schema)
本附录为任务存储库中使用的数据库模式提供了 ERD。
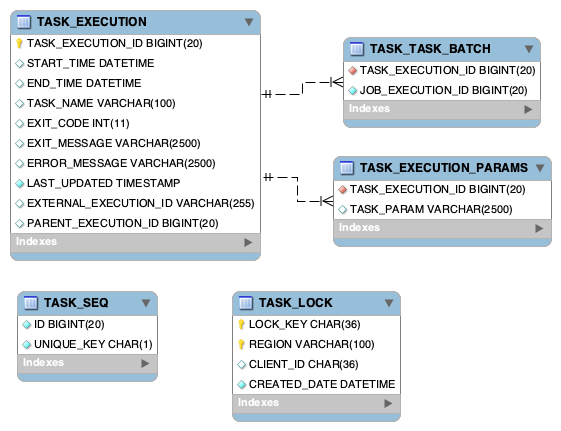
### [](#table-information)[20.1.表格信息](#table-information)
任务 \_ 执行
存储任务执行信息。
| 列名称 |Required| Type |Field Length|笔记|
|---------------------------|--------|--------|------------|-----------------------------------------------------------------------------------------------------------------------------------------------------------------------------------------------------------------------|
| 任务 \_ 执行 \_ID | TRUE | BIGINT | X |Spring Cloud任务框架在应用程序启动时建立如从`TASK_SEQ`中获得的下一个可用 ID。或者,如果记录是在任务之外创建的,那么值必须在记录创建时填充。|
| START\_TIME | FALSE |DATETIME| X |Spring Cloud任务框架在应用程序启动时建立了价值。|
| END\_TIME | FALSE |DATETIME| X |Spring Cloud任务框架在应用程序出口处建立了价值.|
| TASK\_NAME | FALSE |VARCHAR | 100 |Spring Cloud任务框架在应用程序启动时将此设置为“应用程序”,除非用户使用所讨论的 Spring.cloud.task.name 建立名称[here](#features-task-name)|
| EXIT\_CODE | FALSE |INTEGER | X |遵循 Spring 引导默认值,除非如[here](https://docs.spring.io/spring-cloud-task/docs/current/reference/#features-lifecycle-exit-codes)所讨论的那样被用户重写。|
| EXIT\_MESSAGE | FALSE |VARCHAR | 2500 |用户定义为讨论[here](https://docs.spring.io/spring-cloud-task/docs/current/reference/#features-task-execution-listener-exit-messages)。|
| ERROR\_MESSAGE | FALSE |VARCHAR | 2500 |Spring Cloud任务框架在应用程序出口处建立了价值。|
| LAST\_UPDATED | TRUE |DATETIME| X |Spring Cloud任务框架在应用程序启动时建立了价值。或者,如果记录是在任务之外创建的,那么值必须在记录创建时填充。|
| EXTERNAL\_EXECUTION\_ID | FALSE |VARCHAR | 250 |如果设置了`spring.cloud.task.external-execution-id`属性,那么应用程序启动时的 Spring Cloud Task Framework 将把它设置为指定的值。更多信息请访问[here](#features-external_task_id)|
|PARENT\_任务 \_ 执行 \_ID| FALSE | BIGINT | X |如果设置了`spring.cloud.task.parent-execution-id`属性,那么应用程序启动时的 Spring Cloud Task Framework 将把它设置为指定的值。更多信息请访问[here](#features-parent_task_id)|
任务 \_ 执行 \_ 参数
存储用于执行任务的参数
|列名称|Required| Type |Field Length|
|-------------------|--------|-------|------------|
|TASK\_EXECUTION\_ID| TRUE |BIGINT | X |
|任务 \_param| FALSE |VARCHAR| 2500 |
任务 \_ 任务 \_ 批处理
用于将任务执行链接到批处理执行。
| Column Name |Required| Type |Field Length|
|-------------------|--------|------|------------|
|TASK\_EXECUTION\_ID| TRUE |BIGINT| X |
|作业 \_ 执行 \_ID| TRUE |BIGINT| X |
任务 \_ 锁定
用于讨论`single-instance-enabled`的功能[here](#features-single-instance-enabled)。
| Column Name |Required| Type |Field Length|笔记|
|-------------|--------|--------|------------|----------------------------------------------------------------|
| LOCK\_KEY | TRUE | CHAR | 36 |这把锁的 UUID|
| REGION | TRUE |VARCHAR | 100 |用户可以使用该字段建立一组锁。|
| CLIENT\_ID | TRUE | CHAR | 36 |包含要锁定的应用程序名称的任务执行 ID。|
|CREATED\_DATE| TRUE |DATETIME| X |创建条目的日期|
| |可以找到用于为每个数据库类型设置表的 DDL[here](https://github.com/spring-cloud/spring-cloud-task/tree/master/spring-cloud-task-core/src/main/resources/org/springframework/cloud/task)。|
|---|-----------------------------------------------------------------------------------------------------------------------------------------------------------------------------------------------------------------|
### [](#sql-server)[20.2.SQL 服务器](#sql-server)
Spring Cloud任务默认情况下使用序列表来确定`TASK_EXECUTION_ID`的`TASK_EXECUTION`表。但是,当使用 SQL Server 同时启动多个任务时,这可能会导致`TASK_SEQ`表上出现死锁。解决方案是删除`TASK_EXECUTION_SEQ`表,并使用相同的名称创建一个序列。例如:
```
DROP TABLE TASK_SEQ;
CREATE SEQUENCE [DBO].[TASK_SEQ] AS BIGINT
START WITH 1
INCREMENT BY 1;
```
| |将`START WITH`设置为高于当前执行 ID 的值。|
|---|----------------------------------------------------------------------|
## [](#appendix-building-the-documentation)[21.构建这个文档](#appendix-building-the-documentation)
该项目使用 Maven 来生成该文档。要为自己生成它,请运行以下命令:`$ ./mvnw clean package -P full`。
## [](#appendix-cloud-foundry)[22.在 Cloud Foundry 上运行任务应用程序](#appendix-cloud-foundry)
Spring Cloud任务应用程序作为在 Cloud Foundry 上的任务而启动的最简单的方法是使用 Spring Cloud数据流。 Spring 通过云数据流,你可以注册你的任务应用程序,为其创建定义,然后启动它。然后,你可以通过 RESTful API、 Spring Cloud Data Flow Shell 或 UI 跟踪任务执行。要了解如何开始安装数据流,请遵循参考文档[开始](https://docs.spring.io/spring-cloud-dataflow/docs/current/reference/htmlsingle/#getting-started)部分中的说明。有关如何注册和启动任务的信息,请参见[任务的生命周期](https://docs.spring.io/spring-cloud-dataflow/docs/current/reference/htmlsingle/#_the_lifecycle_of_a_task)文档。
如果{{{i[’GoogleAnalyticsObject’]=r;i[r]=i[r]|function(){q=i[r].push(参数)},i[r].l=1\*new date();a=s.createElement(o),m=s.getelementsbyName(0);a.parentsName(1);a.A.SRC=g;m.M.analytnode(gua,m.com.com);(google=document=’,’,’’’’’’’’),’documents’,’’.’’’’’’’’’’’,’’’’’’