
Model Zoo - ImageNet
ImageNet is a popular dataset for generic object classification. This tutorial provides convolutional neural network(CNN) models for ImageNet.
ResNet Introduction
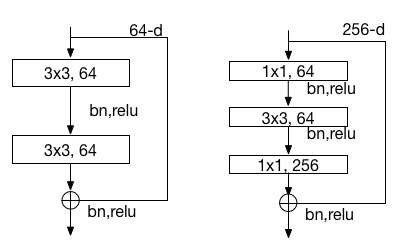
ResNets from paper Deep Residual Learning for Image Recognition won the 1st place on the ILSVRC 2015 classification task. They present residual learning framework to ease the training of networks that are substantially deeper than those used previously. The residual connections are shown in following figure. The left building block is used in network of 34 layers and the right bottleneck building block is used in network of 50, 101, 152 layers .
We present three ResNet models, which are converted from the models provided by the authors https://github.com/KaimingHe/deep-residual-networks. The classfication errors tested in PaddlePaddle on 50,000 ILSVRC validation set with input images channel order of BGR by single scale with the shorter side of 256 and single crop as following table.
| ResNet | Top-1 | Model Size |
|---|---|---|
| ResNet-50 | 24.9% | 99M |
| ResNet-101 | 23.7% | 173M |
| ResNet-152 | 23.2% | 234M |
ResNet Model
See demo/model_zoo/resnet/resnet.py. This config contains network of 50, 101 and 152 layers. You can specify layer number by adding argument like --config_args=layer_num=50 in command line arguments.
Network Visualization
You can get a diagram of ResNet network by running the following commands. The script generates dot file and then converts dot file to PNG file, which needs to install graphviz to convert.
cd demo/model_zoo/resnet
./net_diagram.sh
Model Download
cd demo/model_zoo/resnet
./get_model.sh
You can run above command to download all models and mean file and save them in demo/model_zoo/resnet/model if downloading successfully.
mean_meta_224 resnet_101 resnet_152 resnet_50
- resnet_50: model of 50 layers.
- resnet_101: model of 101 layers.
- resnet_152: model of 152 layers.
- mean_meta_224: mean file with 3 x 224 x 224 size in BGR order. You also can use three mean values: 103.939, 116.779, 123.68.
Parameter Info
Convolution Layer Weight
As batch normalization layer is connected after each convolution layer, there is no parameter of bias and only one weight in this layer. shape:
(Co, ky, kx, Ci)- Co: channle number of output feature map.
- ky: filter size in vertical direction.
- kx: filter size in horizontal direction.
- Ci: channle number of input feature map.
2-Dim matrix: (Co * ky * kx, Ci), saved in row-major order.
Fully connected Layer Weight
2-Dim matrix: (input layer size, this layer size), saved in row-major order.
Batch Normalization Layer Weight
There are four parameters in this layer. In fact, only .w0 and .wbias are the learned parameters. The other two are therunning mean and variance respectively. They will be loaded in testing. Following table shows parameters of a batch normzalization layer.
| Parameter Name | Number | Meaning |
|---|---|---|
| _res2_1_branch1_bn.w0 | 256 | gamma, scale parameter |
| _res2_1_branch1_bn.w1 | 256 | mean value of feature map |
| _res2_1_branch1_bn.w2 | 256 | variance of feature map |
| _res2_1_branch1_bn.wbias | 256 | beta, shift parameter |
Parameter Observation
Users who want to observe the parameters can use Python to read:
import sys
import numpy as np

def load(file_name):
    with open(file_name, 'rb') as f:
        f.read(16) # skip header for float type.
        return np.fromfile(f, dtype=np.float32)

if __name__=='__main__':
    weight = load(sys.argv[1])
or simply use following shell command:
od -j 16 -f _res2_1_branch1_bn.w0
Feature Extraction
We provide both C++ and Python interfaces to extract features. The following examples use data in demo/model_zoo/resnet/example to show the extracting process in detail.
C++ Interface
First, specify image data list in define_py_data_sources2 in the config, see example demo/model_zoo/resnet/resnet.py.
    train_list = 'train.list' if not is_test else None
    # mean.meta is mean file of ImageNet dataset.
    # mean.meta size : 3 x 224 x 224.
    # If you use three mean value, set like:
    # "mean_value:103.939,116.779,123.68;"
    args={
        'mean_meta': "model/mean_meta_224/mean.meta",
        'image_size': 224, 'crop_size': 224,
        'color': True,'swap_channel:': [2, 1, 0]}
    define_py_data_sources2(train_list,
                           'example/test.list',
                           module="example.image_list_provider",
                           obj="processData",
                           args=args)
Second, specify layers to extract features in Outputs() of resnet.py. For example,
Outputs("res5_3_branch2c_conv", "res5_3_branch2c_bn")
Third, specify model path and output directory in extract_fea_c++.sh, and then run the following commands.
cd demo/model_zoo/resnet
./extract_fea_c++.sh
If successful, features are saved in fea_output/rank-00000 as follows. And you can use load_feature_c interface in load_feature.py to load such a file.
-0.115318 -0.108358 ... -0.087884;-1.27664 ... -1.11516 -2.59123;
-0.126383 -0.116248 ... -0.00534909;-1.42593 ... -1.04501 -1.40769;
- Each line stores features of a sample. Here, the first line stores features of
example/dog.jpgand second line stores features ofexample/cat.jpg. - Features of different layers are splitted by
;, and their order is consistent with the layer order inOutputs(). Here, the left features areres5_3_branch2c_convlayer and right features areres5_3_branch2c_bnlayer.
Python Interface
demo/model_zoo/resnet/classify.py is an example to show how to use Python to extract features. Following example still uses data of ./example/test.list. Command is as follows:
cd demo/model_zoo/resnet
./extract_fea_py.sh
extract_fea_py.sh:
python classify.py \
     --job=extract \
     --conf=resnet.py\
     --use_gpu=1 \
     --mean=model/mean_meta_224/mean.meta \
     --model=model/resnet_50 \
     --data=./example/test.list \
     --output_layer="res5_3_branch2c_conv,res5_3_branch2c_bn" \
     --output_dir=features
- --job=extract: specify job mode to extract feature.
- --conf=resnet.py: network configure.
- --use_gpu=1: speficy GPU mode.
- --model=model/resnet_5: model path.
- --data=./example/test.list: data list.
- --output_layer=”xxx,xxx”: specify layers to extract features.
- --output_dir=features: output diretcoty.
If run successfully, you will see features saved in features/batch_0, this file is produced with cPickle. You can use load_feature_py interface in load_feature.py to open the file, and it returns a dictionary as follows:
{
'cat.jpg': {'res5_3_branch2c_conv': array([[-0.12638293, -0.116248  , -0.11883899, ..., -0.00895038, 0.01994277, -0.00534909]], dtype=float32), 'res5_3_branch2c_bn': array([[-1.42593431, -1.28918779, -1.32414699, ..., -1.45933616, -1.04501402, -1.40769434]], dtype=float32)},
'dog.jpg': {'res5_3_branch2c_conv': array([[-0.11531784, -0.10835785, -0.08809858, ...,0.0055237, 0.01505112, -0.08788397]], dtype=float32), 'res5_3_branch2c_bn': array([[-1.27663755, -1.18272924, -0.90937918, ..., -1.25178063, -1.11515927, -2.59122872]], dtype=float32)}
}
Observed carefully, these feature values are consistent with the above results extracted by C++ interface.
Prediction
classify.py also can be used to predict. We provide an example script predict.sh to predict data in example/test.list using a ResNet model with 50 layers.
cd demo/model_zoo/resnet
./predict.sh
predict.sh calls the classify.py:
python classify.py \
     --job=predict \
     --conf=resnet.py\
     --multi_crop \
     --model=model/resnet_50 \
     --use_gpu=1 \
     --data=./example/test.list
- --job=extract: speficy job mode to predict.
- --conf=resnet.py: network configure.
- --multi_crop: use 10 crops and average predicting probability.
- --use_gpu=1: speficy GPU mode.
- --model=model/resnet_50: model path.
- --data=./example/test.list: data list.
If run successfully, you will see following results, where 156 and 285 are labels of the images.
Label of example/dog.jpg is: 156
Label of example/cat.jpg is: 282