# Pipeline Serving
(简体中文|[English](PIPELINE_SERVING.md))
- [架构设计](PIPELINE_SERVING_CN.md#1架构设计)
- [详细设计](PIPELINE_SERVING_CN.md#2详细设计)
- [典型示例](PIPELINE_SERVING_CN.md#3典型示例)
- [高阶用法](PIPELINE_SERVING_CN.md#4高阶用法)
- [日志追踪](PIPELINE_SERVING_CN.md#5日志追踪)
- [性能分析与优化](PIPELINE_SERVING_CN.md#6性能分析与优化)
在许多深度学习框架中,Serving通常用于单模型的一键部署。在AI工业大生产的背景下,端到端的深度学习模型当前还不能解决所有问题,多个深度学习模型配合起来使用还是解决现实问题的常规手段。但多模型应用设计复杂,为了降低开发和维护难度,同时保证服务的可用性,通常会采用串行或简单的并行方式,但一般这种情况下吞吐量仅达到可用状态,而且GPU利用率偏低。
Paddle Serving提供了用户友好的多模型组合服务编程框架,Pipeline Serving,旨在降低编程门槛,提高资源使用率(尤其是GPU设备),提升整体的预估效率。
## 1.架构设计
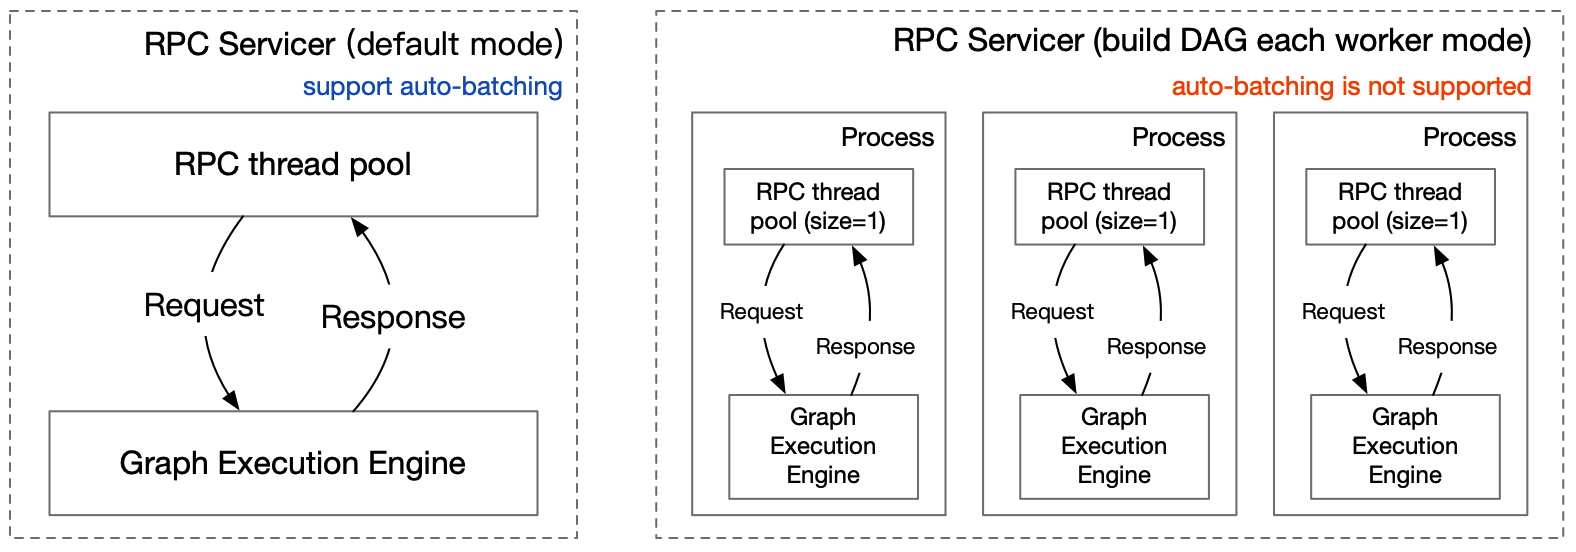
Server端基于RPC服务层和图执行引擎构建,两者的关系如下图所示。
### 1.1 RPC服务层
为满足用户不同的使用需求,RPC服务层同时启动1个Web服务器和1个RPC服务器,可同时处理RESTful API、gRPC 2种类型请求。gPRC gateway接收RESTful API请求通过反向代理服务器将请求转发给gRPC Service;gRPC请求由gRPC service接收,所以,2种类型的请求统一由gRPC Service处理,确保处理逻辑一致。
#### 1.1.1 proto的输入输出结构
gRPC服务和gRPC gateway服务统一用service.proto生成。
```proto
message Request {
repeated string key = 1;
repeated string value = 2;
optional string name = 3;
optional string method = 4;
optional int64 logid = 5;
optional string clientip = 6;
};
message Response {
optional int32 err_no = 1;
optional string err_msg = 2;
repeated string key = 3;
repeated string value = 4;
};
```
Request中`key`与`value`是配对的string数组用于接收数据。 `name`与`method`对应RESTful API的URL://{ip}:{port}/{name}/{method}。`logid`和`clientip`便于用户串联服务级请求和自定义策略。
Response中`err_no`和`err_msg`表达处理结果的正确性和错误信息,`key`和`value`为返回结果。
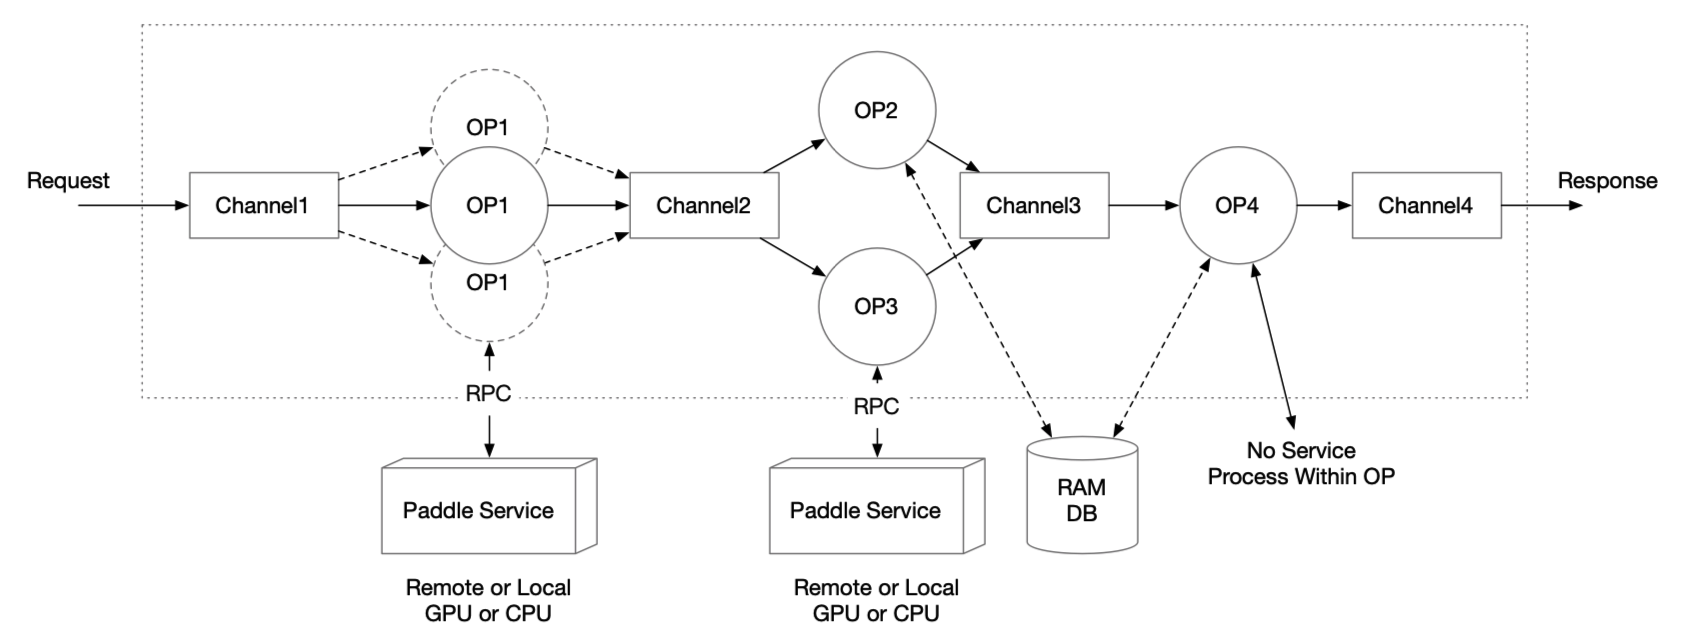
### 1.2 图执行引擎
图执行引擎由 OP 和 Channel 构成,相连接的 OP 之间会共享一个 Channel。
- Channel 可以理解为一个缓冲队列。每个 OP 只接受一个 Channel 的输入和多个 Channel 的输出(每个输出相同);一个 Channel 可以包含来自多个 OP 的输出,同一个 Channel 的数据可以作为多个 OP 的输入Channel
- 用户只需要定义 OP 间的关系,在编译期图引擎负责分析整个图的依赖关系,并声明Channel
- Request 进入图执行引擎服务后会产生一个 Request Id,Reponse 会通过 Request Id 进行对应的返回
- 对于 OP 之间需要传输过大数据的情况,可以考虑 RAM DB 外存进行全局存储,通过在 Channel 中传递索引的 Key 来进行数据传输
#### 1.2.1 OP的设计
- 单个 OP 默认的功能是根据输入的 Channel 数据,访问一个 Paddle Serving 的单模型服务,并将结果存在输出的 Channel
- 单个 OP 可以支持用户自定义,包括 preprocess,process,postprocess 三个函数都可以由用户继承和实现
- 单个 OP 可以控制并发数,从而增加处理并发数
- 单个 OP 可以获取多个不同 RPC 请求的数据,以实现 Auto-Batching
- OP 可以由线程或进程启动
#### 1.2.2 Channel的设计
- Channel 是 OP 之间共享数据的数据结构,负责共享数据或者共享数据状态信息
- Channel 可以支持多个OP的输出存储在同一个 Channel,同一个 Channel 中的数据可以被多个 OP 使用
- 下图为图执行引擎中 Channel 的设计,采用 input buffer 和 output buffer 进行多 OP 输入或多 OP 输出的数据对齐,中间采用一个 Queue 进行缓冲
#### 1.2.3 预测类型的设计
- OP的预测类型(client_type)有3种类型,brpc、grpc和local_predictor,各自特点如下:
- brpc: 使用bRPC Client与远端的Serving服务网络交互,性能优于grpc,但仅支持Linux平台
- grpc: 使用gRPC Client与远端的Serving服务网络交互,支持跨操作系统部署,性能弱于bprc
- local_predictor: 本地服务内加载模型并完成预测,不需要网络交互,延时更低,支持Linux部署。支持本机多卡部署和TensorRT实现高性能预测。
- 选型:
- 延时(越少越好): local_predictor < brpc <= grpc
- 操作系统:grpc > local_precitor >= brpc
- 微服务: brpc或grpc模型分拆成独立服务,简化开发和部署复杂度,提升资源利用率
#### 1.2.4 极端情况的考虑
- `请求超时的处理`
整个图执行引擎每一步都有可能发生超时,图执行引擎里面通过设置 timeout 值来控制,任何环节超时的请求都会返回超时响应。
- `Channel 存储的数据过大`
Channel 中可能会存储过大的数据,导致拷贝等耗时过高,图执行引擎里面可以通过将 OP 计算结果数据存储到外存,如高速的内存 KV 系统
- `Channel 设计中的 input buffer 和 output buffer 是否会无限增加`
- 不会。整个图执行引擎的输入会放到一个 Channel 的 internal queue 里面,直接作为整个服务的流量控制缓冲队列
- 对于 input buffer,根据计算量的情况调整 OP1 和 OP2 的并发数,使得 input buffer 来自各个输入 OP 的数量相对平衡(input buffer 的长度取决于 internal queue 中每个 item 完全 ready 的速度)
- 对于 output buffer,可以采用和 input buffer 类似的处理方法,即调整 OP3 和 OP4 的并发数,使得 output buffer 的缓冲长度得到控制(output buffer 的长度取决于下游 OP 从 output buffer 获取数据的速度)
- 同时 Channel 中数据量不会超过 gRPC 的 `worker_num`,即线程池大小
***
## 2.详细设计
对于Pipeline的设计实现,首先介绍PipelineServer、OP、重写OP前后处理,最后介绍特定OP(RequestOp和ResponseOp)二次开发的方法。
### 2.1 PipelineServer定义
PipelineServer包装了RPC运行层和图引擎执行,所有Pipeline服务首先要实例化PipelineServer示例,再设置2个核心接口 set_response_op、加载配置信息,最后调用run_server启动服务。代码示例如下:
```python
server = PipelineServer()
server.set_response_op(response_op)
server.prepare_server(config_yml_path)
#server.prepare_pipeline_config(config_yml_path)
server.run_server()
```
PipelineServer的核心接口:
- `set_response_op`,设置response_op 将会根据各个 OP 的拓扑关系初始化 Channel 并构建计算图。
- `prepare_server`: 加载配置信息,并启动远端Serving服务,适用于调用远端远端推理服务
- `prepare_pipeline_config`,仅加载配置信息,适用于local_prdict
- `run_server`,启动gRPC服务,接收请求
### 2.2 OP 定义
普通 OP 作为图执行引擎中的基本单元,其构造函数如下:
```python
def __init__(name=None,
input_ops=[],
server_endpoints=[],
fetch_list=[],
client_config=None,
client_type=None,
concurrency=1,
timeout=-1,
retry=1,
batch_size=1,
auto_batching_timeout=None,
local_service_handler=None)
```
各参数含义如下
| 参数名 | 类型 | 含义 |
| :-------------------: | :---------: |:------------------------------------------------: |
| name | (str) | 用于标识 OP 类型的字符串,该字段必须全局唯一。 |
| input_ops | (list) | 当前 OP 的所有前继 OP 的列表。 |
| server_endpoints | (list) |远程 Paddle Serving Service 的 endpoints 列表。如果不设置该参数,认为是local_precditor模式,从local_service_conf中读取配置。 |
| fetch_list | (list) |远程 Paddle Serving Service 的 fetch 列表。 |
| client_config | (str) |Paddle Serving Service 对应的 Client 端配置文件路径。 |
| client_type | (str) |可选择brpc、grpc或local_predictor。local_predictor不启动Serving服务,进程内预测。 |
| concurrency | (int) | OP 的并发数。 |
| timeout | (int) |process 操作的超时时间,单位为毫秒。若该值小于零,则视作不超时。 |
| retry | (int) |超时重试次数。当该值为 1 时,不进行重试。 |
| batch_size | (int) |进行 Auto-Batching 的期望 batch_size 大小,由于构建 batch 可能超时,实际 batch_size 可能小于设定值,默认为 1。 |
| auto_batching_timeout | (float) |进行 Auto-Batching 构建 batch 的超时时间,单位为毫秒。batch_size > 1时,要设置auto_batching_timeout,否则请求数量不足batch_size时会阻塞等待。 |
| local_service_handler | (object) |local predictor handler,Op init()入参赋值 或 在Op init()中创建|
### 2.3 重写OP前后处理
OP 二次开发的目的是满足业务开发人员控制OP处理策略。
| 变量或接口 | 说明 |
| :----------------------------------------------: | :----------------------------------------------------------: |
| def preprocess(self, input_dicts) | 对从 Channel 中获取的数据进行处理,处理完的数据将作为 **process** 函数的输入。(该函数对一个 **sample** 进行处理) |
| def process(self, feed_dict_list, typical_logid) | 基于 Paddle Serving Client 进行 RPC 预测,处理完的数据将作为 **postprocess** 函数的输入。(该函数对一个 **batch** 进行处理) |
| def postprocess(self, input_dicts, fetch_dict) | 处理预测结果,处理完的数据将被放入后继 Channel 中,以被后继 OP 获取。(该函数对一个 **sample** 进行处理) |
| def init_op(self) | 用于加载资源(如字典等)。 |
| self.concurrency_idx | 当前进程(非线程)的并发数索引(不同种类的 OP 单独计算)。 |
OP 在一个运行周期中会依次执行 preprocess,process,postprocess 三个操作(当不设置 `server_endpoints` 参数时,不执行 process 操作),用户可以对这三个函数进行重写,默认实现如下:
```python
def preprocess(self, input_dicts):
# multiple previous Op
if len(input_dicts) != 1:
raise NotImplementedError(
'this Op has multiple previous inputs. Please override this func.'
)
(_, input_dict), = input_dicts.items()
return input_dict
def process(self, feed_dict_list, typical_logid):
err, err_info = ChannelData.check_batch_npdata(feed_dict_list)
if err != 0:
raise NotImplementedError(
"{} Please override preprocess func.".format(err_info))
call_result = self.client.predict(
feed=feed_dict_list, fetch=self._fetch_names, log_id=typical_logid)
if isinstance(self.client, MultiLangClient):
if call_result is None or call_result["serving_status_code"] != 0:
return None
call_result.pop("serving_status_code")
return call_result
def postprocess(self, input_dicts, fetch_dict):
return fetch_dict
```
**preprocess** 的参数是前继 Channel 中的数据 `input_dicts`,该变量(作为一个 **sample**)是一个以前继 OP 的 name 为 Key,对应 OP 的输出为 Value 的字典。
**process** 的参数是 Paddle Serving Client 预测接口的输入变量 `fetch_dict_list`(preprocess 函数的返回值的列表),该变量(作为一个 **batch**)是一个列表,列表中的元素为以 feed_name 为 Key,对应 ndarray 格式的数据为 Value 的字典。`typical_logid` 作为向 PaddleServingService 穿透的 logid。
**postprocess** 的参数是 `input_dicts` 和 `fetch_dict`,`input_dicts` 与 preprocess 的参数一致,`fetch_dict` (作为一个 **sample**)是 process 函数的返回 batch 中的一个 sample(如果没有执行 process ,则该值为 preprocess 的返回值)。
用户还可以对 **init_op** 函数进行重写,已加载自定义的一些资源(比如字典等),默认实现如下:
```python
def init_op(self):
pass
```
需要**注意**的是,在线程版 OP 中,每个 OP 只会调用一次该函数,故加载的资源必须要求是线程安全的。
### 2.4 RequestOp 定义 与 二次开发接口
RequestOp 用于处理 Pipeline Server 接收到的 RPC 数据,处理后的数据将会被加入到图执行引擎中。其功能实现如下:
```python
class RequestOp(Op):
def __init__(self):
# PipelineService.name = "@DAGExecutor"
super(RequestOp, self).__init__(name="@DAGExecutor", input_ops=[])
# init op
try:
self.init_op()
except Exception as e:
_LOGGER.critical("Op(Request) Failed to init: {}".format(e))
os._exit(-1)
def unpack_request_package(self, request):
dict_data = {}
log_id = None
if request is None:
_LOGGER.critical("request is None")
raise ValueError("request is None")
for idx, key in enumerate(request.key):
dict_data[key] = request.value[idx]
log_id = request.logid
_LOGGER.info("RequestOp unpack one request. log_id:{}, clientip:{} \
name:{}, method:{}".format(log_id, request.clientip, request.name,
request.method))
return dict_data, log_id, None, ""
```
**unpack_request_package** 的默认实现是将 RPC request 中的 key 和 value 做成字典交给第一个自定义OP。当默认的RequestOp无法满足参数解析需求时,可通过重写下面2个接口自定义请求参数解析方法。
| 接口 | 说明 |
| :---------------------------------------: | :----------------------------------------: |
| init_op(self) | OP初始化,设置默认名称@DAGExecutor |
| unpack_request_package(self, request) | 处理接收的RPC数据 |
### 2.5 ResponseOp 定义 与 二次开发接口
ResponseOp 用于处理图执行引擎的预测结果,处理后的数据将会作为 Pipeline Server 的RPC 返回值,其函数实现如下,在pack_response_package中做了精简
```python
class ResponseOp(Op):
def __init__(self, input_ops):
super(ResponseOp, self).__init__(
name="@DAGExecutor", input_ops=input_ops)
# init op
try:
self.init_op()
except Exception as e:
_LOGGER.critical("Op(ResponseOp) Failed to init: {}".format(
e, exc_info=True))
os._exit(-1)
def pack_response_package(self, channeldata):
resp = pipeline_service_pb2.Response()
error_code = channeldata.error_code
error_info = ""
...
# pack results
if error_code is None:
error_code = 0
resp.err_no = error_code
resp.err_msg = error_info
return resp
```
**pack_response_package** 的默认实现是将预测结果的字典转化为 RPC response 中的 key 和 value。当默认的 ResponseOp 无法满足结果返回格式要求时,可通过重写下面2个接口自定义返回包打包方法。
| 接口 | 说明 |
| :------------------------------------------: | :-----------------------------------------: |
| init_op(self) | OP初始化,设置默认名称@DAGExecutor |
| pack_response_package(self, channeldata) | 处理接收的RPC数据 |
***
## 3.典型示例
所有Pipeline示例在[examples/pipeline/](../python/examples/pipeline) 目录下,目前有7种类型模型示例:
- [PaddleClas](../python/examples/pipeline/PaddleClas)
- [Detection](../python/examples/pipeline/PaddleDetection)
- [bert](../python/examples/pipeline/bert)
- [imagenet](../python/examples/pipeline/imagenet)
- [imdb_model_ensemble](../python/examples/pipeline/imdb_model_ensemble)
- [ocr](../python/examples/pipeline/ocr)
- [simple_web_service](../python/examples/pipeline/simple_web_service)
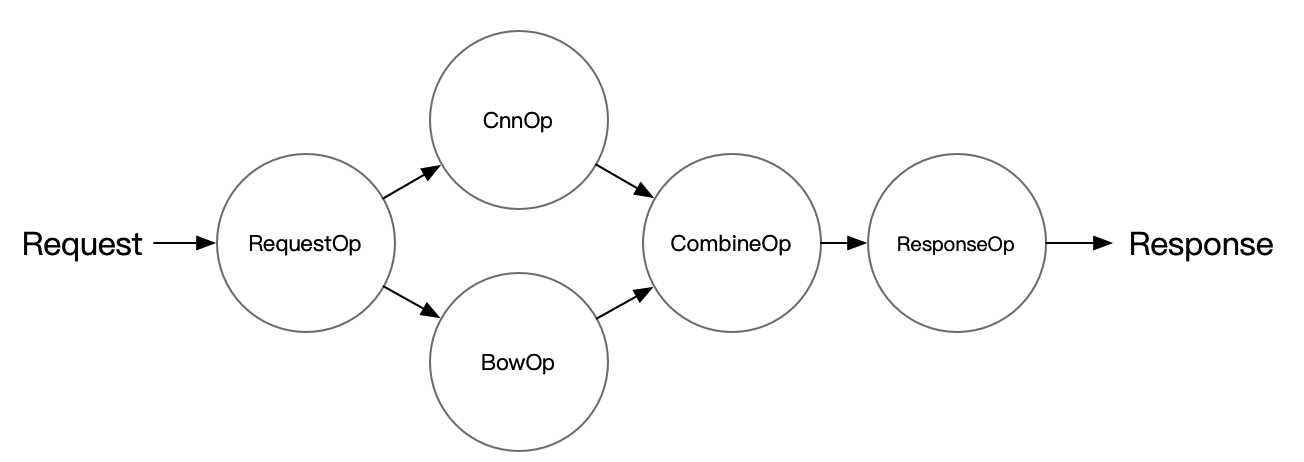
以 imdb_model_ensemble 为例来展示如何使用 Pipeline Serving,相关代码在 `python/examples/pipeline/imdb_model_ensemble` 文件夹下可以找到,例子中的 Server 端结构如下图所示:
### 3.1 Pipeline部署需要的文件
需要五类文件,其中模型文件、配置文件、服务端代码是构建Pipeline服务必备的三个文件。测试客户端和测试数据集为测试准备
- 模型文件
- 配置文件(config.yml)
- 服务级别:服务端口、gRPC线程数、服务超时、重试次数等
- DAG级别:资源类型、开启Trace、性能profile
- OP级别:模型路径、并发度、推理方式、计算硬件、推理超时、自动批量等
- 服务端(web_server.py)
- 服务级别:定义服务名称、读取配置文件、启动服务
- DAG级别:指定多OP之间的拓扑关系
- OP级别:重写OP前后处理
- 测试客户端
- 正确性校验
- 压力测试
- 测试数据集
- 图片、文本、语音等
### 3.2 获取模型文件
```shell
cd python/examples/pipeline/imdb_model_ensemble
sh get_data.sh
python -m paddle_serving_server.serve --model imdb_cnn_model --port 9292 &> cnn.log &
python -m paddle_serving_server.serve --model imdb_bow_model --port 9393 &> bow.log &
```
PipelineServing 也支持本地自动启动 PaddleServingService,请参考 `python/examples/pipeline/ocr` 下的例子。
### 3.3 创建config.yaml
本示例采用了brpc的client连接类型,还可以选择grpc或local_predictor。
```yaml
#rpc端口, rpc_port和http_port不允许同时为空。当rpc_port为空且http_port不为空时,会自动将rpc_port设置为http_port+1
rpc_port: 18070
#http端口, rpc_port和http_port不允许同时为空。当rpc_port可用且http_port为空时,不自动生成http_port
http_port: 18071
#worker_num, 最大并发数。当build_dag_each_worker=True时, 框架会创建worker_num个进程,每个进程内构建grpcSever和DAG
#当build_dag_each_worker=False时,框架会设置主线程grpc线程池的max_workers=worker_num
worker_num: 4
#build_dag_each_worker, False,框架在进程内创建一条DAG;True,框架会每个进程内创建多个独立的DAG
build_dag_each_worker: False
dag:
#op资源类型, True, 为线程模型;False,为进程模型
is_thread_op: True
#重试次数
retry: 1
#使用性能分析, True,生成Timeline性能数据,对性能有一定影响;False为不使用
use_profile: False
#channel的最大长度,默认为0
channel_size: 0
#tracer, 跟踪框架吞吐,每个OP和channel的工作情况。无tracer时不生成数据
tracer:
#每次trace的时间间隔,单位秒/s
interval_s: 10
op:
bow:
# 并发数,is_thread_op=True时,为线程并发;否则为进程并发
concurrency: 1
# client连接类型,brpc, grpc和local_predictor
client_type: brpc
# Serving交互重试次数,默认不重试
retry: 1
# Serving交互超时时间, 单位ms
timeout: 3000
# Serving IPs
server_endpoints: ["127.0.0.1:9393"]
# bow模型client端配置
client_config: "imdb_bow_client_conf/serving_client_conf.prototxt"
# Fetch结果列表,以client_config中fetch_var的alias_name为准
fetch_list: ["prediction"]
# 批量查询Serving的数量, 默认1。batch_size>1要设置auto_batching_timeout,否则不足batch_size时会阻塞
batch_size: 2
# 批量查询超时,与batch_size配合使用
auto_batching_timeout: 2000
cnn:
# 并发数,is_thread_op=True时,为线程并发;否则为进程并发
concurrency: 1
# client连接类型,brpc
client_type: brpc
# Serving交互重试次数,默认不重试
retry: 1
# 预测超时时间, 单位ms
timeout: 3000
# Serving IPs
server_endpoints: ["127.0.0.1:9292"]
# cnn模型client端配置
client_config: "imdb_cnn_client_conf/serving_client_conf.prototxt"
# Fetch结果列表,以client_config中fetch_var的alias_name为准
fetch_list: ["prediction"]
# 批量查询Serving的数量, 默认1。
batch_size: 2
# 批量查询超时,与batch_size配合使用
auto_batching_timeout: 2000
combine:
# 并发数,is_thread_op=True时,为线程并发;否则为进程并发
concurrency: 1
# Serving交互重试次数,默认不重试
retry: 1
# 预测超时时间, 单位ms
timeout: 3000
# 批量查询Serving的数量, 默认1。
batch_size: 2
# 批量查询超时,与batch_size配合使用
auto_batching_timeout: 2000
```
### 3.4 实现Server并启动服务
代码示例中,重点留意3个自定义Op的proprocess、postprocess处理,以及Combin Op初始化列表input_ops=[bow_op, cnn_op],设置Combin Op的前置OP列表。
```python
from paddle_serving_server.pipeline import Op, RequestOp, ResponseOp
from paddle_serving_server.pipeline import PipelineServer
from paddle_serving_server.pipeline.proto import pipeline_service_pb2
from paddle_serving_server.pipeline.channel import ChannelDataEcode
import numpy as np
from paddle_serving_app.reader import IMDBDataset
class ImdbRequestOp(RequestOp):
def init_op(self):
self.imdb_dataset = IMDBDataset()
self.imdb_dataset.load_resource('imdb.vocab')
def unpack_request_package(self, request):
dictdata = {}
for idx, key in enumerate(request.key):
if key != "words":
continue
words = request.value[idx]
word_ids, _ = self.imdb_dataset.get_words_and_label(words)
dictdata[key] = np.array(word_ids)
return dictdata
class CombineOp(Op):
def preprocess(self, input_data):
combined_prediction = 0
for op_name, data in input_data.items():
combined_prediction += data["prediction"]
data = {"prediction": combined_prediction / 2}
return data
read_op = ImdbRequestOp()
bow_op = Op(name="bow",
input_ops=[read_op],
server_endpoints=["127.0.0.1:9393"],
fetch_list=["prediction"],
client_config="imdb_bow_client_conf/serving_client_conf.prototxt",
concurrency=1,
timeout=-1,
retry=1)
cnn_op = Op(name="cnn",
input_ops=[read_op],
server_endpoints=["127.0.0.1:9292"],
fetch_list=["prediction"],
client_config="imdb_cnn_client_conf/serving_client_conf.prototxt",
concurrency=1,
timeout=-1,
retry=1)
combine_op = CombineOp(
name="combine",
input_ops=[bow_op, cnn_op],
concurrency=5,
timeout=-1,
retry=1)
# use default ResponseOp implementation
response_op = ResponseOp(input_ops=[combine_op])
server = PipelineServer()
server.set_response_op(response_op)
server.prepare_server('config.yml')
server.run_server()
```
### 3.5 推理测试
```python
from paddle_serving_client.pipeline import PipelineClient
import numpy as np
client = PipelineClient()
client.connect(['127.0.0.1:18080'])
words = 'i am very sad | 0'
futures = []
for i in range(3):
futures.append(
client.predict(
feed_dict={"words": words},
fetch=["prediction"],
asyn=True))
for f in futures:
res = f.result()
if res["ecode"] != 0:
print(res)
exit(1)
```
***
## 4.高阶用法
### 4.1 业务自定义错误类型
用户可根据业务场景自定义错误码,继承ProductErrCode,在Op的preprocess或postprocess中返回列表中返回,下一阶段处理会根据自定义错误码跳过后置OP处理。
```python
class ProductErrCode(enum.Enum):
"""
ProductErrCode is a base class for recording business error code.
product developers inherit this class and extend more error codes.
"""
pass
```
### 4.2 跳过OP process阶段
preprocess返回结果列表的第二个结果是`is_skip_process=True`表示是否跳过当前OP的process阶段,直接进入postprocess处理
```python
def preprocess(self, input_dicts, data_id, log_id):
"""
In preprocess stage, assembling data for process stage. users can
override this function for model feed features.
Args:
input_dicts: input data to be preprocessed
data_id: inner unique id
log_id: global unique id for RTT
Return:
input_dict: data for process stage
is_skip_process: skip process stage or not, False default
prod_errcode: None default, otherwise, product errores occured.
It is handled in the same way as exception.
prod_errinfo: "" default
"""
# multiple previous Op
if len(input_dicts) != 1:
_LOGGER.critical(
self._log(
"Failed to run preprocess: this Op has multiple previous "
"inputs. Please override this func."))
os._exit(-1)
(_, input_dict), = input_dicts.items()
return input_dict, False, None, ""
```
### 4.3 自定义proto Request 和 Response结构
当默认proto结构不满足业务需求时,同时下面2个文件的proto的Request和Response message结构,保持一致。
> pipeline/gateway/proto/gateway.proto
> pipeline/proto/pipeline_service.proto
再重新编译Serving Server。
### 4.4 自定义URL
grpc gateway处理post请求,默认`method`是`prediction`,例如:127.0.0.1:8080/ocr/prediction。用户可自定义name和method,对于已有url的服务可无缝切换
```proto
service PipelineService {
rpc inference(Request) returns (Response) {
option (google.api.http) = {
post : "/{name=*}/{method=*}"
body : "*"
};
}
};
```
### 4.5 批量推理
Pipeline支持批量推理,通过增大batch size可以提高GPU利用率。Pipeline Pipeline Serving支持3种batch形式以及适用的场景如下:
- 场景1:一个推理请求包含批量数据(batch)
- 单条数据定长,批量变长,数据转成BCHW格式
- 单条数据变长,前处理中将单条数据做padding转成定长
- 场景2:一个推理请求的批量数据拆分成多个小块推理(mini-batch)
- 由于padding会按最长对齐,当一批数据中有个"极大"尺寸数据时会导致推理变慢
- 指定一个块大小,从而缩小"极大"尺寸数据的作用范围
- 场景3:合并多个请求数据批量推理(auto-batching)
- 推理耗时明显长于前后处理,合并多个请求数据推理一次会提高吞吐和GPU利用率
- 要求多个request的数据的shape一致
| 接口 | 说明 |
| :------------------------------------------: | :-----------------------------------------: |
| batch | client发送批量数据,client.predict的batch=True |
| mini-batch | preprocess按list类型返回,参考OCR示例 RecOp的preprocess|
| auto-batching | config.yml中OP级别设置batch_size和auto_batching_timeout |
### 4.7 单机多卡
单机多卡推理,M个OP进程与N个GPU卡绑定,在config.yml中配置3个参数有关系,首先选择进程模式、并发数即进程数,devices是GPU卡ID。绑定方法是进程启动时遍历GPU卡ID,例如启动7个OP进程,config.yml设置devices:0,1,2,那么第1,4,7个启动的进程与0卡绑定,第2,4个启动的进程与1卡绑定,3,6进程与卡2绑定。
- 进程ID: 0 绑定 GPU 卡0
- 进程ID: 1 绑定 GPU 卡1
- 进程ID: 2 绑定 GPU 卡2
- 进程ID: 3 绑定 GPU 卡0
- 进程ID: 4 绑定 GPU 卡1
- 进程ID: 5 绑定 GPU 卡2
- 进程ID: 6 绑定 GPU 卡0
config.yml中硬件配置:
```
#计算硬件ID,当devices为""或不写时为CPU预测;当devices为"0", "0,1,2"时为GPU预测,表示使用的GPU卡
devices: "0,1,2"
```
### 4.8 异构硬件
Pipeline除了支持CPU、GPU之外,还支持在多种异构硬件部署。在config.yml中由device_type和devices。优先使用device_type指定类型,当空缺时根据devices判断。device_type描述如下:
- CPU(Intel) : 0
- GPU : 1
- TensorRT : 2
- CPU(Arm) : 3
- XPU : 4
config.yml中硬件配置:
```
#计算硬件类型: 空缺时由devices决定(CPU/GPU),0=cpu, 1=gpu, 2=tensorRT, 3=arm cpu, 4=kunlun xpu
device_type: 0
#计算硬件ID,优先由device_type决定硬件类型。devices为""或空缺时为CPU预测;当为"0", "0,1,2"时为GPU预测,表示使用的GPU卡
devices: "" # "0,1"
```
### 4.9 低精度推理
Pipeline Serving支持低精度推理,CPU、GPU和TensoRT支持的精度类型如下图所示:
- CPU
- fp32(default)
- fp16
- bf16(mkldnn)
- GPU
- fp32(default)
- fp16
- int8
- Tensor RT
- fp32(default)
- fp16
- int8
参考[simple_web_service](../python/examples/pipeline/simple_web_service)示例
***
## 5.日志追踪
Pipeline服务日志在当前目录的PipelineServingLogs目录下,有3种类型日志,分别是pipeline.log日志、pipeline.log.wf日志、pipeline.tracer日志。
- `pipeline.log` : 记录 debug & info日志信息
- `pipeline.log.wf` : 记录 warning & error日志
- `pipeline.tracer` : 统计各个阶段耗时、channel堆积信息
在服务发生异常时,错误信息会记录在pipeline.log.wf日志中。打印tracer日志要求在config.yml的DAG属性中添加tracer配置。
### 5.1 log唯一标识
Pipeline中有2种id用以串联请求,分别时data_id和log_id,二者区别如下:
- data_id : Pipeline框架生成的自增ID,标记请求唯一性标识
- log_id : 上游模块传入的标识,跟踪多个服务间串联关系,由于用户可不传入或不保证唯一性,因此不能作为唯一性标识
通常,Pipeline框架打印的日志会同时带上data_id和log_id。开启auto-batching后,会使用批量中的第一个data_id标记batch整体,同时框架会在一条日志中打印批量中所有data_id。
### 5.2 日志滚动
Pipeline的日志模块在`logger.py`中定义,使用了`logging.handlers.RotatingFileHandler`支持磁盘日志文件的轮换。根据不同文件级别和日质量分别设置了`maxBytes` 和 `backupCount`,当即将超出预定大小时,将关闭旧文件并打开一个新文件用于输出。
```python
"handlers": {
"f_pipeline.log": {
"class": "logging.handlers.RotatingFileHandler",
"level": "INFO",
"formatter": "normal_fmt",
"filename": os.path.join(log_dir, "pipeline.log"),
"maxBytes": 512000000,
"backupCount": 20,
},
"f_pipeline.log.wf": {
"class": "logging.handlers.RotatingFileHandler",
"level": "WARNING",
"formatter": "normal_fmt",
"filename": os.path.join(log_dir, "pipeline.log.wf"),
"maxBytes": 512000000,
"backupCount": 10,
},
"f_tracer.log": {
"class": "logging.handlers.RotatingFileHandler",
"level": "INFO",
"formatter": "tracer_fmt",
"filename": os.path.join(log_dir, "pipeline.tracer"),
"maxBytes": 512000000,
"backupCount": 5,
},
},
```
***
## 6.性能分析与优化
### 6.1 如何通过 Timeline 工具进行优化
为了更好地对性能进行优化,PipelineServing 提供了 Timeline 工具,对整个服务的各个阶段时间进行打点。
### 6.2 在 Server 端输出 Profile 信息
Server 端用 yaml 中的 `use_profile` 字段进行控制:
```yaml
dag:
use_profile: true
```
开启该功能后,Server 端在预测的过程中会将对应的日志信息打印到标准输出,为了更直观地展现各阶段的耗时,提供 Analyst 模块对日志文件做进一步的分析处理。
使用时先将 Server 的输出保存到文件,以 `profile.txt` 为例,脚本将日志中的时间打点信息转换成 json 格式保存到 `trace` 文件,`trace` 文件可以通过 chrome 浏览器的 tracing 功能进行可视化。
```python
from paddle_serving_server.pipeline import Analyst
import json
import sys
if __name__ == "__main__":
log_filename = "profile.txt"
trace_filename = "trace"
analyst = Analyst(log_filename)
analyst.save_trace(trace_filename)
```
具体操作:打开 chrome 浏览器,在地址栏输入 `chrome://tracing/` ,跳转至 tracing 页面,点击 load 按钮,打开保存的 `trace` 文件,即可将预测服务的各阶段时间信息可视化。
### 6.3 在 Client 端输出 Profile 信息
Client 端在 `predict` 接口设置 `profile=True`,即可开启 Profile 功能。
开启该功能后,Client 端在预测的过程中会将该次预测对应的日志信息打印到标准输出,后续分析处理同 Server。
### 6.4 分析方法
根据pipeline.tracer日志中的各个阶段耗时,按以下公式逐步分析出主要耗时在哪个阶段。
```
单OP耗时:
op_cost = process(pre + mid + post)
OP期望并发数:
op_concurrency = 单OP耗时(s) * 期望QPS
服务吞吐量:
service_throughput = 1 / 最慢OP的耗时 * 并发数
服务平响:
service_avg_cost = ∑op_concurrency 【关键路径】
Channel堆积:
channel_acc_size = QPS(down - up) * time
批量预测平均耗时:
avg_batch_cost = (N * pre + mid + post) / N
```
### 6.5 优化思路
根据长耗时在不同阶段,采用不同的优化方法.
- OP推理阶段(mid-process):
- 增加OP并发度
- 开启auto-batching(前提是多个请求的shape一致)
- 若批量数据中某条数据的shape很大,padding很大导致推理很慢,可使用mini-batch
- 开启TensorRT/MKL-DNN优化
- 开启低精度推理
- OP前处理阶段(pre-process):
- 增加OP并发度
- 优化前处理逻辑
- in/out耗时长(channel堆积>5)
- 检查channel传递的数据大小和延迟
- 优化传入数据,不传递数据或压缩后再传入
- 增加OP并发度
- 减少上游OP并发度