# 命令式编程模式使用教程
从编程范式上说,飞桨兼容支持声明式编程和命令式编程,通俗地讲即静态图和动态图。其实飞桨本没有图的概念,在飞桨的设计中,把一个神经网络定义成一段类似程序的描述,也就是用户在写程序的过程中,就定义了模型表达及计算。在声明式编程模式的控制流实现方面,飞桨借助自己实现的控制流OP而不是python原生的if else和for循环,这使得在飞桨中的定义的program即一个网络模型,可以有一个内部的表达,是可以全局优化编译执行的。考虑对开发者来讲,更愿意使用python原生控制流,飞桨也做了支持,并通过解释方式执行,这就是命令式编程模式。但整体上,这两种编程范式是相对兼容统一的。飞桨将持续发布更完善的命令式编程模式功能,同时保持更强劲的性能。
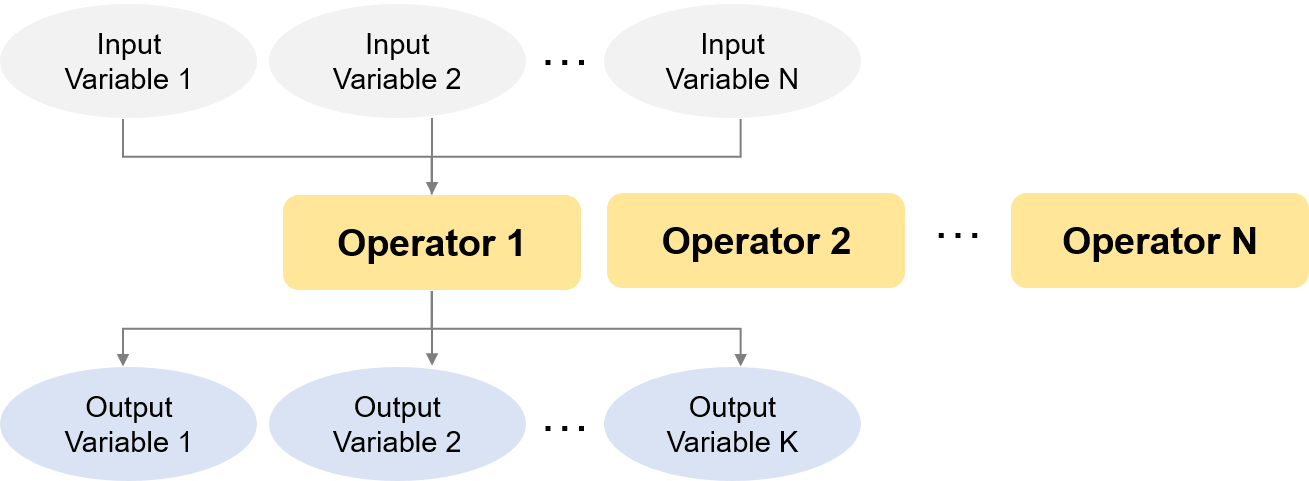
飞桨平台中,将神经网络抽象为计算表示**Operator**(算子,常简称OP)和数据表示**Variable**(变量),如 图1 所示。神经网络的每层操作均由一个或若干**Operator**组成,每个**Operator**接受一系列的**Variable**作为输入,经计算后输出一系列的**Variable**。

图1 Operator和Variable关系示意图
根据**Operator**解析执行方式不同,飞桨支持如下两种编程范式:
* **声明式编程模式(静态图)**:先编译后执行的方式。用户需预先定义完整的网络结构,再对网络结构进行编译优化后,才能执行获得计算结果。
* **命令式编程模式(动态图)**:解析式的执行方式。用户无需预先定义完整的网络结构,每写一行网络代码,即可同时获得计算结果。
举例来说,假设用户写了一行代码:y=x+1,在声明式编程模式下,运行此代码只会往计算图中插入一个Tensor加1的**Operator**,此时**Operator**并未真正执行,无法获得y的计算结果。但在命令式编程模式下,所有**Operator**均是即时执行的,运行完此代码后**Operator**已经执行完毕,用户可直接获得y的计算结果。
## 为什么命令式编程模式越来越流行?
声明式编程模式作为较早提出的一种编程范式,提供丰富的 API ,能够快速的实现各种模型;并且可以利用全局的信息进行图优化,优化性能和显存占用;在预测部署方面也可以实现无缝衔接。 但具体实践中声明式编程模式存在如下问题:
1. 采用先编译后执行的方式,组网阶段和执行阶段割裂,导致调试不方便。
2. 属于一种符号化的编程方式,要学习新的编程方式,有一定的入门门槛。
3. 网络结构固定,对于一些树结构的任务支持的不够好。
命令式编程模式的出现很好的解决了这些问题,存在以下优势:
1. 代码运行完成后,可以立马获取结果,支持使用 IDE 断点调试功能,使得调试更方便。
2. 属于命令式的编程方式,与编写Python的方式类似,更容易上手。
3. 网络的结构在不同的层次中可以变化,使用更灵活。
综合以上优势,使得命令式编程模式越来越受开发者的青睐,本章侧重介绍在飞桨中命令式编程模式的编程方法,包括如下几部分:
1. 如何开启命令式编程模式
2. 如何使用命令式编程模式进行模型训练
3. 如何基于命令式编程模式进行多卡训练
4. 如何部署命令式编程模式模型
5. 命令式编程模式常见的使用技巧,如中间变量值/梯度打印、断点调试、阻断反向传递,以及某些场景下如何改写为声明式编程模式运行。
## 1. 开启命令式编程模式
目前飞桨默认的模式是声明式编程模式,采用基于 context (上下文)的管理方式开启命令式编程模式:
```
with fluid.dygraph.guard()
```
我们先通过一个实例,观察一下命令式编程模式开启前后执行方式的差别:
```python
import numpy as np
import paddle.fluid as fluid
from paddle.fluid.dygraph.base import to_variable
main_program = fluid.Program()
startup_program = fluid.Program()
with fluid.program_guard(main_program=main_program, startup_program=startup_program):
# 利用np.ones函数构造出[2*2]的二维数组,值为1
data = np.ones([2, 2], np.float32)
# 声明式编程模式下,使用layers.data构建占位符用于数据输入
x = fluid.layers.data(name='x', shape=[2], dtype='float32')
print('In static mode, after calling layers.data, x = ', x)
# 声明式编程模式下,对Variable类型的数据执行x=x+10操作
x += 10
# 在声明式编程模式下,需要用户显示指定运行设备
# 此处调用fluid.CPUPlace() API来指定在CPU设备上运行程序
place = fluid.CPUPlace()
# 创建“执行器”,并用place参数指明需要在何种设备上运行
exe = fluid.Executor(place=place)
# 初始化操作,包括为所有变量分配空间等,比如上面的‘x’,在下面这行代码执行后才会被分配实际的内存空间
exe.run(fluid.default_startup_program())
# 使用执行器“执行”已经记录的所有操作,在本例中即执行layers.data、x += 10操作
# 在调用执行器的run接口时,可以通过fetch_list参数来指定要获取哪些变量的计算结果,这里我们要获取‘x += 10’执行完成后‘x’的结果;
# 同时也可以通过feed参数来传入数据,这里我们将data数据传递给‘fluid.layers.data’指定的‘x’。
data_after_run = exe.run(fetch_list=[x], feed={'x': data})
# 此时我们打印执行器返回的结果,可以看到“执行”后,Tensor中的数据已经被赋值并进行了运算,每个元素的值都是11
print('In static mode, data after run:', data_after_run)
# 开启命令式编程模式
with fluid.dygraph.guard():
# 命令式编程模式下,将numpy的ndarray类型的数据转换为Variable类型
x = fluid.dygraph.to_variable(data)
print('In DyGraph mode, after calling dygraph.to_variable, x = ', x)
# 命令式编程模式下,对Variable类型的数据执行x=x+10操作
x += 10
# 命令式编程模式下,调用Variable的numpy函数将Variable类型的数据转换为numpy的ndarray类型的数据
print('In DyGraph mode, data after run:', x.numpy())
```
In static mode, after calling layers.data, x = name: "x"
type {
type: LOD_TENSOR
lod_tensor {
tensor {
data_type: FP32
dims: -1
dims: 2
}
lod_level: 0
}
}
persistable: false
In static mode, data after run: [array([[11., 11.],
[11., 11.]], dtype=float32)]
In DyGraph mode, after calling dygraph.to_variable, x = name generated_var_0, dtype: VarType.FP32 shape: [2, 2] lod: {}
dim: 2, 2
layout: NCHW
dtype: float
data: [1 1 1 1]
In DyGraph mode, data after run: [[11. 11.]
[11. 11.]]
/opt/conda/envs/python35-paddle120-env/lib/python3.7/site-packages/paddle/fluid/executor.py:804: UserWarning: There are no operators in the program to be executed. If you pass Program manually, please use fluid.program_guard to ensure the current Program is being used.
warnings.warn(error_info)
从以上输出结果可以看出:
* 命令式编程模式下,所有操作在运行时就已经完成,更接近我们平时的编程方式,可以随时获取每一个操作的执行结果。
* 声明式编程模式下,过程中并没有实际执行操作,上述例子中可以看到只能打印声明的类型,最后需要调用执行器来统一执行所有操作,计算结果需要通过执行器统一返回。
## 2. 使用命令式编程模式进行模型训练
接下来我们以一个简单的手写体识别任务为例,说明如何使用飞桨的命令式编程模式来进行模型的训练。包括如下步骤:
* 2.1 定义数据读取器:读取数据和预处理操作。
* 2.2 定义模型和优化器:搭建神经网络结构。
* 2.3 训练:配置优化器、学习率、训练参数。循环调用训练过程,循环执行“前向计算 + 损失函数 + 反向传播”。
* 2.4 评估测试:将训练好的模型保存并评估测试。
最后介绍一下:
* 2.5 模型参数的保存和加载方法。
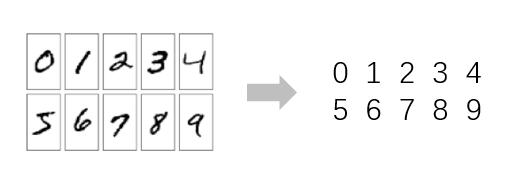
在前面章节我们已经了解到,“手写数字识别”的任务是:根据一个28 * 28像素的图像,识别图片中的数字。可采用MNIST数据集进行训练。

有关该任务和数据集的详细介绍,可参考:[初识飞桨手写数字识别模型](https://aistudio.baidu.com/aistudio/projectdetail/224342)
### 2.1 定义数据读取器
飞桨提供了多个封装好的数据集API,本任务我们可以通过调用 [paddle.dataset.mnist](https://www.paddlepaddle.org.cn/documentation/docs/zh/api_cn/data/dataset_cn.html) 的 train 函数和 test 函数,直接获取处理好的 MNIST 训练集和测试集;然后调用 [paddle.batch](https://www.paddlepaddle.org.cn/documentation/docs/zh/api_cn/io_cn/batch_cn.html#batch) 接口返回 reader 的装饰器,该 reader 将输入 reader 的数据打包成指定 BATCH_SIZE 大小的批处理数据。
```python
import paddle
# 定义批大小
BATCH_SIZE = 64
# 通过调用paddle.dataset.mnist的train函数和test函数来构造reader
train_reader = paddle.batch(
paddle.dataset.mnist.train(), batch_size=BATCH_SIZE, drop_last=True)
test_reader = paddle.batch(
paddle.dataset.mnist.test(), batch_size=BATCH_SIZE, drop_last=True)
```
Cache file /home/aistudio/.cache/paddle/dataset/mnist/train-images-idx3-ubyte.gz not found, downloading https://dataset.bj.bcebos.com/mnist/train-images-idx3-ubyte.gz
Begin to download
Download finished
Cache file /home/aistudio/.cache/paddle/dataset/mnist/train-labels-idx1-ubyte.gz not found, downloading https://dataset.bj.bcebos.com/mnist/train-labels-idx1-ubyte.gz
Begin to download
........
Download finished
Cache file /home/aistudio/.cache/paddle/dataset/mnist/t10k-images-idx3-ubyte.gz not found, downloading https://dataset.bj.bcebos.com/mnist/t10k-images-idx3-ubyte.gz
Begin to download
Download finished
Cache file /home/aistudio/.cache/paddle/dataset/mnist/t10k-labels-idx1-ubyte.gz not found, downloading https://dataset.bj.bcebos.com/mnist/t10k-labels-idx1-ubyte.gz
Begin to download
..
Download finished
### 2.2 定义模型和优化器
本节我们采用如下网络模型,该模型可以很好的完成“手写数字识别”的任务。模型由卷积层 -> 池化层 -> 卷积层 -> 池化层 -> 全连接层组成,池化层即降采样层。

在开始构建网络模型前,需要了解如下信息:
> 在命令式编程模式中,参数和变量的存储管理方式与声明式编程模式不同。命令式编程模式下,网络中学习的参数和中间变量,生命周期和 Python 对象的生命周期是一致的。简单来说,一个 Python 对象的生命周期结束,相应的存储空间就会释放。
对于一个网络模型,在模型学习的过程中参数会不断更新,所以参数需要在整个学习周期内一直保持存在,因此需要一个机制来保持网络的所有的参数不被释放,飞桨的命令式编程模式采用了继承自 [fluid.dygraph.Layer](https://www.paddlepaddle.org.cn/documentation/docs/zh/api_cn/dygraph_cn/Layer_cn.html#layer) 的面向对象设计的方法来管理所有的参数,该方法也更容易模块化组织代码。
下面介绍如何通过继承 fluid.dygraph.Layers 实现一个简单的ConvPool层;该层由一个 [卷积层](https://www.paddlepaddle.org.cn/documentation/docs/zh/api_cn/dygraph_cn/Conv2D_cn.html#conv2d) 和一个 [池化层](https://www.paddlepaddle.org.cn/documentation/docs/zh/api_cn/dygraph_cn/Pool2D_cn.html#pool2d) 组成。
```python
import paddle.fluid as fluid
from paddle.fluid.dygraph.nn import Conv2D, Pool2D
# 定义SimpleImgConvPool网络,必须继承自fluid.dygraph.Layer
# 该网络由一个卷积层和一个池化层组成
class SimpleImgConvPool(fluid.dygraph.Layer):
# 在__init__构造函数中会执行变量的初始化、参数初始化、子网络初始化的操作
# 本例中执行了Conv2D和Pool2D网络的初始化操作
def __init__(self,
num_channels,
num_filters,
filter_size,
pool_size,
pool_stride,
pool_padding=0,
pool_type='max',
global_pooling=False,
conv_stride=1,
conv_padding=0,
conv_dilation=1,
conv_groups=1,
act=None,
use_cudnn=False,
param_attr=None,
bias_attr=None):
super(SimpleImgConvPool, self).__init__()
# Conv2D网络的初始化
self._conv2d = Conv2D(
num_channels=num_channels,
num_filters=num_filters,
filter_size=filter_size,
stride=conv_stride,
padding=conv_padding,
dilation=conv_dilation,
groups=conv_groups,
param_attr=None,
bias_attr=None,
act=act,
use_cudnn=use_cudnn)
# Pool2D网络的初始化
self._pool2d = Pool2D(
pool_size=pool_size,
pool_type=pool_type,
pool_stride=pool_stride,
pool_padding=pool_padding,
global_pooling=global_pooling,
use_cudnn=use_cudnn)
# forward函数实现了SimpleImgConvPool网络的执行逻辑
def forward(self, inputs):
x = self._conv2d(inputs)
x = self._pool2d(x)
return x
```
可以看出实现一个 ConvPool 层(即SimpleImgConvPool)分为两个步骤:
1. 定义 \_\_init\_\_ 构造函数。
在 \_\_init\_\_ 构造函数中,通常会执行变量初始化、参数初始化、子网络初始化等操作,执行这些操作时不依赖于输入的动态信息。这里我们对子网络(卷积层和池化层)做了初始化操作。
2. 定义 forward 函数。
该函数负责定义网络运行时的执行逻辑,将会在每一轮训练/预测中被调用。上述示例中,forward 函数的逻辑是先执行一个卷积操作,然后执行一个池化操作。
接下来我们介绍如何利用子网络组合出MNIST网络,该网络由两个 SimpleImgConvPool 子网络和一个全连接层组成。
```python
# 定义MNIST网络,必须继承自fluid.dygraph.Layer
# 该网络由两个SimpleImgConvPool子网络、reshape层、matmul层、softmax层、accuracy层组成
class MNIST(fluid.dygraph.Layer):
# 在__init__构造函数中会执行变量的初始化、参数初始化、子网络初始化的操作
# 本例中执行了self.pool_2_shape变量、matmul层中参数self.output_weight、SimpleImgConvPool子网络的初始化操作
def __init__(self):
super(MNIST, self).__init__()
self._simple_img_conv_pool_1 = SimpleImgConvPool(
1, 20, 5, 2, 2, act="relu")
self._simple_img_conv_pool_2 = SimpleImgConvPool(
20, 50, 5, 2, 2, act="relu")
# self.pool_2_shape变量定义了经过self._simple_img_conv_pool_2层之后的数据
# 除了batch_size维度之外其他维度的乘积
self.pool_2_shape = 50 * 4 * 4
# self.pool_2_shape、SIZE定义了self.output_weight参数的维度
SIZE = 10
# 定义全连接层的参数
self.output_weight = self.create_parameter(
[self.pool_2_shape, 10])
# forward函数实现了MNIST网络的执行逻辑
def forward(self, inputs, label=None):
x = self._simple_img_conv_pool_1(inputs)
x = self._simple_img_conv_pool_2(x)
x = fluid.layers.reshape(x, shape=[-1, self.pool_2_shape])
x = fluid.layers.matmul(x, self.output_weight)
x = fluid.layers.softmax(x)
if label is not None:
acc = fluid.layers.accuracy(input=x, label=label)
return x, acc
else:
return x
```
在这个复杂的 Layer 的 \_\_init\_\_ 构造函数中,包含了更多基础的操作:
1. 变量的初始化:self.pool_2_shape = 50 * 4 * 4
2. 全连接层参数的创建,通过调用 [Layer](https://www.paddlepaddle.org.cn/documentation/docs/zh/api_cn/dygraph_cn/Layer_cn.html#layer) 的 [create_parameter](https://www.paddlepaddle.org.cn/documentation/docs/zh/api_cn/dygraph_cn/Layer_cn.html#create_parameter) 接口:self.output_weight = self.create_parameter( [ self.pool_2_shape, 10])
3. 子 Layer 的构造:self._simple_img_conv_pool_1、self._simple_img_conv_pool_2
forward 函数的实现和 前面SimpleImgConvPool 类中的实现方式类似。
接下来定义MNIST类的对象,以及优化器。这里优化器我们选择 [AdamOptimizer](https://www.paddlepaddle.org.cn/documentation/docs/zh/api_cn/optimizer_cn/AdamOptimizer_cn.html#adamoptimizer) ,通过 [Layer](https://www.paddlepaddle.org.cn/documentation/docs/zh/api_cn/dygraph_cn/Layer_cn.html#layer) 的 [parameters](https://www.paddlepaddle.org.cn/documentation/docs/zh/api_cn/dygraph_cn/Layer_cn.html#parameters) 接口来读取该网络的全部参数,实现如下:
```python
import numpy as np
from paddle.fluid.optimizer import AdamOptimizer
from paddle.fluid.dygraph.base import to_variable
with fluid.dygraph.guard():
# 定义MNIST类的对象
mnist = MNIST()
# 定义优化器为AdamOptimizer,学习旅learning_rate为0.001
# 注意命令式编程模式下必须传入parameter_list参数,该参数为需要优化的网络参数,本例需要优化mnist网络中的所有参数
adam = AdamOptimizer(learning_rate=0.001, parameter_list=mnist.parameters())
```
### 2.3 训练
当我们定义好上述网络结构之后,就可以进行训练了。
实现如下:
* 数据读取:读取每批数据,通过 [to_variable](https://www.paddlepaddle.org.cn/documentation/docs/zh/api_cn/dygraph_cn/to_variable_cn.html#to-variable) 接口将 numpy.ndarray 对象转换为 [Variable](https://www.paddlepaddle.org.cn/documentation/docs/zh/api_cn/fluid_cn/Variable_cn.html#variable) 类型的对象。
* 网络正向执行:在正向执行时,用户构造出img和label之后,可利用类似函数调用的方式(如:mnist(img, label))传递参数执行对应网络的 forward 函数。
* 计算损失值:根据网络返回的计算结果,计算损失值,便于后续执行反向计算。
* 执行反向计算:需要用户主动调用 [backward](https://www.paddlepaddle.org.cn/documentation/docs/zh/api_cn/fluid_cn/Variable_cn.html#backward) 接口来执行反向计算。
* 参数更新:调用优化器的 [minimize](https://www.paddlepaddle.org.cn/documentation/docs/zh/api_cn/optimizer_cn/AdamOptimizer_cn.html#minimize) 接口对参数进行更新。
* 梯度重置:将本次计算的梯度值清零,以便进行下一次迭代和梯度更新。
* 保存训练好的模型:通过 [Layer](https://www.paddlepaddle.org.cn/documentation/docs/zh/api_cn/dygraph_cn/Layer_cn.html#layer) 的 [state_dict](https://www.paddlepaddle.org.cn/documentation/docs/zh/api_cn/dygraph_cn/Layer_cn.html#state_dict) 获取模型的参数;通过 [save_dygraph](https://www.paddlepaddle.org.cn/documentation/docs/zh/api_cn/dygraph_cn/save_dygraph_cn.html#save-dygraph) 对模型参数进行保存。
```python
import numpy as np
from paddle.fluid.optimizer import AdamOptimizer
from paddle.fluid.dygraph.base import to_variable
with fluid.dygraph.guard():
# 定义MNIST类的对象
mnist = MNIST()
# 定义优化器为AdamOptimizer,学习旅learning_rate为0.001
# 注意命令式编程模式下必须传入parameter_list参数,该参数为需要优化的网络参数,本例需要优化mnist网络中的所有参数
adam = AdamOptimizer(learning_rate=0.001, parameter_list=mnist.parameters())
# 设置全部样本的训练次数
epoch_num = 5
# 执行epoch_num次训练
for epoch in range(epoch_num):
# 读取训练数据进行训练
for batch_id, data in enumerate(train_reader()):
dy_x_data = np.array([x[0].reshape(1, 28, 28) for x in data]).astype('float32')
y_data = np.array([x[1] for x in data]).astype('int64').reshape(-1, 1)
#将ndarray类型的数据转换为Variable类型
img = to_variable(dy_x_data)
label = to_variable(y_data)
# 网络正向执行
cost, acc = mnist(img, label)
# 计算损失值
loss = fluid.layers.cross_entropy(cost, label)
avg_loss = fluid.layers.mean(loss)
# 执行反向计算
avg_loss.backward()
# 参数更新
adam.minimize(avg_loss)
# 将本次计算的梯度值清零,以便进行下一次迭代和梯度更新
mnist.clear_gradients()
# 输出对应epoch、batch_id下的损失值
if batch_id % 100 == 0:
print("Loss at epoch {} step {}: {:}".format(
epoch, batch_id, avg_loss.numpy()))
# 保存训练好的模型
model_dict = mnist.state_dict()
fluid.save_dygraph(model_dict, "save_temp")
```
Loss at epoch 0 step 0: [3.362183]
Loss at epoch 0 step 100: [0.20108832]
Loss at epoch 0 step 200: [0.1681692]
Loss at epoch 0 step 300: [0.11894853]
Loss at epoch 0 step 400: [0.13005154]
Loss at epoch 0 step 500: [0.10004535]
Loss at epoch 0 step 600: [0.11465541]
Loss at epoch 0 step 700: [0.14584845]
Loss at epoch 0 step 800: [0.21515566]
Loss at epoch 0 step 900: [0.13847716]
Loss at epoch 1 step 0: [0.03004131]
Loss at epoch 1 step 100: [0.1855965]
Loss at epoch 1 step 200: [0.07302501]
Loss at epoch 1 step 300: [0.02016284]
Loss at epoch 1 step 400: [0.03899964]
Loss at epoch 1 step 500: [0.05415711]
Loss at epoch 1 step 600: [0.09633664]
Loss at epoch 1 step 700: [0.07155745]
Loss at epoch 1 step 800: [0.13023862]
Loss at epoch 1 step 900: [0.09051394]
Loss at epoch 2 step 0: [0.00580437]
Loss at epoch 2 step 100: [0.1506507]
Loss at epoch 2 step 200: [0.03713503]
Loss at epoch 2 step 300: [0.01145383]
Loss at epoch 2 step 400: [0.0497771]
### 2.4 评估测试
模型训练完成,我们已经保存了训练好的模型,接下来进行评估测试。某些OP(如 dropout、batch_norm)需要区分训练模式和评估模式,以标识不同的执行状态。飞桨中OP默认采用的是训练模式(train mode),可通过如下方法切换:
```
model.eval() #切换到评估模式
model.train() #切换到训练模式
```
模型评估测试的实现如下:
* 首先定义 MNIST 类的对象 mnist_eval,然后通过 [load_dygraph](https://www.paddlepaddle.org.cn/documentation/docs/zh/api_cn/dygraph_cn/load_dygraph_cn.html#load-dygraph) 接口加载保存好的模型参数,通过 [Layer](https://www.paddlepaddle.org.cn/documentation/docs/zh/api_cn/dygraph_cn/Layer_cn.html#layer) 的 [set_dict](https://www.paddlepaddle.org.cn/documentation/docs/zh/api_cn/dygraph_cn/Layer_cn.html#set_dict) 接口将参数导入到模型中,通过 [Layer](https://www.paddlepaddle.org.cn/documentation/docs/zh/api_cn/dygraph_cn/Layer_cn.html#layer) 的 eval 接口切换到预测评估模式。
* 读取测试数据执行网络正向计算,进行评估测试,输出不同 batch 数据下损失值和准确率的平均值。
```python
with fluid.dygraph.guard():
# 定义MNIST类的对象
mnist_eval = MNIST()
# 加载保存的模型
model_dict, _ = fluid.load_dygraph("save_temp")
mnist_eval.set_dict(model_dict)
print("checkpoint loaded")
# 切换到预测评估模式
mnist_eval.eval()
acc_set = []
avg_loss_set = []
# 读取测试数据进行评估测试
for batch_id, data in enumerate(test_reader()):
dy_x_data = np.array([x[0].reshape(1, 28, 28)
for x in data]).astype('float32')
y_data = np.array(
[x[1] for x in data]).astype('int64').reshape(-1, 1)
# 将ndarray类型的数据转换为Variable类型
img = to_variable(dy_x_data)
label = to_variable(y_data)
# 网络正向执行
prediction, acc = mnist_eval(img, label)
# 计算损失值
loss = fluid.layers.cross_entropy(input=prediction, label=label)
avg_loss = fluid.layers.mean(loss)
acc_set.append(float(acc.numpy()))
avg_loss_set.append(float(avg_loss.numpy()))
# 输出不同 batch 数据下损失值和准确率的平均值
acc_val_mean = np.array(acc_set).mean()
avg_loss_val_mean = np.array(avg_loss_set).mean()
print("Eval avg_loss is: {}, acc is: {}".format(avg_loss_val_mean, acc_val_mean))
```
### 2.5 模型参数的保存和加载
在命令式编程模式下,模型和优化器在不同的模块中,所以模型和优化器分别在不同的对象中存储,使得模型参数和优化器信息需分别存储。
因此模型的保存需要单独调用模型和优化器中的 state_dict() 接口,同样模型的加载也需要单独进行处理。
保存模型 :
1. 保存模型参数:首先通过 minist.state_dict 函数获取 mnist 网络的所有参数,然后通过 fluid.save_dygraph 函数将获得的参数保存至以 save_path 为前缀的文件中。
1. 保存优化器信息:首先通过 adam.state_dict 函数获取 adam 优化器的信息,然后通过 fluid.save_dygraph 函数将获得的参数保存至以 save_path 为前缀的文件中。
* [Layer](https://www.paddlepaddle.org.cn/documentation/docs/zh/api_cn/dygraph_cn/Layer_cn.html#layer) 的 [state_dict](https://www.paddlepaddle.org.cn/documentation/docs/zh/api_cn/dygraph_cn/Layer_cn.html#state_dict) 接口:该接口可以获取当前层及其子层的所有参数,并将参数存放在 dict 结构中。
* [Optimizer](https://www.paddlepaddle.org.cn/documentation/docs/zh/api_cn/optimizer_cn/AdamOptimizer_cn.html#adamoptimizer) 的 state_dict 接口:该接口可以获取优化器的信息,并将信息存放在 dict 结构中。其中包含优化器使用的所有变量,例如对于 Adam 优化器,包括 beta1、beta2、momentum 等信息。注意如果该优化器的 minimize 函数没有被调用过,则优化器的信息为空。
* [save_dygraph](https://www.paddlepaddle.org.cn/documentation/docs/zh/api_cn/dygraph_cn/save_dygraph_cn.html#save-dygraph) 接口:该接口将传入的参数或优化器的 dict 保存到磁盘上。
```
# 保存模型参数
1. fluid.save_dygraph(minist.state_dict(), “save_path”)
# 保存优化器信息
2. fluid.save_dygraph(adam.state_dict(), “save_path”)
```
加载模型:
1. 通过 fluid.load_dygraph 函数获取模型参数信息 model_state 和优化器信息 opt_state;
1. 通过 mnist.set_dict 函数用获取的模型参数信息设置 mnist 网络的参数
1. 通过 adam.set_dict 函数用获取的优化器信息设置 adam 优化器信息。
* [Layer](https://www.paddlepaddle.org.cn/documentation/docs/zh/api_cn/dygraph_cn/Layer_cn.html#layer) 的 [set_dict](https://www.paddlepaddle.org.cn/documentation/docs/zh/api_cn/dygraph_cn/Layer_cn.html#set_dict) 接口:该接口根据传入的 dict 结构设置参数,所有参数将由 dict 结构中的 Tensor 设置。
* [Optimizer](https://www.paddlepaddle.org.cn/documentation/docs/zh/api_cn/optimizer_cn/AdamOptimizer_cn.html#adamoptimizer) 的 set_dict 接口:该接口根据传入的 dict 结构设置优化器信息,例如对于 Adam 优化器,包括 beta1、beta2、momentum 等信息。如果使用了 LearningRateDecay ,则 global_step 信息也将会被设置。
* [load_dygraph](https://www.paddlepaddle.org.cn/documentation/docs/zh/api_cn/dygraph_cn/load_dygraph_cn.html#load-dygraph) 接口:该接口尝试从磁盘中加载参数或优化器的 dict 。
```
# 获取模型参数和优化器信息
1. model_state, opt_state= fluid.load_dygraph(“save_path”)
# 加载模型参数
2. mnist.set_dict(model_state)
# 加载优化器信息
3. adam.set_dict(opt_state)
```
## 3. 多卡训练
针对数据量、计算量较大的任务,我们需要多卡并行训练,以提高训练效率。目前命令式编程模式可支持GPU的单机多卡训练方式,在命令式编程模式中多卡的启动和单卡略有不同,命令式编程模式多卡通过 Python 基础库 subprocess.Popen 在每一张 GPU 上启动单独的 Python 程序的方式,每张卡的程序独立运行,只是在每一轮梯度计算完成之后,所有的程序进行梯度的同步,然后更新训练的参数。
我们通过一个实例了解如何进行多卡训练:
>由于AI Studio上未配置多卡环境,所以本实例需在本地构建多卡环境后运行。
1. 本实例仍然采用前面定义的 MNIST 网络,可将前面定义的 SimpleImgConvPool、MNIST 网络结构、相关的库导入代码、以及下面多卡训练的示例代码拷贝至本地文件 train.py 中。
```python
import numpy as np
from paddle.fluid.optimizer import AdamOptimizer
from paddle.fluid.dygraph.base import to_variable
# 通过 Env() 的 dev_id 设置程序运行的设备
place = fluid.CUDAPlace(fluid.dygraph.parallel.Env().dev_id)
with fluid.dygraph.guard(place):
# 准备多卡环境
strategy = fluid.dygraph.parallel.prepare_context()
epoch_num = 5
BATCH_SIZE = 64
mnist = MNIST()
adam = fluid.optimizer.AdamOptimizer(learning_rate=0.001, parameter_list=mnist.parameters())
# 数据并行模块
mnist = fluid.dygraph.parallel.DataParallel(mnist, strategy)
train_reader = paddle.batch(
paddle.dataset.mnist.train(), batch_size=BATCH_SIZE, drop_last=True)
# 数据切分
train_reader = fluid.contrib.reader.distributed_batch_reader(
train_reader)
for epoch in range(epoch_num):
for batch_id, data in enumerate(train_reader()):
dy_x_data = np.array([x[0].reshape(1, 28, 28)
for x in data]).astype('float32')
y_data = np.array(
[x[1] for x in data]).astype('int64').reshape(-1, 1)
img = fluid.dygraph.to_variable(dy_x_data)
label = fluid.dygraph.to_variable(y_data)
label.stop_gradient = True
# 网络正向执行
cost, acc = mnist(img, label)
# 计算损失值
loss = fluid.layers.cross_entropy(cost, label)
avg_loss = fluid.layers.mean(loss)
# 单步训练:首先对 loss 进行归一化,然后计算单卡的梯度,最终将所有的梯度聚合
avg_loss = mnist.scale_loss(avg_loss)
avg_loss.backward()
mnist.apply_collective_grads()
# 参数更新
adam.minimize(avg_loss)
# 将本次计算的梯度值清零,以便进行下一次迭代和梯度更新
mnist.clear_gradients()
# 输出对应epoch、batch_id下的损失值
if batch_id % 100 == 0 and batch_id is not 0:
print("epoch: {}, batch_id: {}, loss is: {}".format(epoch, batch_id, avg_loss.numpy()))
```
2、飞桨命令式编程模式多进程多卡模型训练启动时,需要指定使用的 GPU,比如使用 0,1 卡,可执行如下命令启动训练:
```
CUDA_VISIBLE_DEVICES=0,1 python -m paddle.distributed.launch --log_dir ./mylog train.py
```
其中 log_dir 为存放 log 的地址,train.py 为程序名。
执行结果如下:
```
----------- Configuration Arguments -----------
cluster_node_ips: 127.0.0.1
log_dir: ./mylog
node_ip: 127.0.0.1
print_config: True
selected_gpus: 0,1
started_port: 6170
training_script: train.py
training_script_args: []
use_paddlecloud: False
------------------------------------------------
trainers_endpoints: 127.0.0.1:6170,127.0.0.1:6171 , node_id: 0 , current_node_ip: 127.0.0.1 , num_nodes: 1 , node_ips: ['127.0.0.1'] , nranks: 2
```
此时,程序会将每个进程的输出 log 导出到 ./mylog 路径下,可以打开 workerlog.0 和 workerlog.1 来查看结果:
```
.
├── mylog
│ ├── workerlog.0
│ └── workerlog.1
└── train.py
```
总结一下,多卡训练相比单卡训练,有如下步骤不同:
1. 通过 Env() 的 dev_id 设置程序运行的设备。
```
place = fluid.CUDAPlace(fluid.dygraph.parallel.Env().dev_id)
with fluid.dygraph.guard(place):
```
2. 准备多卡环境。
```
strategy = fluid.dygraph.parallel.prepare_context()
```
3. 数据并行模块。
在数据并行的时候,我们需要存储和初始化一些多卡相关的信息,这些信息和操作放在 DataParallel 类中,使用的时候,我们需要利用 model(定义的模型) 和 strategy(第二步得到的多卡环境) 信息初始化 DataParallel。
```
mnist = fluid.dygraph.parallel.DataParallel(mnist, strategy)
```
4. 数据切分。
数据切分是一个非常重要的流程,是为了防止每张卡在每一轮训练见到的数据都一样,可以使用 distributed_batch_reader 对单卡的 reader 进行进行切分处理。 用户也可以其他的策略来达到数据切分的目的,比如事先分配好每张卡的数据,这样就可以使用单卡的 reader ,不使用 distributed_batch_reader。
```
train_reader = fluid.contrib.reader.distributed_batch_reader(train_reader)
```
5. 单步训练。
首先对 loss 进行归一化,然后计算单卡的梯度,最终将所有的梯度聚合。
```
avg_loss = mnist.scale_loss(avg_loss)
avg_loss.backward()
mnist.apply_collective_grads()
```
6. 模型保存。
和单卡不同,多卡训练时需逐个进程执行保存操作,多个进程同时保存会使模型文件格式出错。
```
if fluid.dygraph.parallel.Env().local_rank == 0:
fluid.save_dygraph(mnist.state_dict, “path”)
```
7. 评估测试。
对模型进行评估测试时,如果需要加载模型,须确保评估和保存的操作在同一个进程中,否则可能出现模型尚未保存完成,即启动评估,造成加载出错的问题。如果不需要加载模型,则没有这个问题,在一个进程或多个进程中评估均可。
## 4. 模型部署
命令式编程模式虽然有非常多的优点,但是如果用户希望使用 C++ 部署已经训练好的模型,会存在一些不便利。比如,命令式编程模式中可使用 Python 原生的控制流,包含 if/else、switch、for/while,这些控制流需要通过一定的机制才能映射到 C++ 端,实现在 C++ 端的部署。
- 如果用户使用的 if/else、switch、for/while 与输入(包括输入的值和 shape )无关,则可以使用如下命令式编程模式模型部署方案:
- 使用 TracedLayer 将前向命令式编程模式模型转换为声明式编程模式模型。可以将命令式编程模式保存后做在线C++预测;除此以外,用户也可使用转换后的声明式编程模式模型在Python端做预测,通常比原先的命令式编程模式性能更好。
- 所有的TracedLayer对象均不应通过构造函数创建,而需通过调用静态方法 TracedLayer.trace(layer, inputs) 创建。
- TracedLayer使用 Executor 和 CompiledProgram 运行声明式编程模式模型。
```python
from paddle.fluid.dygraph import TracedLayer
with fluid.dygraph.guard():
# 定义MNIST类的对象
mnist = MNIST()
in_np = np.random.random([10, 1, 28, 28]).astype('float32')
# 将numpy的ndarray类型的数据转换为Variable类型
input_var = fluid.dygraph.to_variable(in_np)
# 通过 TracerLayer.trace 接口将命令式编程模式模型转换为声明式编程模式模型
out_dygraph, static_layer = TracedLayer.trace(mnist, inputs=[input_var])
save_dirname = './saved_infer_model'
# 将转换后的模型保存
static_layer.save_inference_model(save_dirname, feed=[0], fetch=[0])
```
```python
# 声明式编程模式中需要使用执行器执行之前已经定义好的网络
place = fluid.CPUPlace()
exe = fluid.Executor(place)
program, feed_vars, fetch_vars = fluid.io.load_inference_model(save_dirname, exe)
# 声明式编程模式中需要调用执行器的run方法执行计算过程
fetch, = exe.run(program, feed={feed_vars[0]: in_np}, fetch_list=fetch_vars)
```
以上示例中,通过 [TracerLayer.trace](https://www.paddlepaddle.org.cn/documentation/docs/zh/api_cn/dygraph_cn/TracedLayer_cn.html#trace) 接口来运行命令式编程模式模型并将其转换为声明式编程模式模型,该接口需要传入命令式编程模式的网络模型 mnist 和输入变量列表 [input_var];然后调用 [save_inference_model](https://www.paddlepaddle.org.cn/documentation/docs/zh/api_cn/dygraph_cn/TracedLayer_cn.html#save_inference_model) 接口将声明式编程模式模型保存为用于预测部署的模型,之后利用 [load_inference_model](https://www.paddlepaddle.org.cn/documentation/docs/zh/api_cn/io_cn/load_inference_model_cn.html) 接口将保存的模型加载,并使用 [Executor](https://www.paddlepaddle.org.cn/documentation/docs/zh/api_cn/executor_cn/Executor_cn.html#executor) 执行,检查结果是否正确。
[save_inference_model](https://www.paddlepaddle.org.cn/documentation/docs/zh/develop/api_cn/dygraph_cn/TracedLayer_cn.html#save_inference_model) 保存的下来的模型,同样可以使用 C++ 加载部署,具体的操作请参考:[C++ 预测 API介绍](https://www.paddlepaddle.org.cn/documentation/docs/zh/advanced_guide/inference_deployment/inference/native_infer.html)
* 如果任务中包含了依赖数据的控制流,比如下面这个示例中if条件的判断依赖输入的shape。针对这种场景,可以使用基于ProgramTranslator的方式转成声明式编程模式的program,通过save_inference_model 接口将声明式编程模式模型保存为用于预测部署的模型,之后利用 [load_inference_model](https://www.paddlepaddle.org.cn/documentation/docs/zh/api_cn/io_cn/load_inference_model_cn.html) 接口将保存的模型加载,并使用 [Executor](https://www.paddlepaddle.org.cn/documentation/docs/zh/api_cn/executor_cn/Executor_cn.html#executor) 执行,检查结果是否正确。
保存的下来的模型,同样可以使用 C++ 加载部署,具体的操作请参考:[C++ 预测 API介绍](https://www.paddlepaddle.org.cn/documentation/docs/zh/advanced_guide/inference_deployment/inference/native_infer.html)
```python
with fluid.dygraph.guard():
in_np = np.array([-2]).astype('int')
# 将numpy的ndarray类型的数据转换为Variable类型
input_var = fluid.dygraph.to_variable(in_np)
# if判断与输入input_var的shape有关
if input_var.shape[0] > 1:
print("input_var's shape[0] > 1")
else:
print("input_var's shape[1] < 1")
```
* 针对依赖数据的控制流,解决流程如下 1. 添加declarative装饰器; 2. 利用ProgramTranslator进行转换
1) 添加declarative装饰器
首先需要对给MNist类的forward函数添加一个declarative 装饰器,来标记需要转换的代码块,(注:需要在最外层的class的forward函数中添加)
```python
from paddle.fluid.dygraph.jit import declarative
# 定义MNIST网络,必须继承自fluid.dygraph.Layer
# 该网络由两个SimpleImgConvPool子网络、reshape层、matmul层、softmax层、accuracy层组成
class MNIST(fluid.dygraph.Layer):
# 在__init__构造函数中会执行变量的初始化、参数初始化、子网络初始化的操作
# 本例中执行了self.pool_2_shape变量、matmul层中参数self.output_weight、SimpleImgConvPool子网络的初始化操作
def __init__(self):
super(MNIST, self).__init__()
self._simple_img_conv_pool_1 = SimpleImgConvPool(
1, 20, 5, 2, 2, act="relu")
self._simple_img_conv_pool_2 = SimpleImgConvPool(
20, 50, 5, 2, 2, act="relu")
# self.pool_2_shape变量定义了经过self._simple_img_conv_pool_2层之后的数据
# 除了batch_size维度之外其他维度的乘积
self.pool_2_shape = 50 * 4 * 4
# self.pool_2_shape、SIZE定义了self.output_weight参数的维度
SIZE = 10
# 定义全连接层的参数
self.output_weight = self.create_parameter(
[self.pool_2_shape, 10])
# forward函数实现了MNIST网络的执行逻辑
@declarative
def forward(self, inputs, label=None):
x = self._simple_img_conv_pool_1(inputs)
x = self._simple_img_conv_pool_2(x)
x = fluid.layers.reshape(x, shape=[-1, self.pool_2_shape])
x = fluid.layers.matmul(x, self.output_weight)
x = fluid.layers.softmax(x)
if label is not None:
acc = fluid.layers.accuracy(input=x, label=label)
return x, acc
else:
return x
```
File "", line 25
@declarative
^
TabError: inconsistent use of tabs and spaces in indentation
2) 利用ProgramTranslator进行转换
```python
from paddle.fluid.dygraph.dygraph_to_static import ProgramTranslator
with fluid.dygraph.guard():
prog_trans = fluid.dygraph.ProgramTranslator()
mnist = MNIST()
in_np = np.random.random([10, 1, 28, 28]).astype('float32')
label_np = np.random.randint(0, 10, size=(10,1)).astype( "int64")
input_var = fluid.dygraph.to_variable(in_np)
label_var = flui.dyraph.to_variable(label_np)
out = mnist( input_var, label_var)
prog_trans.save_inference_model("./mnist_dy2stat", fetch=[0,1])
```
## 5. 使用技巧
### 5.1 中间变量值、梯度打印
1. 用户想要查看任意变量的值,可以使用 [numpy](https://www.paddlepaddle.org.cn/documentation/docs/zh/api_cn/fluid_cn/Variable_cn.html#numpy) 接口。
```
x = y * 10
print(x.numpy())
```
来直接打印变量的值
2. 查看反向的值
可以在执行了 backward 之后,可以通过 [gradient](https://www.paddlepaddle.org.cn/documentation/docs/zh/api_cn/fluid_cn/Variable_cn.html#gradient) 接口来看任意变量的梯度
```
x = y * 10
x.backward()
print(y.gradient())
```
可以直接打印反向梯度的值
### 5.2 断点调试
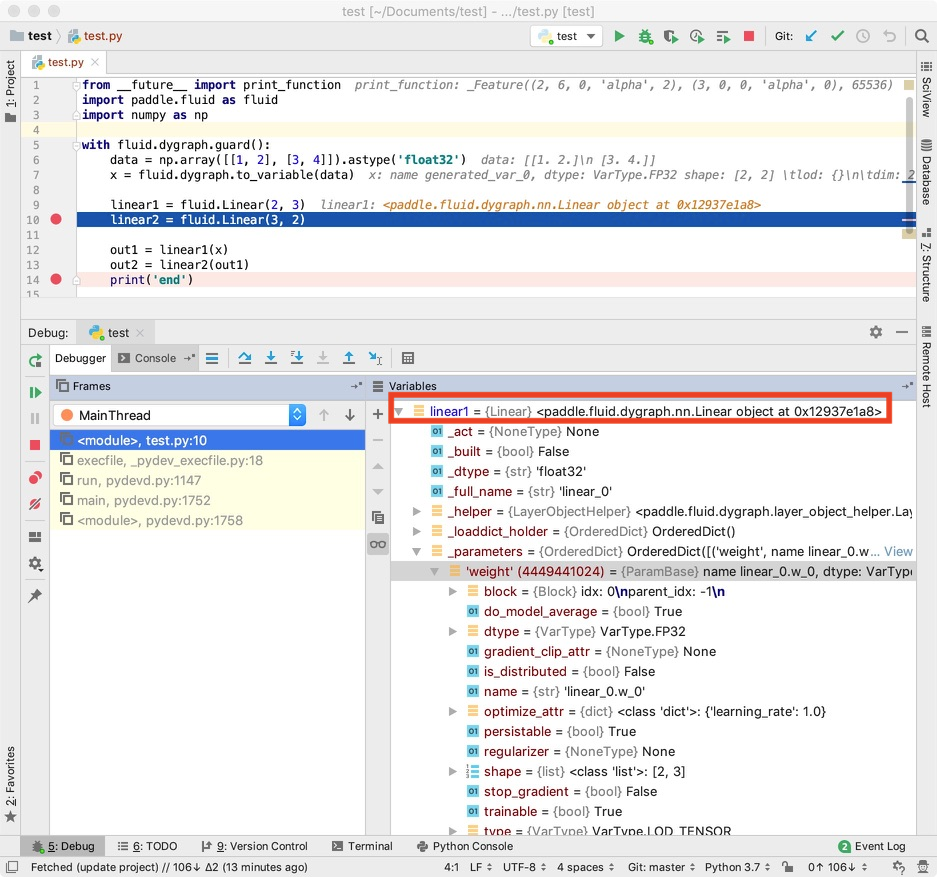
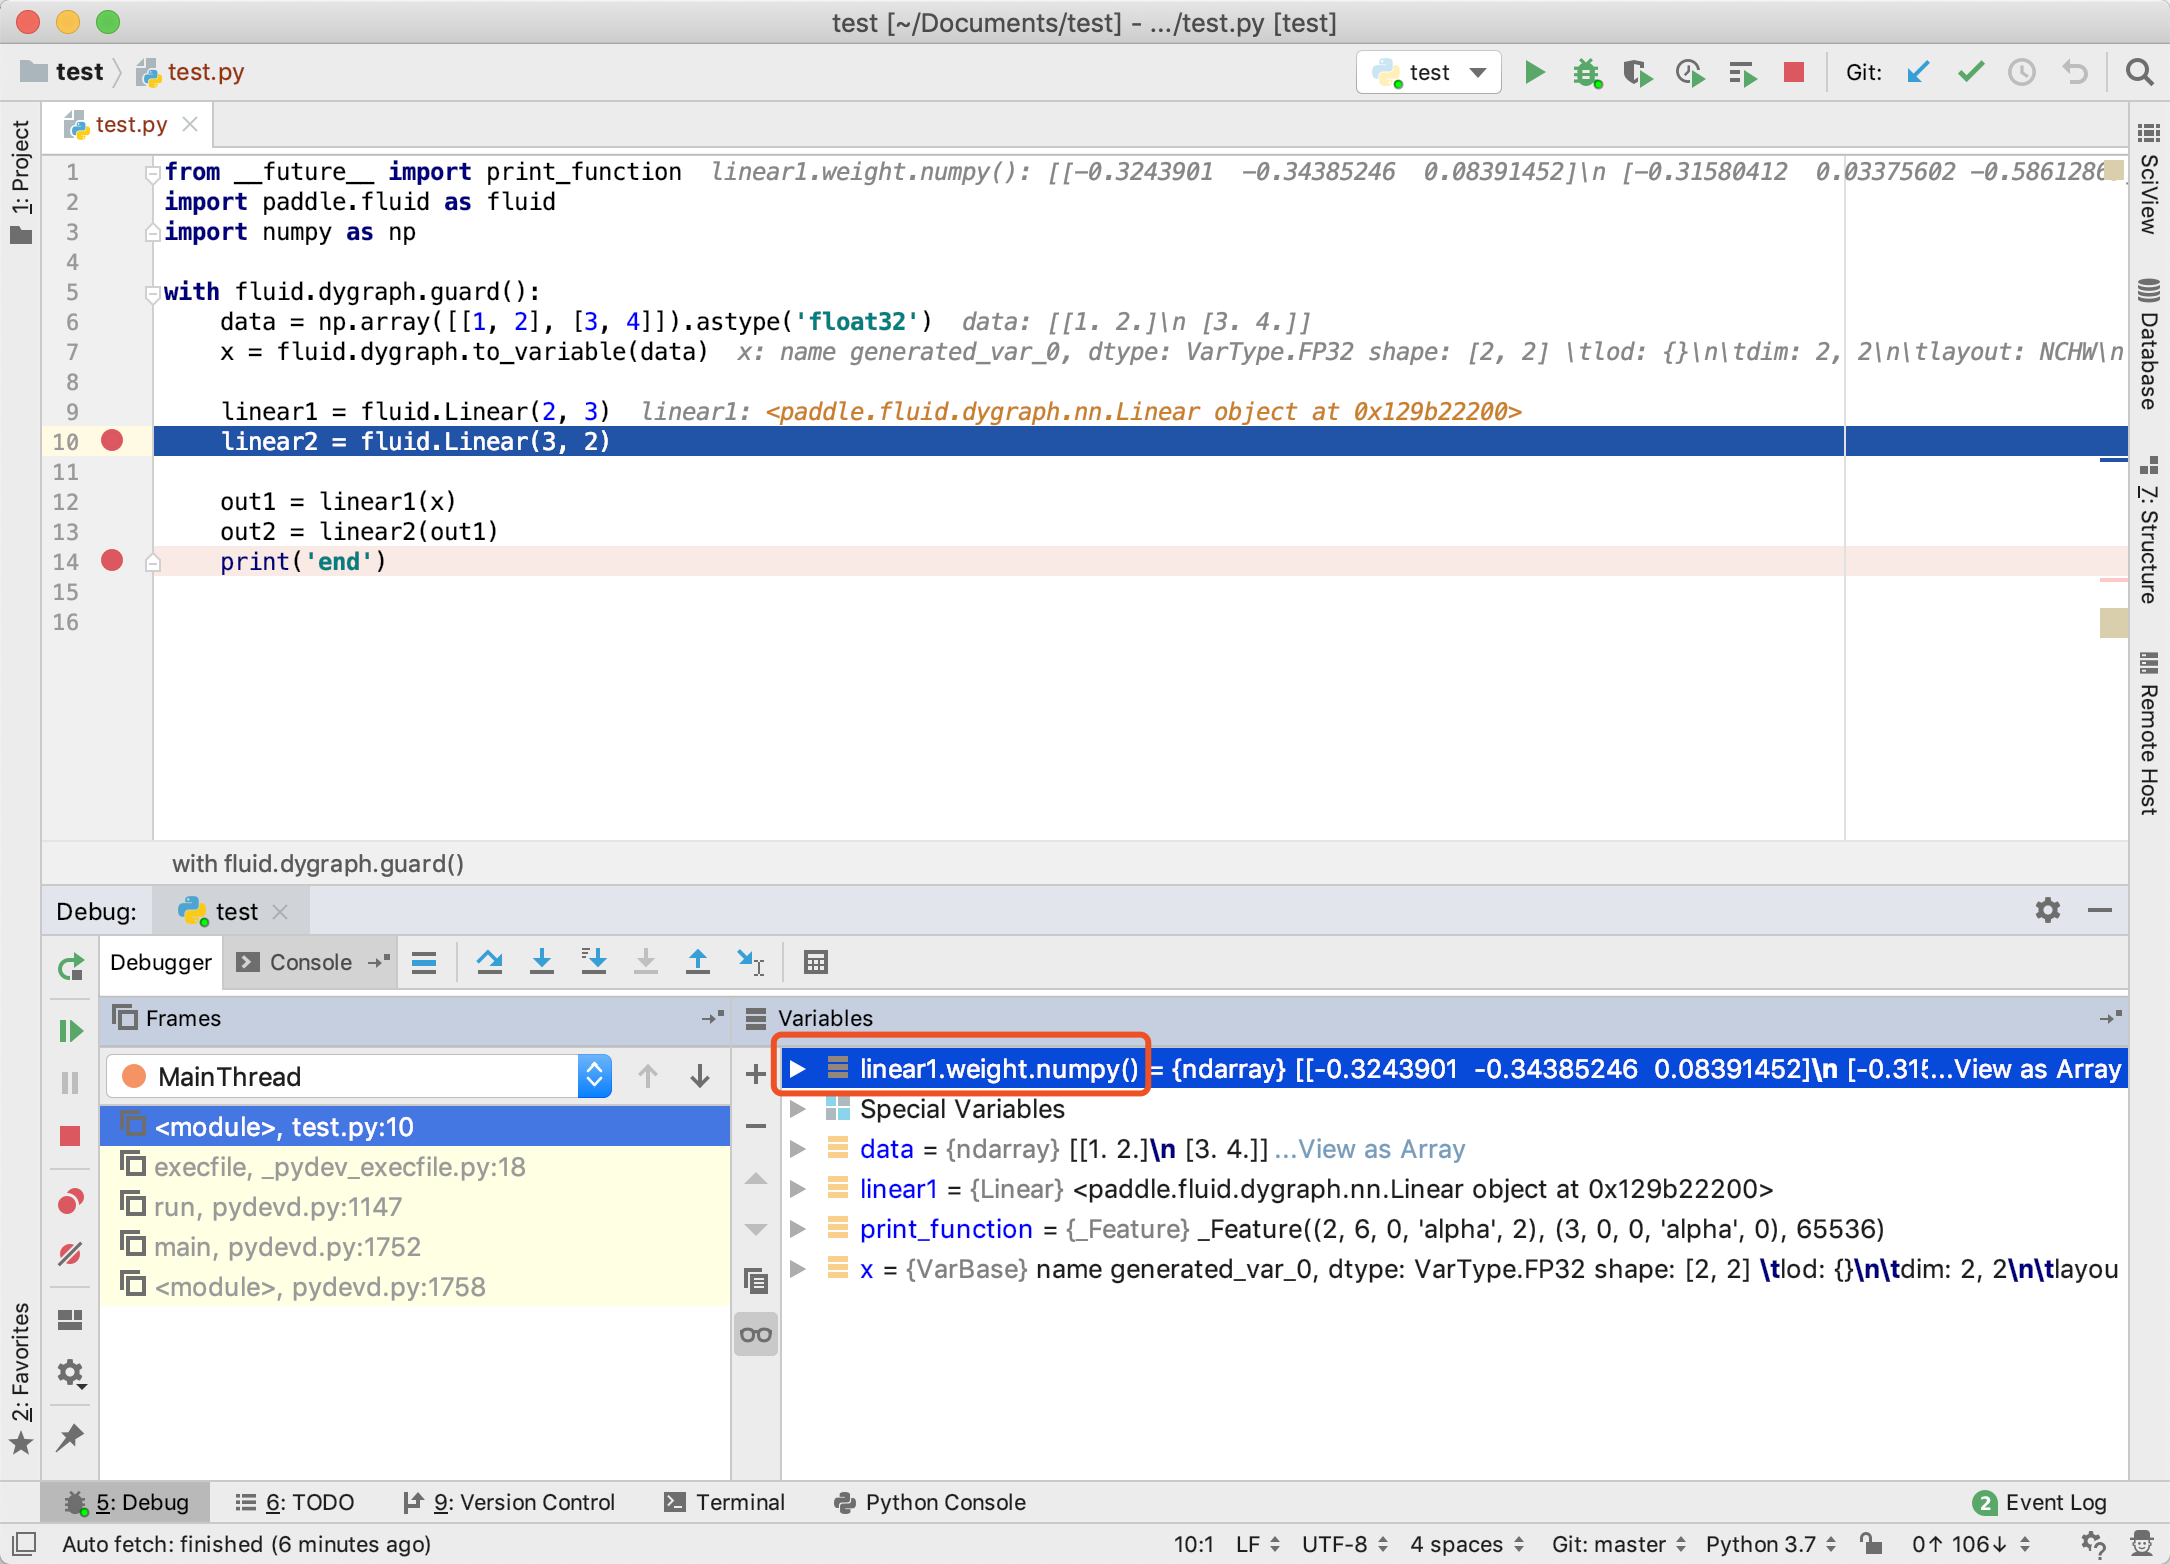
因为命令式编程模式采用了命令似的编程方式,程序在执行之后,可以立马获取到执行的结果,因此在命令式编程模式中,用户可以利用IDE提供的断点调试功能,通过查 Variable 的 shape、真实值等信息,有助于发现程序中的问题。
1. 如下图所示,在示例程序中设置两个断点,执行到第一个断点的位置,我们可以观察变量 x 和 linear1 的信息。


2. 同时可以观察 linear1 中的权重值。


### 5.3 使用声明式编程模式运行
命令式编程模式虽然有友好编写、易于调试等功能,但是命令式编程模式中需要频繁进行 Python 与 C++ 交互,会导致一些任务在命令式编程模式中运行比声明式编程模式慢,根据经验,这类任务中包含了很多小粒度的 OP(指运算量相对比较小的 OP,如加减乘除、sigmoid 等,像 conv、matmul 等属于大粒度的 OP不在此列 )。
在实际任务中,如果发现这类任务运行较慢,有以下两种处理方式:
* 1. 当用户使用的 if/else、switch、for/while 与输入(包括输入的值和 shape )无关时,可以在不改动模型定义的情况下使用声明式编程模式的模式运行。该方法将模型训练改为了声明式编程模式,区别于第4小节仅预测部署改为了声明式编程模式。
* 2. 如果使用了与输入相关的控制流,请参照[如何把命令式编程模式转写成声明式编程模式](https://www.paddlepaddle.org.cn/tutorials/projectdetail/360460#anchor-3)章节,将命令式编程模式代码进行转写。
下面我们介绍上面的第一种方案,仍然以手写字体识别任务为例,在声明式编程模式下的实现如下:
```python
# 设置全部样本训练次数(epoch_num)、批大小(BATCH_SIZE)。
epoch_num = 1
BATCH_SIZE = 64
main_program = fluid.Program()
startup_program = fluid.Program()
with fluid.program_guard(main_program=main_program, startup_program=startup_program):
# 声明式编程模式中需要使用执行器执行之前已经定义好的网络
exe = fluid.Executor(fluid.CPUPlace())
# 定义MNIST类的对象,可以使用命令式编程模式定义好的网络结构
mnist_static = MNIST()
# 定义优化器对象,声明式编程模式下不需要传入parameter_list参数
sgd_static = fluid.optimizer.SGDOptimizer(learning_rate=1e-3)
# 通过调用paddle.dataset.mnist的train函数,直接获取处理好的MNIST训练集
train_reader = paddle.batch(
paddle.dataset.mnist.train(), batch_size=BATCH_SIZE, drop_last=True)
# 声明式编程模式需要明确定义输入变量,即“占位符”,在声明式编程模式组网阶段并没有读入数据,所以需要使用占位符指明输入数据的类型,shape等信息
img_static = fluid.data(
name='pixel', shape=[None, 1, 28, 28], dtype='float32')
label_static = fluid.data(name='label', shape=[None, 1], dtype='int64')
# 调用网络,执行前向计算
cost_static = mnist_static(img_static)
# 计算损失值
loss_static = fluid.layers.cross_entropy(cost_static, label_static)
avg_loss_static = fluid.layers.mean(loss_static)
# 调用优化器的minimize接口计算和更新梯度
sgd_static.minimize(avg_loss_static)
# 声明式编程模式中需要显示对网络进行初始化操作
exe.run(fluid.default_startup_program())
for epoch in range(epoch_num):
for batch_id, data in enumerate(train_reader()):
x_data_static = np.array(
[x[0].reshape(1, 28, 28)
for x in data]).astype('float32')
y_data_static = np.array(
[x[1] for x in data]).astype('int64').reshape([BATCH_SIZE, 1])
fetch_list = [avg_loss_static.name]
# 声明式编程模式中需要调用执行器的run方法执行计算过程,需要获取的计算结果(如avg_loss)需要通过fetch_list指定
out = exe.run(
fluid.default_main_program(),
feed={"pixel": x_data_static,
"label": y_data_static},
fetch_list=fetch_list)
static_out = out[0]
if batch_id % 100 == 0 and batch_id is not 0:
print("epoch: {}, batch_id: {}, loss: {}".format(epoch, batch_id, static_out))
```
命令式编程模式改写成声明式编程模式涉及如下改动:
1. 定义占位符
* 利用fluid.data 定义占位符,在声明式编程模式表示会在执行器执行时才会提供数据。
2. 组网
* 优化器对象在声明式编程模式下不需要传入parameter_list参数。
* 将定义的占位符,输入给模型执行正向,然后计算损失值,最后利用优化器将损失值做最小化优化,得到要训练的网络。
3. 执行
* 需要对网络进行初始化操作。
* 需要使用执行器执行之前已经定义好的网络,需要调用执行器的run方法执行计算过程。
### 5.4 阻断反向传递
在一些任务中,只希望拿到正向预测的值,但是不希望更新参数,或者在反向的时候剪枝,减少计算量,阻断反向的传播, Paddle提供了两种解决方案: [detach](https://www.paddlepaddle.org.cn/documentation/docs/zh/api_cn/fluid_cn/Variable_cn.html#detach) 接口和 [stop_gradient](https://www.paddlepaddle.org.cn/documentation/docs/zh/api_cn/fluid_cn/Variable_cn.html#stop_gradient) 接口,建议用户使用 detach 接口。
1. detach接口(建议用法)
使用方式如下:
```
fw_out = fw_out.detach()
```
detach() 接口会产生一个新的、和当前计算图分离的,但是拥有当前变量内容的临时变量。
通过该接口可以阻断反向的梯度传递。
```python
import paddle.fluid as fluid
import numpy as np
with fluid.dygraph.guard():
value0 = np.arange(26).reshape(2, 13).astype("float32")
value1 = np.arange(6).reshape(2, 3).astype("float32")
value2 = np.arange(10).reshape(2, 5).astype("float32")
# 将ndarray类型的数据转换为Variable类型
a = fluid.dygraph.to_variable(value0)
b = fluid.dygraph.to_variable(value1)
c = fluid.dygraph.to_variable(value2)
# 构造fc、fc2层
fc = fluid.Linear(13, 5, dtype="float32")
fc2 = fluid.Linear(3, 3, dtype="float32")
# 对fc、fc2层执行前向计算
out1 = fc(a)
out2 = fc2(b)
# 将不会对out1这部分子图做反向计算
out1 = out1.detach()
out = fluid.layers.concat(input=[out1, out2, c], axis=1)
out.backward()
# 可以发现这里out1.gradient()的值都为0,同时使得fc.weight的grad没有初始化
assert (out1.gradient() == 0).all()
```
2. stop_gradient 接口
每个 Variable 都有一个 stop_gradient 属性,可以用于细粒度地在反向梯度计算时排除部分子图,以提高效率。
如果OP只要有一个输入需要梯度,那么该OP的输出也需要梯度。相反,只有当OP的所有输入都不需要梯度时,该OP的输出也不需要梯度。在所有的 Variable 都不需要梯度的子图中,反向计算就不会进行计算了。
在命令式编程模式下,除参数以外的所有 Variable 的 stop_gradient 属性默认值都为 True,而参数的 stop_gradient 属性默认值为 False。 该属性用于自动剪枝,避免不必要的反向运算。
使用方式如下:
```
fw_out.stop_gradient = True
```
通过将 Variable 的 stop_gradient 属性设置为 True,当 stop_gradient 设置为 True 时,梯度在反向传播时,遇到该 Variable,就不会继续传递。
```python
import paddle.fluid as fluid
import numpy as np
with fluid.dygraph.guard():
value0 = np.arange(26).reshape(2, 13).astype("float32")
value1 = np.arange(6).reshape(2, 3).astype("float32")
value2 = np.arange(10).reshape(2, 5).astype("float32")
# 将ndarray类型的数据转换为Variable类型
a = fluid.dygraph.to_variable(value0)
b = fluid.dygraph.to_variable(value1)
c = fluid.dygraph.to_variable(value2)
# 构造fc、fc2层
fc = fluid.Linear(13, 5, dtype="float32")
fc2 = fluid.Linear(3, 3, dtype="float32")
# 对fc、fc2层执行前向计算
out1 = fc(a)
out2 = fc2(b)
# 相当于不会对out1这部分子图做反向计算
out1.stop_gradient = True
out = fluid.layers.concat(input=[out1, out2, c], axis=1)
out.backward()
# 可以发现这里fc参数的梯度都为0
assert (fc.weight.gradient() == 0).all()
assert (out1.gradient() == 0).all()
```

