# 图像效果
设置组件的模糊、阴影、球面效果以及设置图片的图像效果。
> **说明:**
>
> 从API Version 7开始支持。后续版本如有新增内容,则采用上角标单独标记该内容的起始版本。
## 属性
| 名称 | 参数类型 | 默认值 | 描述 |
| -------------------------------- | ------------------------------------------------------------ | ------ | ------------------------------------------------------------ |
| blur | number | - | 为当前组件添加内容模糊效果,入参为模糊半径,模糊半径越大越模糊,为0时不模糊。
取值范围:[0, +∞)
从API version 9开始,该接口支持在ArkTS卡片中使用。 |
| linearGradientBlur10+ |
value: number,
{
fractionStops:Array,
direction:[GradientDirection](ts-appendix-enums.md#gradientdirection)
}
| - | 为当前组件添加内容线性渐变模糊效果,
-value为模糊半径,模糊半径越大越模糊,为0时不模糊。取值范围:[0, +∞)
线性梯度模糊包含两个部分fractionStops和direction
-fractionStops数组中保存的每一个二元数组(取值0-1,小于0则为0,大于0则为1)表示[模糊程度, 模糊位置];模糊位置需严格递增,开发者传入的数据不符合规范会记录日志,渐变模糊数组中二元数组个数必须大于等于2,否则渐变模糊不生效
-direction为渐变模糊方向,默认值为[GradientDirection](ts-appendix-enums.md#gradientdirection).Bottom
从API version 10开始,该接口支持在ArkTS卡片中使用。 |
| backdropBlur | number | - | 为当前组件添加背景模糊效果,入参为模糊半径,模糊半径越大越模糊,为0时不模糊。
取值范围:[0, +∞)
从API version 9开始,该接口支持在ArkTS卡片中使用。 |
| shadow | [ShadowOptions](#shadowoptions对象说明) \| [ShadowStyle](#shadowstyle10枚举说明)10+ | - | 为当前组件添加阴影效果。
入参类型为ShadowOptions时,可以指定模糊半径、阴影的颜色、X轴和Y轴的偏移量。
入参类型为ShadowStyle时,可指定不同阴影样式。
从API version 9开始,该接口支持在ArkTS卡片中使用,ArkTS卡片上不支持参数为 [ShadowStyle](#shadowstyle10枚举说明)类型。 |
| grayscale | number | 0.0 | 为当前组件添加灰度效果。值定义为灰度转换的比例,入参1.0则完全转为灰度图像,入参则0.0图像无变化,入参在0.0和1.0之间时,效果呈线性变化。(百分比)
取值范围:[0, 1]
**说明:**
设置小于0的值时,按值为0处理,设置大于1的值时,按值为1处理。
从API version 9开始,该接口支持在ArkTS卡片中使用。 |
| brightness | number | 1.0 | 为当前组件添加高光效果,入参为高光比例,值为1时没有效果,小于1时亮度变暗,0为全黑,大于1时亮度增加,数值越大亮度越大。
取值范围:[0, +∞)
**说明:**
设置小于0的值时,按值为0处理。
从API version 9开始,该接口支持在ArkTS卡片中使用。 |
| saturate | number | 1.0 | 为当前组件添加饱和度效果,饱和度为颜色中的含色成分和消色成分(灰)的比例,入参为1时,显示原图像,大于1时含色成分越大,饱和度越大,小于1时消色成分越大,饱和度越小。(百分比)
取值范围:[0, +∞)
**说明:**
设置小于0的值时,按值为0处理。
从API version 9开始,该接口支持在ArkTS卡片中使用。 |
| contrast | number | 1.0 | 为当前组件添加对比度效果,入参为对比度的值。值为1时,显示原图,大于1时,值越大对比度越高,图像越清晰醒目,小于1时,值越小对比度越低,当对比度为0时,图像变为全灰。(百分比)
取值范围:[0, +∞)
**说明:**
设置小于0的值时,按值为0处理。
从API version 9开始,该接口支持在ArkTS卡片中使用。 |
| invert | number | 0 | 反转输入的图像。入参为图像反转的比例,值为1时完全反转,值为0则图像无变化。(百分比)
取值范围:[0, 1]
**说明:**
设置小于0的值时,按值为0处理。
从API version 9开始,该接口支持在ArkTS卡片中使用。 |
| sepia | number | 0 | 将图像转换为深褐色。入参为图像反转的比例,值为1则完全是深褐色的,值为0图像无变化。 (百分比)
从API version 9开始,该接口支持在ArkTS卡片中使用。 |
| hueRotate | number \| string | '0deg' | 色相旋转效果,输入参数为旋转角度。
取值范围:(-∞, +∞)
**说明:**
色调旋转360度会显示原始颜色。先将色调旋转180 度,然后再旋转-180度会显示原始颜色。数据类型为number时,值为90和'90deg'效果一致。
从API version 9开始,该接口支持在ArkTS卡片中使用。 |
| colorBlend 8+ | [Color](ts-appendix-enums.md#color) \| string \| [Resource](ts-types.md#resource) | - | 为当前组件添加颜色叠加效果,入参为叠加的颜色。
从API version 9开始,该接口支持在ArkTS卡片中使用。 |
| sphericalEffect10+ | [number] | - | 设置组件的图像球面化程度。
取值范围:[0,1]。
**说明:**
1. 如果value等于0则图像保持原样,如果value等于1则图像为完全球面化效果。在0和1之间,数值越大,则球面化程度越高。
`value < 0 `或者` value > 1`为异常情况,`value < 0`按0处理,`value > 1`按1处理。
2. 如果组件的图像使用异步加载,则不支持球面效果。例如Image组件默认使用异步加载,如果要使用球面效果,就要设置`syncLoad`为`true`,但是这种做法不推荐。`backgroundImage`也是使用异步加载,所以如果设置了`backgroundImage`,不支持球面效果。
3. 如果组件设置了阴影,不支持球面效果。
此接口为系统接口。 |
| lightUpEffect10+ | [number] | - | 设置组件图像亮起程度。
取值范围:[0,1]。
如果value等于0则图像为全黑,如果value等于1则图像为全亮效果。0到1之间数值越大,表示图像亮度越高。`value < 0` 或者 `value > 1`为异常情况,`value < 0`按0处理,`value > 1`按1处理。
此接口为系统接口。|
| pixelStretchEffect10+ | [PixelStretchEffectOptions](ts-types.md#PixelStretchEffectOptions) | - | 设置组件的图像边缘像素扩展距离。
参数`options`包括上下左右四个方向的边缘像素扩展距离。
**说明:**
1. 如果距离为正值,表示向外扩展,放大原来图像大小。上下左右四个方向分别用边缘像素填充,填充的距离即为设置的边缘扩展的距离。
2. 如果距离为负值,表示内缩,但是最终图像大小不变。
内缩方式:
图像根据`options`的设置缩小,缩小大小为四个方向边缘扩展距离的绝对值。
图像用边缘像素扩展到原来大小。
3. 对`options`的输入约束:
上下左右四个方向的扩展统一为非正值或者非负值。即四个边同时向外扩或者内缩,方向一致。
所有方向的输入均为百分比或者具体值,不支持百分比和具体值混用。
所有异常情况下,显示为{0,0,0,0}效果,即跟原图保持一致。
此接口为系统接口。 |
## ShadowOptions对象说明
阴影属性集合,用于设置阴影的模糊半径、阴影的颜色、X轴和Y轴的偏移量。
从API version 9开始,该接口支持在ArkTS卡片中使用。
| 名称 | 类型 | 必填 | 说明 |
| ------ | ------ | ---- | --------------- |
| radius | number \| [Resource](ts-types.md#resource) | 是 | 阴影模糊半径。
取值范围:[0, +∞)
**说明:**
设置小于0的值时,按值为0处理。 |
| color | [Color](ts-appendix-enums.md#color) \| string \| [Resource](ts-types.md#resource) | 否 | 阴影的颜色。
默认为黑色。 |
| offsetX | number \| [Resource](ts-types.md#resource) | 否 | 阴影的X轴偏移量。
默认为0。 |
| offsetY | number \| [Resource](ts-types.md#resource) | 否 | 阴影的Y轴偏移量。
默认为0。 |
## ShadowStyle10+枚举说明
| 名称 | 描述 |
| ------ | -------------------------------------- |
| OUTER_DEFAULT_XS | 超小阴影。 |
| OUTER_DEFAULT_SM | 小阴影。 |
| OUTER_DEFAULT_MD | 中阴影。 |
| OUTER_DEFAULT_LG | 大阴影。 |
| OUTER_FLOATING_SM | 浮动小阴影。 |
| OUTER_FLOATING_MD | 浮动中阴影。 |
## 示例
### 示例1
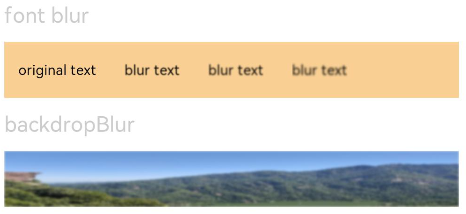
模糊属性的用法,blur内容模糊,backdropBlur背景模糊。
```ts
// xxx.ets
@Entry
@Component
struct BlurEffectsExample {
build() {
Column({ space: 10 }) {
// 对字体进行模糊
Text('font blur').fontSize(15).fontColor(0xCCCCCC).width('90%')
Flex({ alignItems: ItemAlign.Center }) {
Text('original text').margin(10)
Text('blur text')
.blur(1).margin(10)
Text('blur text')
.blur(2).margin(10)
Text('blur text')
.blur(3).margin(10)
}.width('90%').height(40)
.backgroundColor(0xF9CF93)
// 对背景进行模糊
Text('backdropBlur').fontSize(15).fontColor(0xCCCCCC).width('90%')
Text()
.width('90%')
.height(40)
.fontSize(16)
.backdropBlur(3)
.backgroundImage('/pages/attrs/image/image.jpg')
.backgroundImageSize({ width: 1200, height: 160 })
}.width('100%').margin({ top: 5 })
}
}
```

### 示例2
设置图片的效果,包括阴影,灰度,高光,饱和度,对比度,图像反转,叠色,色相旋转等。
```ts
// xxx.ets
@Entry
@Component
struct ImageEffectsExample {
build() {
Column({ space: 10 }) {
// 添加阴影效果,图片效果不变
Text('shadow').fontSize(15).fontColor(0xCCCCCC).width('90%')
Image($r('app.media.image'))
.width('90%')
.height(40)
.shadow({ radius: 10, color: Color.Green, offsetX: 20, offsetY: 30 })
// 灰度效果0~1,越接近1,灰度越明显
Text('grayscale').fontSize(15).fontColor(0xCCCCCC).width('90%')
Image($r('app.media.image')).width('90%').height(40).grayscale(0.3)
Image($r('app.media.image')).width('90%').height(40).grayscale(0.8)
// 高光效果,1为正常图片,<1变暗,>1亮度增大
Text('brightness').fontSize(15).fontColor(0xCCCCCC).width('90%')
Image($r('app.media.image')).width('90%').height(40).brightness(1.2)
// 饱和度,原图为1
Text('saturate').fontSize(15).fontColor(0xCCCCCC).width('90%')
Image($r('app.media.image')).width('90%').height(40).saturate(2.0)
Image($r('app.media.image')).width('90%').height(40).saturate(0.7)
// 对比度,1为原图,>1值越大越清晰,<1值越小越模糊
Text('contrast').fontSize(15).fontColor(0xCCCCCC).width('90%')
Image($r('app.media.image')).width('90%').height(40).contrast(2.0)
Image($r('app.media.image')).width('90%').height(40).contrast(0.8)
// 图像反转比例
Text('invert').fontSize(15).fontColor(0xCCCCCC).width('90%')
Image($r('app.media.image')).width('90%').height(40).invert(0.2)
Image($r('app.media.image')).width('90%').height(40).invert(0.8)
// 叠色添加
Text('colorBlend').fontSize(15).fontColor(0xCCCCCC).width('90%')
Image($r('app.media.image')).width('90%').height(40).colorBlend(Color.Green)
Image($r('app.media.image')).width('90%').height(40).colorBlend(Color.Blue)
// 深褐色
Text('sepia').fontSize(15).fontColor(0xCCCCCC).width('90%')
Image($r('app.media.image')).width('90%').height(40).sepia(0.8)
// 色相旋转
Text('hueRotate').fontSize(15).fontColor(0xCCCCCC).width('90%')
Image($r('app.media.image')).width('90%').height(40).hueRotate(90)
}.width('100%').margin({ top: 5 })
}
}
```

### 示例3
设置组件的图像球面效果。
```ts
// xxx.ets
@Entry
@Component
struct SphericalEffectExample {
build() {
Stack() {
TextInput({ placeholder: "请输入变化范围百分比([0%,100%])"})
.width('50%')
.height(35)
.type(InputType.Number)
.enterKeyType(EnterKeyType.Done)
.caretColor(Color.Red)
.placeholderColor(Color.Blue)
.placeholderFont({
size: 20,
style: FontStyle.Italic,
weight: FontWeight.Bold
})
.sphericalEffect(0.5)
}.alignContent(Alignment.Center).width("100%").height("100%")
}
}
```
效果图如下:

去掉sphericalEffect的设置,效果如下:

### 示例4
设置组件的图像渐亮效果。
```ts
// xxx.ets
@Entry
@Component
struct LightUpExample {
build() {
Stack() {
Text('This is the text content with letterSpacing 0.')
.letterSpacing(0)
.fontSize(12)
.border({ width: 1 })
.padding(10)
.width('50%')
.lightUpEffect(0.6)
}.alignContent(Alignment.Center).width("100%").height("100%")
}
}
```
效果图如下:

修改lightUpEffect参数值为0.2:

去掉lightUpEffect的设置,效果如下:

### 示例5
```ts
// xxx.ets
@Entry
@Component
struct LightUpExample {
@State isLunar: boolean = false
private selectedDate: Date = new Date('2028-08-08')
build() {
Stack() {
DatePicker({
start: new Date('1970-1-1'),
end: new Date('2100-1-1'),
selected: this.selectedDate
})
.lunar(this.isLunar)
.onChange((value: DatePickerResult) => {
this.selectedDate.setFullYear(value.year, value.month, value.day)
console.info('select current date is: ' + JSON.stringify(value))
})
.lightUpEffect(0.6)
}.alignContent(Alignment.Center).width("100%").height("100%")
}
}
```

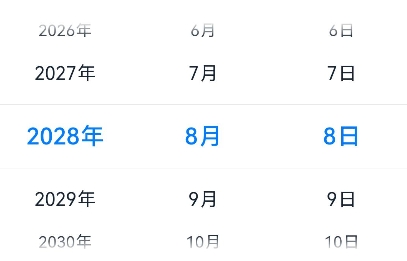
去掉lightUpEffect的设置,效果如下:

### 示例6
设置组件的图像边缘像素扩展效果。
```ts
// xxx.ets
@Entry
@Component
struct PixelStretchExample {
build() {
Stack() {
Text('This is the text content with letterSpacing 0.')
.letterSpacing(0)
.fontSize(12)
.border({ width: 1 })
.padding(10)
.width('50%')
.pixelStretchEffect({top:10,left:10,right:10,bottom:10 })
}.alignContent(Alignment.Center).width("100%").height("100%")
}
}
```
效果图如下:

去掉pixelStretchEffect的设置,原图效果如下:

### 示例7
基于示例6,现在把边缘扩展距离改为非正值。
```ts
// xxx.ets
@Entry
@Component
struct PixelStretchExample {
build() {
Stack() {
Text('This is the text content with letterSpacing 0.')
.letterSpacing(0)
.fontSize(12)
.border({ width: 1 })
.padding(10)
.width('50%')
.pixelStretchEffect({top:-10,left:-10,right:-10,bottom:-10 })
}.alignContent(Alignment.Center).width("100%").height("100%")
}
}
```
效果图如下:

跟原图对比发现,效果图分两步实现:
1、原图大小缩小,缩小后的大小为原图大小减去像素
收缩的距离。例如,原图大小为`100*100`,设置了`pixelStretchEffect({top:-10,left:-10,
right:-10,bottom:-10 })`,则缩小后的大小为`(100-10-10)*(100-10-10)`,即`80*80`。
2、使用边缘像素扩展,将图像扩展为原图大小。
### 示例8
设置组件的内容线性渐变模糊效果。
```ts
// xxx.ets
@Entry
@Component
struct ImageExample1 {
private_resource1:Resource = $r('app.media.1')
@State image_src: Resource = this.private_resource1
build() {
Column() {
Flex({ direction: FlexDirection.Column, alignItems: ItemAlign.Start }) {
Row({ space: 5 }) {
Image(this.image_src)
.linearGradientBlur(60, { fractionStops: [[0,0],[0,0.33],[1,0.66],[1,1]], direction: GradientDirection.Bottom })
}
}
}
}
}
```
