# Spring Cloud Data Flow Reference Guid
# Preface
## 1. About the documentation
The documentation for this release is available in [HTML](https://docs.spring.io/spring-cloud-dataflow/docs/2.9.2/reference/htmlsingle).
The latest copy of the Spring Cloud Data Flow reference guide can be found [here](https://docs.spring.io/spring-cloud-dataflow/docs/current-SNAPSHOT/reference/html/).
Copies of this document may be made for your own use and for
distribution to others, provided that you do not charge any fee for such copies and
further provided that each copy contains this Copyright Notice, whether distributed in
print or electronically.
## 2. Getting help
Having trouble with Spring Cloud Data Flow? We would like to help!
* Ask a question. We monitor [stackoverflow.com](https://stackoverflow.com) for questions
tagged with [`spring-cloud-dataflow`](https://stackoverflow.com/tags/spring-cloud-dataflow).
* Report bugs with Spring Cloud Data Flow at [github.com/spring-cloud/spring-cloud-dataflow/issues](https://github.com/spring-cloud/spring-cloud-dataflow/issues).
* Chat with the community and developers on [Gitter](https://gitter.im/spring-cloud/spring-cloud-dataflow).
| |All of Spring Cloud Data Flow is open source, including the documentation! If you find problems
with the docs or if you just want to improve them, please [get involved](https://github.com/spring-cloud/spring-cloud-dataflow).|
|---|------------------------------------------------------------------------------------------------------------------------------------------------------------------------------------------------------------------------------------|
# Getting Started
## 3. Getting Started - Local
See the [Local Machine](https://dataflow.spring.io/docs/installation/local/) section of the microsite for more information on setting up docker compose and manual installation.
Once you have the Data Flow server installed locally, you probably want to get started with orchestrating the deployment of readily available pre-built applications into coherent streaming or batch data pipelines. We have guides to help you get started with both [Stream](https://dataflow.spring.io/docs/stream-developer-guides/) and [Batch](https://dataflow.spring.io/docs/batch-developer-guides/) processing.
## 4. Getting Started - Cloud Foundry
This section covers how to get started with Spring Cloud Data Flow on Cloud Foundry. See the [Cloud Foundry](https://dataflow.spring.io/docs/installation/cloudfoundry/) section of the microsite for more information on installing Spring Cloud Data Flow on Cloud Foundry.
Once you have the Data Flow server installed on Cloud Foundry, you probably want to get started with orchestrating the deployment of readily available pre-built applications into coherent streaming or batch data pipelines. We have guides to help you get started with both [Stream](https://dataflow.spring.io/docs/stream-developer-guides/) and [Batch](https://dataflow.spring.io/docs/batch-developer-guides/) processing.
## 5. Getting Started - Kubernetes
[Spring Cloud Data Flow](https://cloud.spring.io/spring-cloud-dataflow/) is a toolkit for building data integration and real-time data-processing pipelines.
Pipelines consist of Spring Boot applications built with the Spring Cloud Stream or Spring Cloud Task microservice frameworks.
This makes Spring Cloud Data Flow suitable for a range of data-processing use cases, from import-export to event streaming and predictive analytics.
This project provides support for using Spring Cloud Data Flow with Kubernetes as the runtime for these pipelines, with applications packaged as Docker images.
See the [Kubernetes](https://dataflow.spring.io/docs/installation/kubernetes/) section of the microsite for more information on installing Spring Cloud Data Flow on Kubernetes.
Once you have the Data Flow server installed on Kubernetes, you probably want to get started with orchestrating the deployment of readily available pre-built applications into a coherent streaming or batch data pipelines. We have guides to help you get started with both [Stream](https://dataflow.spring.io/docs/stream-developer-guides/) and [Batch](https://dataflow.spring.io/docs/batch-developer-guides/) processing.
### 5.1. Application and Server Properties
This section covers how you can customize the deployment of your applications. You can use a number of properties to influence settings for the applications that are deployed. Properties can be applied on a per-application basis or in the appropriate server configuration for all deployed applications.
| |Properties set on a per-application basis always take precedence over properties set as the server configuration. This arrangement lets you override global server level properties on a per-application basis.|
|---|---------------------------------------------------------------------------------------------------------------------------------------------------------------------------------------------------------------|
Properties to be applied for all deployed Tasks are defined in the `src/kubernetes/server/server-config-[binder].yaml` file and for Streams in `src/kubernetes/skipper/skipper-config-[binder].yaml`. Replace `[binder]` with the messaging middleware you are using — for example, `rabbit` or `kafka`.
#### 5.1.1. Memory and CPU Settings
Applications are deployed with default memory and CPU settings. If you need to, you can adjust these values. The following example shows how to set `Limits` to `1000m` for `CPU` and `1024Mi` for memory and `Requests` to `800m` for CPU and `640Mi` for memory:
```
deployer..kubernetes.limits.cpu=1000m
deployer..kubernetes.limits.memory=1024Mi
deployer..kubernetes.requests.cpu=800m
deployer..kubernetes.requests.memory=640Mi
```
Those values results in the following container settings being used:
```
Limits:
cpu: 1
memory: 1Gi
Requests:
cpu: 800m
memory: 640Mi
```
You can also control the default values to which to set the `cpu` and `memory` globally.
The following example shows how to set the CPU and memory for streams:
```
data:
application.yaml: |-
spring:
cloud:
skipper:
server:
platform:
kubernetes:
accounts:
default:
limits:
memory: 640mi
cpu: 500m
```
The following example shows how to set the CPU and memory for tasks:
```
data:
application.yaml: |-
spring:
cloud:
dataflow:
task:
platform:
kubernetes:
accounts:
default:
limits:
memory: 640mi
cpu: 500m
```
The settings we have used so far affect only the settings for the container. They do not affect the memory setting for the JVM process in the container. If you would like to set JVM memory settings, you can set an environment variable to do so. See the next section for details.
#### 5.1.2. Environment Variables
To influence the environment settings for a given application, you can use the `spring.cloud.deployer.kubernetes.environmentVariables` deployer property.
For example, a common requirement in production settings is to influence the JVM memory arguments.
You can do so by using the `JAVA_TOOL_OPTIONS` environment variable, as the following example shows:
```
deployer..kubernetes.environmentVariables=JAVA_TOOL_OPTIONS=-Xmx1024m
```
| |The `environmentVariables` property accepts a comma-delimited string. If an environment variable contains a value
that is also a comma-delimited string, it must be enclosed in single quotation marks — for example,`spring.cloud.deployer.kubernetes.environmentVariables=spring.cloud.stream.kafka.binder.brokers='somehost:9092,
anotherhost:9093'`|
|---|---------------------------------------------------------------------------------------------------------------------------------------------------------------------------------------------------------------------------------------------------------------------------------------------------------------------------------------------------------------|
This overrides the JVM memory setting for the desired `` (replace `` with the name of your application).
#### 5.1.3. Liveness and Readiness Probes
The `liveness` and `readiness` probes use paths called `/health` and `/info`, respectively. They use a `delay` of `10` for both and a `period` of `60` and `10` respectively. You can change these defaults when you deploy the stream by using deployer properties. The liveness and readiness probes are applied only to streams.
The following example changes the `liveness` probe (replace `` with the name of your application) by setting deployer properties:
```
deployer..kubernetes.livenessProbePath=/health
deployer..kubernetes.livenessProbeDelay=120
deployer..kubernetes.livenessProbePeriod=20
```
You can declare the same as part of the server global configuration for streams, as the following example shows:
```
data:
application.yaml: |-
spring:
cloud:
skipper:
server:
platform:
kubernetes:
accounts:
default:
livenessProbePath: /health
livenessProbeDelay: 120
livenessProbePeriod: 20
```
Similarly, you can swap `liveness` for `readiness` to override the default `readiness` settings.
By default, port 8080 is used as the probe port. You can change the defaults for both `liveness` and `readiness` probe ports by using deployer properties, as the following example shows:
```
deployer..kubernetes.readinessProbePort=7000
deployer..kubernetes.livenessProbePort=7000
```
You can declare the same as part of the global configuration for streams, as the following example shows:
```
data:
application.yaml: |-
spring:
cloud:
skipper:
server:
platform:
kubernetes:
accounts:
default:
readinessProbePort: 7000
livenessProbePort: 7000
```
| |By default, the `liveness` and `readiness` probe paths use Spring Boot 2.x+ actuator endpoints. To use Spring Boot 1.x actuator endpoint paths, you must adjust the `liveness` and `readiness` values, as the following example shows (replace `` with the name of your application):
```
deployer..kubernetes.livenessProbePath=/health
deployer..kubernetes.readinessProbePath=/info
```
To automatically set both `liveness` and `readiness` endpoints on a per-application basis to the default Spring Boot 1.x paths, you can set the following property:
```
deployer..kubernetes.bootMajorVersion=1
```|
|---|-----------------------------------------------------------------------------------------------------------------------------------------------------------------------------------------------------------------------------------------------------------------------------------------------------------------------------------------------------------------------------------------------------------------------------------------------------------------------------------------------------------------------------------------------------------------------------------------------------------------------------------------------------------------------------------------------------------------|
You can access secured probe endpoints by using credentials stored in a [Kubernetes secret](https://kubernetes.io/docs/concepts/configuration/secret/). You can use an existing secret, provided the credentials are contained under the `credentials` key name of the secret’s `data` block. You can configure probe authentication on a per-application basis. When enabled, it is applied to both the `liveness` and `readiness` probe endpoints by using the same credentials and authentication type. Currently, only `Basic` authentication is supported.
To create a new secret:
1. Generate the base64 string with the credentials used to access the secured probe endpoints.
Basic authentication encodes a username and a password as a base64 string in the format of `username:password`.
The following example (which includes output and in which you should replace `user` and `pass` with your values) shows how to generate a base64 string:
```
$ echo -n "user:pass" | base64
dXNlcjpwYXNz
```
2. With the encoded credentials, create a file (for example, `myprobesecret.yml`) with the following contents:
```
apiVersion: v1
kind: Secret
metadata:
name: myprobesecret
type: Opaque
data:
credentials: GENERATED_BASE64_STRING
```
3. Replace `GENERATED_BASE64_STRING` with the base64-encoded value generated earlier.
4. Create the secret by using `kubectl`, as the following example shows:
```
$ kubectl create -f ./myprobesecret.yml
secret "myprobesecret" created
```
5. Set the following deployer properties to use authentication when accessing probe endpoints, as the following example shows:
```
deployer..kubernetes.probeCredentialsSecret=myprobesecret
```
Replace `` with the name of the application to which to apply authentication.
#### 5.1.4. Using `SPRING_APPLICATION_JSON`
You can use a `SPRING_APPLICATION_JSON` environment variable to set Data Flow server properties (including the configuration of Maven repository settings) that are common across all of the Data Flow server implementations. These settings go at the server level in the container `env` section of a deployment YAML. The following example shows how to do so:
```
env:
- name: SPRING_APPLICATION_JSON
value: "{ \"maven\": { \"local-repository\": null, \"remote-repositories\": { \"repo1\": { \"url\": \"https://repo.spring.io/libs-snapshot\"} } } }"
```
#### 5.1.5. Private Docker Registry
You can pull Docker images from a private registry on a per-application basis. First, you must create a secret in the cluster. Follow the [Pull an Image from a Private Registry](https://kubernetes.io/docs/tasks/configure-pod-container/pull-image-private-registry/) guide to create the secret.
Once you have created the secret, you can use the `imagePullSecret` property to set the secret to use, as the following example shows:
```
deployer..kubernetes.imagePullSecret=mysecret
```
Replace `` with the name of your application and `mysecret` with the name of the secret you created earlier.
You can also configure the image pull secret at the global server level.
The following example shows how to do so for streams:
```
data:
application.yaml: |-
spring:
cloud:
skipper:
server:
platform:
kubernetes:
accounts:
default:
imagePullSecret: mysecret
```
The following example shows how to do so for tasks:
```
data:
application.yaml: |-
spring:
cloud:
dataflow:
task:
platform:
kubernetes:
accounts:
default:
imagePullSecret: mysecret
```
Replace `mysecret` with the name of the secret you created earlier.
#### 5.1.6. Annotations
You can add annotations to Kubernetes objects on a per-application basis. The supported object types are pod `Deployment`, `Service`, and `Job`. Annotations are defined in a `key:value` format, allowing for multiple annotations separated by a comma. For more information and use cases on annotations, see [Annotations](https://kubernetes.io/docs/concepts/overview/working-with-objects/annotations/).
The following example shows how you can configure applications to use annotations:
```
deployer..kubernetes.podAnnotations=annotationName:annotationValue
deployer..kubernetes.serviceAnnotations=annotationName:annotationValue,annotationName2:annotationValue2
deployer..kubernetes.jobAnnotations=annotationName:annotationValue
```
Replace `` with the name of your application and the value of your annotations.
#### 5.1.7. Entry Point Style
An entry point style affects how application properties are passed to the container to be deployed. Currently, three styles are supported:
* `exec` (default): Passes all application properties and command line arguments in the deployment request as container arguments. Application properties are transformed into the format of `--key=value`.
* `shell`: Passes all application properties and command line arguments as environment variables. Each of the applicationor command-line argument properties is transformed into an uppercase string and `.` characters are replaced with `_`.
* `boot`: Creates an environment variable called `SPRING_APPLICATION_JSON` that contains a JSON representation of all application properties. Command line arguments from the deployment request are set as container args.
| |In all cases, environment variables defined at the server-level configuration and on a per-application basis are sent on to the container as is.|
|---|------------------------------------------------------------------------------------------------------------------------------------------------|
You can configure an application as follows:
```
deployer..kubernetes.entryPointStyle=
```
Replace `` with the name of your application and `` with your desired entry point style.
You can also configure the entry point style at the global server level.
The following example shows how to do so for streams:
```
data:
application.yaml: |-
spring:
cloud:
skipper:
server:
platform:
kubernetes:
accounts:
default:
entryPointStyle: entryPointStyle
```
The following example shows how to do so for tasks:
```
data:
application.yaml: |-
spring:
cloud:
dataflow:
task:
platform:
kubernetes:
accounts:
default:
entryPointStyle: entryPointStyle
```
Replace `entryPointStyle` with the desired entry point style.
You should choose an Entry Point Style of either `exec` or `shell`, to correspond to how the `ENTRYPOINT` syntax is defined in the container’s `Dockerfile`. For more information and uses cases on `exec` versus `shell`, see the [ENTRYPOINT](https://docs.docker.com/engine/reference/builder/#entrypoint) section of the Docker documentation.
Using the `boot` entry point style corresponds to using the `exec` style `ENTRYPOINT`. Command line arguments from the deployment request are passed to the container, with the addition of application properties being mapped into the `SPRING_APPLICATION_JSON` environment variable rather than command line arguments.
| |When you use the `boot` Entry Point Style, the `deployer..kubernetes.environmentVariables` property must not contain `SPRING_APPLICATION_JSON`.|
|---|------------------------------------------------------------------------------------------------------------------------------------------------------------|
#### 5.1.8. Deployment Service Account
You can configure a custom service account for application deployments through properties. You can use an existing service account or create a new one. One way to create a service account is by using `kubectl`, as the following example shows:
```
$ kubectl create serviceaccount myserviceaccountname
serviceaccount "myserviceaccountname" created
```
Then you can configure individual applications as follows:
```
deployer..kubernetes.deploymentServiceAccountName=myserviceaccountname
```
Replace `` with the name of your application and `myserviceaccountname` with your service account name.
You can also configure the service account name at the global server level.
The following example shows how to do so for streams:
```
data:
application.yaml: |-
spring:
cloud:
skipper:
server:
platform:
kubernetes:
accounts:
default:
deploymentServiceAccountName: myserviceaccountname
```
The following example shows how to do so for tasks:
```
data:
application.yaml: |-
spring:
cloud:
dataflow:
task:
platform:
kubernetes:
accounts:
default:
deploymentServiceAccountName: myserviceaccountname
```
Replace `myserviceaccountname` with the service account name to be applied to all deployments.
#### 5.1.9. Image Pull Policy
An image pull policy defines when a Docker image should be pulled to the local registry. Currently, three policies are supported:
* `IfNotPresent` (default): Do not pull an image if it already exists.
* `Always`: Always pull the image regardless of whether it already exists.
* `Never`: Never pull an image. Use only an image that already exists.
The following example shows how you can individually configure applications:
```
deployer..kubernetes.imagePullPolicy=Always
```
Replace `` with the name of your application and `Always` with your desired image pull policy.
You can configure an image pull policy at the global server level.
The following example shows how to do so for streams:
```
data:
application.yaml: |-
spring:
cloud:
skipper:
server:
platform:
kubernetes:
accounts:
default:
imagePullPolicy: Always
```
The following example shows how to do so for tasks:
```
data:
application.yaml: |-
spring:
cloud:
dataflow:
task:
platform:
kubernetes:
accounts:
default:
imagePullPolicy: Always
```
Replace `Always` with your desired image pull policy.
#### 5.1.10. Deployment Labels
You can set custom labels on objects related to [Deployment](https://kubernetes.io/docs/concepts/workloads/controllers/deployment/). See [Labels](https://kubernetes.io/docs/concepts/overview/working-with-objects/labels/) for more information on labels. Labels are specified in `key:value` format.
The following example shows how you can individually configure applications:
```
deployer..kubernetes.deploymentLabels=myLabelName:myLabelValue
```
Replace `` with the name of your application, `myLabelName` with your label name, and `myLabelValue` with the value of your label.
Additionally, you can apply multiple labels, as the following example shows:
```
deployer..kubernetes.deploymentLabels=myLabelName:myLabelValue,myLabelName2:myLabelValue2
```
#### 5.1.11. Tolerations
Tolerations work with taints to ensure pods are not scheduled onto particular nodes.
Tolerations are set into the pod configuration while taints are set onto nodes.
See the [Taints and Tolerations](https://kubernetes.io/docs/concepts/configuration/taint-and-toleration/) section of the Kubernetes reference for more information.
The following example shows how you can individually configure applications:
```
deployer..kubernetes.tolerations=[{key: 'mykey', operator: 'Equal', value: 'myvalue', effect: 'NoSchedule'}]
```
Replace `` with the name of your application and the key-value pairs according to your desired toleration configuration.
You can configure tolerations at the global server level as well.
The following example shows how to do so for streams:
```
data:
application.yaml: |-
spring:
cloud:
skipper:
server:
platform:
kubernetes:
accounts:
default:
tolerations:
- key: mykey
operator: Equal
value: myvalue
effect: NoSchedule
```
The following example shows how to do so for tasks:
```
data:
application.yaml: |-
spring:
cloud:
dataflow:
task:
platform:
kubernetes:
accounts:
default:
tolerations:
- key: mykey
operator: Equal
value: myvalue
effect: NoSchedule
```
Replace the `tolerations` key-value pairs according to your desired toleration configuration.
#### 5.1.12. Secret References
Secrets can be referenced and their entire data contents can be decoded and inserted into the pod environment as individual variables.
See the [Configure all key-value pairs in a Secret as container environment variables](https://kubernetes.io/docs/tasks/inject-data-application/distribute-credentials-secure/#configure-all-key-value-pairs-in-a-secret-as-container-environment-variables) section of the Kubernetes reference for more information.
The following example shows how you can individually configure applications:
```
deployer..kubernetes.secretRefs=testsecret
```
You can also specify multiple secrets, as follows:
```
deployer..kubernetes.secretRefs=[testsecret,anothersecret]
```
Replace `` with the name of your application and the `secretRefs` attribute with the appropriate values for your application environment and secret.
You can configure secret references at the global server level as well.
The following example shows how to do so for streams:
```
data:
application.yaml: |-
spring:
cloud:
skipper:
server:
platform:
kubernetes:
accounts:
default:
secretRefs:
- testsecret
- anothersecret
```
The following example shows how to do so for tasks:
```
data:
application.yaml: |-
spring:
cloud:
dataflow:
task:
platform:
kubernetes:
accounts:
default:
secretRefs:
- testsecret
- anothersecret
```
Replace the items of `secretRefs` with one or more secret names.
#### 5.1.13. Secret Key References
Secrets can be referenced and their decoded value can be inserted into the pod environment.
See the [Using Secrets as Environment Variables](https://kubernetes.io/docs/concepts/configuration/secret/#using-secrets-as-environment-variables) section of the Kubernetes reference for more information.
The following example shows how you can individually configure applications:
```
deployer..kubernetes.secretKeyRefs=[{envVarName: 'MY_SECRET', secretName: 'testsecret', dataKey: 'password'}]
```
Replace `` with the name of your application and the `envVarName`, `secretName`, and `dataKey` attributes with the appropriate values for your application environment and secret.
You can configure secret key references at the global server level as well.
The following example shows how to do so for streams:
```
data:
application.yaml: |-
spring:
cloud:
skipper:
server:
platform:
kubernetes:
accounts:
default:
secretKeyRefs:
- envVarName: MY_SECRET
secretName: testsecret
dataKey: password
```
The following example shows how to do so for tasks:
```
data:
application.yaml: |-
spring:
cloud:
dataflow:
task:
platform:
kubernetes:
accounts:
default:
secretKeyRefs:
- envVarName: MY_SECRET
secretName: testsecret
dataKey: password
```
Replace the `envVarName`, `secretName`, and `dataKey` attributes with the appropriate values for your secret.
#### 5.1.14. ConfigMap References
A ConfigMap can be referenced and its entire data contents can be decoded and inserted into the pod environment as individual variables.
See the [Configure all key-value pairs in a ConfigMap as container environment variables](https://kubernetes.io/docs/tasks/configure-pod-container/configure-pod-configmap/#configure-all-key-value-pairs-in-a-configmap-as-container-environment-variables) section of the Kubernetes reference for more information.
The following example shows how you can individually configure applications:
```
deployer..kubernetes.configMapRefs=testcm
```
You can also specify multiple ConfigMap instances, as follows:
```
deployer..kubernetes.configMapRefs=[testcm,anothercm]
```
Replace `` with the name of your application and the `configMapRefs` attribute with the appropriate values for your application environment and ConfigMap.
You can configure ConfigMap references at the global server level as well.
The following example shows how to do so for streams. Edit the appropriate `skipper-config-(binder).yaml`, replacing `(binder)` with the corresponding binder in use:
```
data:
application.yaml: |-
spring:
cloud:
skipper:
server:
platform:
kubernetes:
accounts:
default:
configMapRefs:
- testcm
- anothercm
```
The following example shows how to do so for tasks by editing the `server-config.yaml` file:
```
data:
application.yaml: |-
spring:
cloud:
dataflow:
task:
platform:
kubernetes:
accounts:
default:
configMapRefs:
- testcm
- anothercm
```
Replace the items of `configMapRefs` with one or more secret names.
#### 5.1.15. ConfigMap Key References
A ConfigMap can be referenced and its associated key value inserted into the pod environment.
See the [Define container environment variables using ConfigMap data](https://kubernetes.io/docs/tasks/configure-pod-container/configure-pod-configmap/#define-container-environment-variables-using-configmap-data) section of the Kubernetes reference for more information.
The following example shows how you can individually configure applications:
```
deployer..kubernetes.configMapKeyRefs=[{envVarName: 'MY_CM', configMapName: 'testcm', dataKey: 'platform'}]
```
Replace `` with the name of your application and the `envVarName`, `configMapName`, and `dataKey` attributes with the appropriate values for your application environment and ConfigMap.
You can configure ConfigMap references at the global server level as well.
The following example shows how to do so for streams. Edit the appropriate `skipper-config-(binder).yaml`, replacing `(binder)` with the corresponding binder in use:
```
data:
application.yaml: |-
spring:
cloud:
skipper:
server:
platform:
kubernetes:
accounts:
default:
configMapKeyRefs:
- envVarName: MY_CM
configMapName: testcm
dataKey: platform
```
The following example shows how to do so for tasks by editing the `server-config.yaml` file:
```
data:
application.yaml: |-
spring:
cloud:
dataflow:
task:
platform:
kubernetes:
accounts:
default:
configMapKeyRefs:
- envVarName: MY_CM
configMapName: testcm
dataKey: platform
```
Replace the `envVarName`, `configMapName`, and `dataKey` attributes with the appropriate values for your ConfigMap.
#### 5.1.16. Pod Security Context
You can confiure the pod security context to run processes under the specified UID (user ID) or GID (group ID).
This is useful when you want to not run processes under the default `root` UID and GID.
You can define either the `runAsUser` (UID) or `fsGroup` (GID), and you can configure them to work together.
See the [Security Context](https://kubernetes.io/docs/tasks/configure-pod-container/security-context/) section of the Kubernetes reference for more information.
The following example shows how you can individually configure application pods:
```
deployer..kubernetes.podSecurityContext={runAsUser: 65534, fsGroup: 65534}
```
Replace `` with the name of your application and the `runAsUser` and/or `fsGroup` attributes with the appropriate values for your container environment.
You can configure the pod security context at the global server level as well.
The following example shows how to do so for streams. Edit the appropriate `skipper-config-(binder).yaml`, replacing `(binder)` with the corresponding binder in use:
```
data:
application.yaml: |-
spring:
cloud:
skipper:
server:
platform:
kubernetes:
accounts:
default:
podSecurityContext:
runAsUser: 65534
fsGroup: 65534
```
The following example shows how to do so for tasks by editing the `server-config.yaml` file:
```
data:
application.yaml: |-
spring:
cloud:
dataflow:
task:
platform:
kubernetes:
accounts:
default:
podSecurityContext:
runAsUser: 65534
fsGroup: 65534
```
Replace the `runAsUser` and/or `fsGroup` attributes with the appropriate values for your container environment.
#### 5.1.17. Service Ports
When you deploy applications, a kubernetes Service object is created with a default port of `8080`. If the `server.port` property is set, it overrides the default port value. You can add additional ports to the Service object on a per-application basis. You can add multiple ports with a comma delimiter.
The following example shows how you can configure additional ports on a Service object for an application:
```
deployer..kubernetes.servicePorts=5000
deployer..kubernetes.servicePorts=5000,9000
```
Replace `` with the name of your application and the value of your ports.
#### 5.1.18. StatefulSet Init Container
When deploying an application by using a StatefulSet, an Init Container is used to set the instance index in the pod.
By default, the image used is `busybox`, which you can be customize.
The following example shows how you can individually configure application pods:
```
deployer..kubernetes.statefulSetInitContainerImageName=myimage:mylabel
```
Replace `` with the name of your application and the `statefulSetInitContainerImageName` attribute with the appropriate value for your environment.
You can configure the StatefulSet Init Container at the global server level as well.
The following example shows how to do so for streams. Edit the appropriate `skipper-config-(binder).yaml`, replacing `(binder)` with the corresponding binder in use:
```
data:
application.yaml: |-
spring:
cloud:
skipper:
server:
platform:
kubernetes:
accounts:
default:
statefulSetInitContainerImageName: myimage:mylabel
```
The following example shows how to do so for tasks by editing the `server-config.yaml` file:
```
data:
application.yaml: |-
spring:
cloud:
dataflow:
task:
platform:
kubernetes:
accounts:
default:
statefulSetInitContainerImageName: myimage:mylabel
```
Replace the `statefulSetInitContainerImageName` attribute with the appropriate value for your environment.
#### 5.1.19. Init Containers
When you deploy applications, you can set a custom Init Container on a per-application basis.
Refer to the [Init Containers](https://kubernetes.io/docs/concepts/workloads/pods/init-containers/) section of the Kubernetes reference for more information.
The following example shows how you can configure an Init Container for an application:
```
deployer..kubernetes.initContainer={containerName: 'test', imageName: 'busybox:latest', commands: ['sh', '-c', 'echo hello']}
```
Replace `` with the name of your application and set the values of the `initContainer` attributes appropriate for your Init Container.
#### 5.1.20. Lifecycle Support
When you deploy applications, you may attach `postStart` and `preStop` [Lifecycle handlers](https://kubernetes.io/docs/tasks/configure-pod-container/attach-handler-lifecycle-event/) to execute commands.
The Kubernetes API supports other types of handlers besides `exec`. This feature may be extended to support additional actions in a future release.
To configure the Lifecycle handlers as shown in the linked page above,specify each command as a comma-delimited list, using the following property keys:
```
deployer..kubernetes.lifecycle.postStart.exec.command=/bin/sh,-c,'echo Hello from the postStart handler > /usr/share/message'
deployer..kubernetes.lifecycle.preStop.exec.command=/bin/sh,-c,'nginx -s quit; while killall -0 nginx; do sleep 1; done'
```
#### 5.1.21. Additional Containers
When you deploy applications, you may need one or more containers to be deployed along with the main container.
This would allow you to adapt some deployment patterns such as sidecar, adapter in case of multi container pod setup.
The following example shows how you can configure additional containers for an application:
```
deployer..kubernetes.additionalContainers=[{name: 'c1', image: 'busybox:latest', command: ['sh', '-c', 'echo hello1'], volumeMounts: [{name: 'test-volume', mountPath: '/tmp', readOnly: true}]},{name: 'c2', image: 'busybox:1.26.1', command: ['sh', '-c', 'echo hello2']}]
```
# Applications
A selection of pre-built [stream](https://cloud.spring.io/spring-cloud-stream-app-starters/) and [task or batch](https://cloud.spring.io/spring-cloud-task-app-starters/) starter applications for various data integration and processing scenarios to facilitate learning and experimentation. The table in the next section includes the pre-built applications at a glance. For more details, review how to [register supported applications](#supported-apps-and-tasks).
## 6. Available Applications
| Source | Processor | Sink | Task |
|-----------------------------------------------------------------------------------------------------------------------------------------------------------------|----------------------------------------------------------------------------------------------------------------------------------------------------------------------------------------------|----------------------------------------------------------------------------------------------------------------------------------------------------------------------------|--------------------------------------------------------------------------------------------------------------------------------------|
| [sftp](https://docs.spring.io/spring-cloud-stream-app-starters/docs/current/reference/htmlsingle/#spring-cloud-stream-modules-sftp-source) | [tcp-client](https://docs.spring.io/spring-cloud-stream-app-starters/docs/current/reference/htmlsingle/#spring-cloud-stream-modules-tcp-client-processor) | [mqtt](https://docs.spring.io/spring-cloud-stream-app-starters/docs/current/reference/htmlsingle/#spring-cloud-stream-modules-mqtt-sink) | [timestamp](https://docs.spring.io/spring-cloud-task-app-starters/docs/current/reference/htmlsingle/#_timestamp_task) |
| [jms](https://docs.spring.io/spring-cloud-stream-app-starters/docs/current/reference/htmlsingle/#spring-cloud-stream-modules-jms-source) | [scriptable-transform](https://docs.spring.io/spring-cloud-stream-app-starters/docs/current/reference/htmlsingle/#spring-cloud-stream-modules-scriptable-transform) | [log](https://docs.spring.io/spring-cloud-stream-app-starters/docs/current/reference/htmlsingle/#spring-cloud-stream-modules-log-sink) |[composed-task-runner](https://docs.spring.io/spring-cloud-task-app-starters/docs/current/reference/htmlsingle/#_composed_task_runner)|
| [ftp](https://docs.spring.io/spring-cloud-stream-app-starters/docs/current/reference/htmlsingle/#spring-cloud-stream-modules-ftp-source) | [transform](https://docs.spring.io/spring-cloud-stream-app-starters/docs/current/reference/htmlsingle/#spring-clound-stream-modules-transform-processor) | [throughput](https://docs.spring.io/spring-cloud-stream-app-starters/docs/current/reference/htmlsingle/#spring-cloud-stream-modules-throughput-sink) | [timestamp-batch](https://docs.spring.io/spring-cloud-task-app-starters/docs/current/reference/htmlsingle/#_timestamp_batch_task) |
| [time](https://docs.spring.io/spring-cloud-stream-app-starters/docs/current/reference/htmlsingle/#spring-cloud-stream-modules-time-source) | [header-enricher](https://docs.spring.io/spring-cloud-stream-app-starters/docs/current/reference/htmlsingle/#spring-cloud-stream-modules-header-enricher-processor) | [mongodb](https://docs.spring.io/spring-cloud-stream-app-starters/docs/current/reference/htmlsingle/#spring-cloud-stream-modules-mongodb-sink) | |
| [load-generator](https://docs.spring.io/spring-cloud-stream-app-starters/docs/current/reference/htmlsingle/#spring-cloud-stream-modules-load-generator-source) | [python-http](https://docs.spring.io/spring-cloud-stream-app-starters/docs/current/reference/htmlsingle/#spring-cloud-stream-modules-python-http-processor) | [ftp](https://docs.spring.io/spring-cloud-stream-app-starters/docs/current/reference/htmlsingle/#spring-cloud-stream-modules-ftp-sink) | |
| [syslog](https://docs.spring.io/spring-cloud-stream-app-starters/docs/current/reference/htmlsingle/#spring-cloud-stream-modules-syslog-source) | [twitter-sentiment](https://docs.spring.io/spring-cloud-stream-app-starters/docs/current/reference/htmlsingle/#spring-cloud-stream-modules-twitter-sentiment-processor) | [jdbc](https://docs.spring.io/spring-cloud-stream-app-starters/docs/current/reference/htmlsingle/#spring-cloud-stream-modules-jdbc-sink) | |
| [s3](https://docs.spring.io/spring-cloud-stream-app-starters/docs/current/reference/htmlsingle/#spring-cloud-stream-modules-aws-s3-source) | [splitter](https://docs.spring.io/spring-cloud-stream-app-starters/docs/current/reference/htmlsingle/#spring-cloud-stream-modules-splitter) | [cassandra](https://docs.spring.io/spring-cloud-stream-app-starters/docs/current/reference/htmlsingle/#spring-cloud-stream-modules-cassandra-sink) | |
| [loggregator](https://docs.spring.io/spring-cloud-stream-app-starters/docs/current/reference/htmlsingle/#spring-cloud-stream-modules-loggregator-source) | [image-recognition](https://docs.spring.io/spring-cloud-stream-app-starters/docs/current/reference/htmlsingle/#spring-cloud-stream-modules-image-recognition-processor) | [router](https://docs.spring.io/spring-cloud-stream-app-starters/docs/current/reference/htmlsingle/#spring-cloud-stream-modules-router-sink) | |
|[triggertask (deprecated)](https://docs.spring.io/spring-cloud-stream-app-starters/docs/current/reference/htmlsingle/#spring-cloud-stream-modules-trigger-source)| [bridge](https://docs.spring.io/spring-cloud-stream-app-starters/docs/current/reference/htmlsingle/#spring-cloud-stream-modules-bridge-processor) | [redis-pubsub](https://docs.spring.io/spring-cloud-stream-app-starters/docs/current/reference/htmlsingle/#spring-cloud-stream-modules-redis-sink) | |
| [twitterstream](https://docs.spring.io/spring-cloud-stream-app-starters/docs/current/reference/htmlsingle/#spring-cloud-stream-modules-twitterstream-source) | [pmml](https://docs.spring.io/spring-cloud-stream-app-starters/docs/current/reference/htmlsingle/#spring-cloud-stream-modules-pmml-processor) | [file](https://docs.spring.io/spring-cloud-stream-app-starters/docs/current/reference/htmlsingle/#spring-cloud-stream-modules-file-sink) | |
| [mongodb](https://docs.spring.io/spring-cloud-stream-app-starters/docs/current/reference/htmlsingle/#spring-cloud-stream-modules-mongodb-source) | [python-jython](https://docs.spring.io/spring-cloud-stream-app-starters/docs/current/reference/htmlsingle/#spring-cloud-stream-modules-python-jython-processor) | [websocket](https://docs.spring.io/spring-cloud-stream-app-starters/docs/current/reference/htmlsingle/#spring-cloud-stream-modules-websocket-sink) | |
| [gemfire-cq](https://docs.spring.io/spring-cloud-stream-app-starters/docs/current/reference/htmlsingle/#spring-cloud-stream-modules-gemfire-cq-source) | [groovy-transform](https://docs.spring.io/spring-cloud-stream-app-starters/docs/current/reference/htmlsingle/#spring-cloud-stream-modules-groovy-transform-processor) | [s3](https://docs.spring.io/spring-cloud-stream-app-starters/docs/current/reference/htmlsingle/#spring-cloud-stream-modules-aws-s3-sink) | |
| [http](https://docs.spring.io/spring-cloud-stream-app-starters/docs/current/reference/htmlsingle/#spring-cloud-stream-modules-http-source) | [httpclient](https://docs.spring.io/spring-cloud-stream-app-starters/docs/current/reference/htmlsingle/#spring-cloud-stream-modules-httpclient-processor) | [rabbit](https://docs.spring.io/spring-cloud-stream-app-starters/docs/current/reference/htmlsingle/#spring-cloud-stream-modules-rabbit-sink) | |
| [rabbit](https://docs.spring.io/spring-cloud-stream-app-starters/docs/current/reference/htmlsingle/#spring-cloud-stream-modules-rabbit-source) | [filter](https://docs.spring.io/spring-cloud-stream-app-starters/docs/current/reference/htmlsingle/#spring-cloud-stream-modules-filter-processor) | [counter](https://docs.spring.io/spring-cloud-stream-app-starters/docs/current/reference/htmlsingle/#spring-cloud-stream-modules-counter-sink) | |
| [tcp](https://docs.spring.io/spring-cloud-stream-app-starters/docs/current/reference/htmlsingle/#spring-cloud-stream-modules-tcp-source) | [pose-estimation](https://docs.spring.io/spring-cloud-stream-app-starters/docs/current/reference/htmlsingle/#spring-cloud-stream-modules-pose-estimation-processor) | [pgcopy](https://docs.spring.io/spring-cloud-stream-app-starters/docs/current/reference/htmlsingle/#spring-cloud-stream-modules-pgcopy-sink) | |
| [trigger](https://docs.spring.io/spring-cloud-stream-app-starters/docs/current/reference/htmlsingle/#spring-cloud-stream-modules-trigger-source) | [grpc](https://docs.spring.io/spring-cloud-stream-app-starters/docs/current/reference/htmlsingle/#spring-cloud-stream-modules-grpc-processor) | [gpfdist](https://github.com/spring-cloud-stream-app-starters/gpfdist) | |
| [mqtt](https://docs.spring.io/spring-cloud-stream-app-starters/docs/current/reference/htmlsingle/#spring-cloud-stream-modules-mqtt-source) | [groovy-filter](https://docs.spring.io/spring-cloud-stream-app-starters/docs/current/reference/htmlsingle/#spring-cloud-stream-modules-groovy-filter-processor) | [sftp](https://docs.spring.io/spring-cloud-stream-app-starters/docs/current/reference/htmlsingle/#spring-cloud-stream-modules-sftp-sink) | |
| [tcp-client](https://docs.spring.io/spring-cloud-stream-app-starters/docs/current/reference/htmlsingle/#spring-cloud-stream-modules-tcp-client-source) | [aggregator](https://docs.spring.io/spring-cloud-stream-app-starters/docs/current/reference/htmlsingle/#spring-cloud-stream-modules-aggregator-processor) |[task-launcher-dataflow](https://docs.spring.io/spring-cloud-stream-app-starters/docs/current/reference/htmlsingle/#spring-cloud-stream-modules-task-launcher-dataflow-sink)| |
| [mail](https://docs.spring.io/spring-cloud-stream-app-starters/docs/current/reference/htmlsingle/#spring-cloud-stream-modules-mail-source) | [counter](https://docs.spring.io/spring-cloud-stream-app-starters/docs/current/reference/htmlsingle/#spring-cloud-stream-modules-counter-processor) | [hdfs](https://docs.spring.io/spring-cloud-stream-app-starters/docs/current/reference/htmlsingle/#spring-cloud-stream-modules-hdfs-sink) | |
| [jdbc](https://docs.spring.io/spring-cloud-stream-app-starters/docs/current/reference/htmlsingle/#spring-cloud-stream-modules-jdbc-source) | [tensorflow](https://docs.spring.io/spring-cloud-stream-app-starters/docs/current/reference/htmlsingle/#spring-cloud-stream-modules-tensorflow-processor) | [tcp](https://docs.spring.io/spring-cloud-stream-app-starters/docs/current/reference/htmlsingle/#spring-cloud-stream-modules-tcp-sink) | |
| [gemfire](https://docs.spring.io/spring-cloud-stream-app-starters/docs/current/reference/htmlsingle/#spring-cloud-stream-modules-gemfire-source) |[tasklaunchrequest-transform (deprecated)](https://docs.spring.io/spring-cloud-stream-app-starters/docs/current/reference/htmlsingle/#spring-cloud-stream-modules-tasklaunchrequest-transform)| [gemfire](https://docs.spring.io/spring-cloud-stream-app-starters/docs/current/reference/htmlsingle/#spring-cloud-stream-modules-gemfire-sink) | |
| [file](https://docs.spring.io/spring-cloud-stream-app-starters/docs/current/reference/htmlsingle/#spring-cloud-stream-modules-file-source) | [object-detection](https://docs.spring.io/spring-cloud-stream-app-starters/docs/current/reference/htmlsingle/#spring-cloud-stream-modules-object-detection-processor) | | |
| [sftp-dataflow](https://docs.spring.io/spring-cloud-stream-app-starters/docs/current/reference/htmlsingle/#spring-cloud-stream-modules-sftp-dataflow-source) | | | |
# Architecture
## 7. Introduction
Spring Cloud Data Flow simplifies the development and deployment of applications that are focused on data-processing use cases.
The [Architecture](https://dataflow.spring.io/docs/concepts/architecture/) section of the microsite describes Data Flow’s architecture.
# Configuration
## 8. Maven
If you want to override specific Maven configuration properties (remote repositories, proxies, and others) or run the Data Flow Server behind a proxy,
you need to specify those properties as command-line arguments when you start the Data Flow Server, as shown in the following example:
```
$ java -jar spring-cloud-dataflow-server-2.9.2.jar --spring.config.additional-location=/home/joe/maven.yml
```
The preceding command assumes a `maven.yaml` similar to the following:
```
maven:
localRepository: mylocal
remote-repositories:
repo1:
url: https://repo1
auth:
username: user1
password: pass1
snapshot-policy:
update-policy: daily
checksum-policy: warn
release-policy:
update-policy: never
checksum-policy: fail
repo2:
url: https://repo2
policy:
update-policy: always
checksum-policy: fail
proxy:
host: proxy1
port: "9010"
auth:
username: proxyuser1
password: proxypass1
```
By default, the protocol is set to `http`. You can omit the auth properties if the proxy does not need a username and password. Also, by default, the maven `localRepository` is set to `${user.home}/.m2/repository/`.
As shown in the preceding example, you can specify the remote repositories along with their authentication (if needed). If the remote repositories are behind a proxy, you can specify the proxy properties, as shown in the preceding example.
You can specify the repository policies for each remote repository configuration, as shown in the preceding example.
The key `policy` is applicable to both the `snapshot` and the `release` repository policies.
See the [Repository Policies](https://github.com/apache/maven-resolver/blob/master/maven-resolver-api/src/main/java/org/eclipse/aether/repository/RepositoryPolicy.java) topic for the list of
supported repository policies.
As these are Spring Boot `@ConfigurationProperties` you need to specify by adding them to the `SPRING_APPLICATION_JSON` environment variable. The following example shows how the JSON is structured:
```
$ SPRING_APPLICATION_JSON='
{
"maven": {
"local-repository": null,
"remote-repositories": {
"repo1": {
"url": "https://repo1",
"auth": {
"username": "repo1user",
"password": "repo1pass"
}
},
"repo2": {
"url": "https://repo2"
}
},
"proxy": {
"host": "proxyhost",
"port": 9018,
"auth": {
"username": "proxyuser",
"password": "proxypass"
}
}
}
}
'
```
### 8.1. Wagon
There is a limited support for using `Wagon` transport with Maven. Currently, this
exists to support *preemptive* authentication with `http`-based repositories
and needs to be enabled manually.
Wagon-based `http` transport is enabled by setting the `maven.use-wagon` property
to `true`. Then you can enable *preemptive* authentication for each remote
repository. Configuration loosely follows the similar patterns found in[HttpClient HTTP Wagon](https://maven.apache.org/guides/mini/guide-http-settings.html).
At the time of this writing, documentation in Maven’s own site is slightly misleading
and missing most of the possible configuration options.
The `maven.remote-repositories..wagon.http` namespace contains all Wagon`http` related settings, and the keys directly under it map to supported `http` methods — namely, `all`, `put`, `get` and `head`, as in Maven’s own configuration.
Under these method configurations, you can then set various options, such as`use-preemptive`. A simpl *preemptive* configuration to send an auth
header with all requests to a specified remote repository would look like the following example:
```
maven:
use-wagon: true
remote-repositories:
springRepo:
url: https://repo.example.org
wagon:
http:
all:
use-preemptive: true
auth:
username: user
password: password
```
Instead of configuring `all` methods, you can tune settings for `get`and `head` requests only, as follows:
```
maven:
use-wagon: true
remote-repositories:
springRepo:
url: https://repo.example.org
wagon:
http:
get:
use-preemptive: true
head:
use-preemptive: true
use-default-headers: true
connection-timeout: 1000
read-timeout: 1000
headers:
sample1: sample2
params:
http.socket.timeout: 1000
http.connection.stalecheck: true
auth:
username: user
password: password
```
There are settings for `use-default-headers`, `connection-timeout`,`read-timeout`, request `headers`, and HttpClient `params`. For more about parameters,
see [Wagon ConfigurationUtils](https://github.com/apache/maven-wagon/blob/master/wagon-providers/wagon-http-shared/src/main/java/org/apache/maven/wagon/shared/http/ConfigurationUtils.java).
## 9. Security
By default, the Data Flow server is unsecured and runs on an unencrypted HTTP connection.
You can secure your REST endpoints as well as the Data Flow Dashboard by enabling HTTPS
and requiring clients to authenticate with [OAuth 2.0](https://oauth.net/2/).
| |Appendix [Azure](#appendix-identity-provider-azure) contains more information how to
setup *Azure Active Directory* integration.|
|---|------------------------------------------------------------------------------------------------------------------------------------|
| |By default, the REST endpoints (administration, management, and health) as well as the Dashboard UI do not require authenticated access.|
|---|----------------------------------------------------------------------------------------------------------------------------------------|
While you can theoretically choose any OAuth provider in conjunction with
Spring Cloud Data Flow, we recommend using the[CloudFoundry User Account and Authentication (UAA) Server](https://github.com/cloudfoundry/uaa).
Not only is the UAA OpenID certified and is used by Cloud Foundry, but you can
also use it in local stand-alone deployment scenarios. Furthermore, the UAA not
only provides its own user store, but it also provides comprehensive LDAP integration.
#### 9.1. Enabling HTTPS
By default, the dashboard, management, and health endpoints use HTTP as a transport.
You can switch to HTTPS by adding a certificate to your configuration in`application.yml`, as shown in the following example:
```
server:
port: 8443 (1)
ssl:
key-alias: yourKeyAlias (2)
key-store: path/to/keystore (3)
key-store-password: yourKeyStorePassword (4)
key-password: yourKeyPassword (5)
trust-store: path/to/trust-store (6)
trust-store-password: yourTrustStorePassword (7)
```
|**1**| As the default port is `9393`, you may choose to change the port to a more common HTTPs-typical port. |
|-----|-------------------------------------------------------------------------------------------------------------------------------------------------------|
|**2**| The alias (or name) under which the key is stored in the keystore. |
|**3**| The path to the keystore file. You can also specify classpath resources, by using the classpath prefix - for example: `classpath:path/to/keystore`. |
|**4**| The password of the keystore. |
|**5**| The password of the key. |
|**6**|The path to the truststore file. You can also specify classpath resources, by using the classpath prefix - for example: `classpath:path/to/trust-store`|
|**7**| The password of the trust store. |
| |If HTTPS is enabled, it completely replaces HTTP as the protocol over
which the REST endpoints and the Data Flow Dashboard interact. Plain HTTP requests
fail. Therefore, make sure that you configure your Shell accordingly.|
|---|--------------------------------------------------------------------------------------------------------------------------------------------------------------------------------------------------------------------------------------|
##### Using Self-Signed Certificates
For testing purposes or during development, it might be convenient to create self-signed certificates.
To get started, execute the following command to create a certificate:
```
$ keytool -genkey -alias dataflow -keyalg RSA -keystore dataflow.keystore \
-validity 3650 -storetype JKS \
-dname "CN=localhost, OU=Spring, O=Pivotal, L=Kailua-Kona, ST=HI, C=US" (1)
-keypass dataflow -storepass dataflow
```
|**1**|`CN` is the important parameter here. It should match the domain you are trying to access - for example, `localhost`.|
|-----|---------------------------------------------------------------------------------------------------------------------|
Then add the following lines to your `application.yml` file:
```
server:
port: 8443
ssl:
enabled: true
key-alias: dataflow
key-store: "/your/path/to/dataflow.keystore"
key-store-type: jks
key-store-password: dataflow
key-password: dataflow
```
This is all you need to do for the Data Flow Server. Once you start the server,
you should be able to access it at `[localhost:8443/](https://localhost:8443/)`.
As this is a self-signed certificate, you should hit a warning in your browser, which
you need to ignore.
| |*Never* use self-signed certificates in production.|
|---|---------------------------------------------------|
##### Self-Signed Certificates and the Shell
By default, self-signed certificates are an issue for the shell, and additional steps
are necessary to make the shell work with self-signed certificates. Two options
are available:
* Add the self-signed certificate to the JVM truststore.
* Skip certificate validation.
###### Adding the Self-signed Certificate to the JVM Truststore
In order to use the JVM truststore option, you need to
export the previously created certificate from the keystore, as follows:
```
$ keytool -export -alias dataflow -keystore dataflow.keystore -file dataflow_cert -storepass dataflow
```
Next, you need to create a truststore that the shell can use, as follows:
```
$ keytool -importcert -keystore dataflow.truststore -alias dataflow -storepass dataflow -file dataflow_cert -noprompt
```
Now you are ready to launch the Data Flow Shell with the following JVM arguments:
```
$ java -Djavax.net.ssl.trustStorePassword=dataflow \
-Djavax.net.ssl.trustStore=/path/to/dataflow.truststore \
-Djavax.net.ssl.trustStoreType=jks \
-jar spring-cloud-dataflow-shell-2.9.2.jar
```
| |If you run into trouble establishing a connection over SSL, you can enable additional
logging by using and setting the `javax.net.debug` JVM argument to `ssl`.|
|---|-------------------------------------------------------------------------------------------------------------------------------------------------------------------|
Do not forget to target the Data Flow Server with the following command:
```
dataflow:> dataflow config server https://localhost:8443/
```
###### Skipping Certificate Validation
Alternatively, you can also bypass the certification validation by providing the
optional `--dataflow.skip-ssl-validation=true` command-line parameter.
If you set this command-line parameter, the shell accepts any (self-signed) SSL
certificate.
| |If possible, you should avoid using this option. Disabling the trust manager
defeats the purpose of SSL and makes your application vulnerable to man-in-the-middle attacks.|
|---|-------------------------------------------------------------------------------------------------------------------------------------------------------------------------------|
#### 9.2. Authentication by using OAuth 2.0
To support authentication and authorization, Spring Cloud Data
Flow uses [OAuth 2.0](https://oauth.net/2/).
It lets you integrate Spring Cloud Data Flow into Single Sign On (SSO)
environments.
| |As of Spring Cloud Data Flow 2.0, OAuth2 is the only mechanism
for providing authentication and authorization.|
|---|------------------------------------------------------------------------------------------------------------------|
The following OAuth2 Grant Types are used:
* **Authorization Code**: Used for the GUI (browser) integration. Visitors are redirected to your OAuth Service for authentication
* **Password**: Used by the shell (and the REST integration), so visitors can log in with username and password
* **Client Credentials**: Retrieves an access token directly from your OAuth provider and passes it to the Data Flow server by using the Authorization HTTP header
| |Currently, Spring Cloud Data Flow uses opaque tokens and not transparent
tokens (JWT).|
|---|------------------------------------------------------------------------------------------|
You can access the REST endpoints in two ways:
* **Basic authentication**, which uses the *Password Grant Type* to authenticate with your OAuth2 service
* **Access token**, which uses the Client *Credentials Grant Type*
| |When you set up authentication, you really should enable HTTPS
as well, especially in production environments.|
|---|------------------------------------------------------------------------------------------------------------------|
You can turn on OAuth2 authentication by adding the following to `application.yml` or by setting
environment variables. The following example shows the minimal setup needed for[CloudFoundry User Account and Authentication (UAA) Server](https://github.com/cloudfoundry/uaa):
```
spring:
security:
oauth2: (1)
client:
registration:
uaa: (2)
client-id: myclient
client-secret: mysecret
redirect-uri: '{baseUrl}/login/oauth2/code/{registrationId}'
authorization-grant-type: authorization_code
scope:
- openid (3)
provider:
uaa:
jwk-set-uri: http://uaa.local:8080/uaa/token_keys
token-uri: http://uaa.local:8080/uaa/oauth/token
user-info-uri: http://uaa.local:8080/uaa/userinfo (4)
user-name-attribute: user_name (5)
authorization-uri: http://uaa.local:8080/uaa/oauth/authorize
resourceserver:
opaquetoken:
introspection-uri: http://uaa.local:8080/uaa/introspect (6)
client-id: dataflow
client-secret: dataflow
```
|**1**| Providing this property activates OAuth2 security. |
|-----|---------------------------------------------------------------------------------------------------------------------------------------------------------------------------------------------------------------------|
|**2**| The provider ID. You can specify more than one provider. |
|**3**|As the UAA is an OpenID provider, you must at least specify the `openid` scope.
If your provider also provides additional scopes to control the role assignments,
you must specify those scopes here as well.|
|**4**| OpenID endpoint. Used to retrieve user information such as the username. Mandatory. |
|**5**| The JSON property of the response that contains the username. |
|**6**| Used to introspect and validate a directly passed-in token. Mandatory. |
You can verify that basic authentication is working properly by using curl, as follows:
```
curl -u myusername:mypassword http://localhost:9393/ -H 'Accept: application/json'
```
As a result, you should see a list of available REST endpoints.
| |When you access the Root URL with a web browser and
security enabled, you are redirected to the Dashboard UI. To see the
list of REST endpoints, specify the `application/json` `Accept` header. Also be sure
to add the `Accept` header by using tools such as[Postman](https://chrome.google.com/webstore/detail/postman/fhbjgbiflinjbdggehcddcbncdddomop?hl=en) (Chrome)
or [RESTClient](https://addons.mozilla.org/en-GB/firefox/addon/restclient/) (Firefox).|
|---|----------------------------------------------------------------------------------------------------------------------------------------------------------------------------------------------------------------------------------------------------------------------------------------------------------------------------------------------------------------------------------------------------------------------------------------------------------------------------------|
Besides Basic Authentication, you can also provide an access token, to
access the REST API. To do so, retrieve an
OAuth2 Access Token from your OAuth2 provider and pass that access token to
the REST Api by using the **Authorization** HTTP header, as follows:
```
$ curl -H "Authorization: Bearer " http://localhost:9393/ -H 'Accept: application/json'
```
#### 9.3. Customizing Authorization
The preceding content mostly deals with authentication — that is, how to assess
the identity of the user. In this section, we discuss the available**authorization** options — that is, who can do what.
The authorization rules are defined in `dataflow-server-defaults.yml` (part of
the Spring Cloud Data Flow Core module).
Because the determination of security roles is environment-specific,
Spring Cloud Data Flow, by default, assigns all roles to authenticated OAuth2
users. The `DefaultDataflowAuthoritiesExtractor` class is used for that purpose.
Alternatively, you can have Spring Cloud Data Flow map OAuth2 scopes to Data Flow roles by
setting the boolean property `map-oauth-scopes` for your provider to `true` (the default is `false`).
For example, if your provider’s ID is `uaa`, the property would be`spring.cloud.dataflow.security.authorization.provider-role-mappings.uaa.map-oauth-scopes`.
For more details, see the chapter on [Role Mappings](#configuration-security-role-mapping).
You can also customize the role-mapping behavior by providing your own Spring bean definition that
extends Spring Cloud Data Flow’s `AuthorityMapper` interface. In that case,
the custom bean definition takes precedence over the default one provided by
Spring Cloud Data Flow.
The default scheme uses seven roles to protect the [REST endpoints](#api-guide)that Spring Cloud Data Flow exposes:
* **ROLE\_CREATE**: For anything that involves creating, such as creating streams or tasks
* **ROLE\_DEPLOY**: For deploying streams or launching tasks
* **ROLE\_DESTROY**: For anything that involves deleting streams, tasks, and so on.
* **ROLE\_MANAGE**: For Boot management endpoints
* **ROLE\_MODIFY**: For anything that involves mutating the state of the system
* **ROLE\_SCHEDULE**: For scheduling related operation (such as scheduling a task)
* **ROLE\_VIEW**: For anything that relates to retrieving state
As mentioned earlier in this section, all authorization-related default settings are specified
in `dataflow-server-defaults.yml`, which is part of the Spring Cloud Data Flow Core
Module. Nonetheless, you can override those settings, if desired — for example,
in `application.yml`. The configuration takes the form of a YAML list (as some
rules may have precedence over others). Consequently, you need to copy and paste
the whole list and tailor it to your needs (as there is no way to merge lists).
| |Always refer to your version of the `application.yml` file, as the following snippet may be outdated.|
|---|-----------------------------------------------------------------------------------------------------|
The default rules are as follows:
```
spring:
cloud:
dataflow:
security:
authorization:
enabled: true
loginUrl: "/"
permit-all-paths: "/authenticate,/security/info,/assets/**,/dashboard/logout-success-oauth.html,/favicon.ico"
rules:
# About
- GET /about => hasRole('ROLE_VIEW')
# Audit
- GET /audit-records => hasRole('ROLE_VIEW')
- GET /audit-records/** => hasRole('ROLE_VIEW')
# Boot Endpoints
- GET /management/** => hasRole('ROLE_MANAGE')
# Apps
- GET /apps => hasRole('ROLE_VIEW')
- GET /apps/** => hasRole('ROLE_VIEW')
- DELETE /apps/** => hasRole('ROLE_DESTROY')
- POST /apps => hasRole('ROLE_CREATE')
- POST /apps/** => hasRole('ROLE_CREATE')
- PUT /apps/** => hasRole('ROLE_MODIFY')
# Completions
- GET /completions/** => hasRole('ROLE_VIEW')
# Job Executions & Batch Job Execution Steps && Job Step Execution Progress
- GET /jobs/executions => hasRole('ROLE_VIEW')
- PUT /jobs/executions/** => hasRole('ROLE_MODIFY')
- GET /jobs/executions/** => hasRole('ROLE_VIEW')
- GET /jobs/thinexecutions => hasRole('ROLE_VIEW')
# Batch Job Instances
- GET /jobs/instances => hasRole('ROLE_VIEW')
- GET /jobs/instances/* => hasRole('ROLE_VIEW')
# Running Applications
- GET /runtime/streams => hasRole('ROLE_VIEW')
- GET /runtime/streams/** => hasRole('ROLE_VIEW')
- GET /runtime/apps => hasRole('ROLE_VIEW')
- GET /runtime/apps/** => hasRole('ROLE_VIEW')
# Stream Definitions
- GET /streams/definitions => hasRole('ROLE_VIEW')
- GET /streams/definitions/* => hasRole('ROLE_VIEW')
- GET /streams/definitions/*/related => hasRole('ROLE_VIEW')
- POST /streams/definitions => hasRole('ROLE_CREATE')
- DELETE /streams/definitions/* => hasRole('ROLE_DESTROY')
- DELETE /streams/definitions => hasRole('ROLE_DESTROY')
# Stream Deployments
- DELETE /streams/deployments/* => hasRole('ROLE_DEPLOY')
- DELETE /streams/deployments => hasRole('ROLE_DEPLOY')
- POST /streams/deployments/** => hasRole('ROLE_MODIFY')
- GET /streams/deployments/** => hasRole('ROLE_VIEW')
# Stream Validations
- GET /streams/validation/ => hasRole('ROLE_VIEW')
- GET /streams/validation/* => hasRole('ROLE_VIEW')
# Stream Logs
- GET /streams/logs/* => hasRole('ROLE_VIEW')
# Task Definitions
- POST /tasks/definitions => hasRole('ROLE_CREATE')
- DELETE /tasks/definitions/* => hasRole('ROLE_DESTROY')
- GET /tasks/definitions => hasRole('ROLE_VIEW')
- GET /tasks/definitions/* => hasRole('ROLE_VIEW')
# Task Executions
- GET /tasks/executions => hasRole('ROLE_VIEW')
- GET /tasks/executions/* => hasRole('ROLE_VIEW')
- POST /tasks/executions => hasRole('ROLE_DEPLOY')
- POST /tasks/executions/* => hasRole('ROLE_DEPLOY')
- DELETE /tasks/executions/* => hasRole('ROLE_DESTROY')
# Task Schedules
- GET /tasks/schedules => hasRole('ROLE_VIEW')
- GET /tasks/schedules/* => hasRole('ROLE_VIEW')
- GET /tasks/schedules/instances => hasRole('ROLE_VIEW')
- GET /tasks/schedules/instances/* => hasRole('ROLE_VIEW')
- POST /tasks/schedules => hasRole('ROLE_SCHEDULE')
- DELETE /tasks/schedules/* => hasRole('ROLE_SCHEDULE')
# Task Platform Account List */
- GET /tasks/platforms => hasRole('ROLE_VIEW')
# Task Validations
- GET /tasks/validation/ => hasRole('ROLE_VIEW')
- GET /tasks/validation/* => hasRole('ROLE_VIEW')
# Task Logs
- GET /tasks/logs/* => hasRole('ROLE_VIEW')
# Tools
- POST /tools/** => hasRole('ROLE_VIEW')
```
The format of each line is the following:
```
HTTP_METHOD URL_PATTERN '=>' SECURITY_ATTRIBUTE
```
where:
* HTTP\_METHOD is one HTTP method (such as PUT or GET), capital case.
* URL\_PATTERN is an Ant-style URL pattern.
* SECURITY\_ATTRIBUTE is a SpEL expression. See [Expression-Based Access Control](https://docs.spring.io/spring-security/site/docs/current/reference/htmlsingle/#el-access).
* Each of those is separated by one or whitespace characters (spaces, tabs, and so on).
Be mindful that the above is a YAML list, not a map (thus the use of '-' dashes
at the start of each line) that lives under the `spring.cloud.dataflow.security.authorization.rules` key.
##### Authorization — Shell and Dashboard Behavior
When security is enabled, the dashboard and the shell are role-aware,
meaning that, depending on the assigned roles, not all functionality may be visible.
For instance, shell commands for which the user does not have the necessary roles
are marked as unavailable.
| |Currently, the shell’s `help` command lists commands that are unavailable.
Please track the following issue: [github.com/spring-projects/spring-shell/issues/115](https://github.com/spring-projects/spring-shell/issues/115)|
|---|---------------------------------------------------------------------------------------------------------------------------------------------------------------------------------------------------------------------------------|
Conversely, for the Dashboard, the UI does not show pages or page elements for
which the user is not authorized.
##### Securing the Spring Boot Management Endpoints
When security is enabled, the[Spring Boot HTTP Management Endpoints](https://docs.spring.io/spring-boot/docs/2.1.1.RELEASE/reference/html/production-ready-monitoring.html)are secured in the same way as the other REST endpoints. The management REST endpoints
are available under `/management` and require the `MANAGEMENT` role.
The default configuration in `dataflow-server-defaults.yml` is as follows:
```
management:
endpoints:
web:
base-path: /management
security:
roles: MANAGE
```
| |Currently, you should not customize the default management path.|
|---|----------------------------------------------------------------|
#### 9.4. Setting up UAA Authentication
For local deployment scenarios, we recommend using the [CloudFoundry User
Account and Authentication (UAA) Server](https://github.com/cloudfoundry/uaa), which is [OpenID certified](https://openid.net/certification/).
While the UAA is used by [Cloud Foundry](https://www.cloudfoundry.org/),
it is also a fully featured stand alone OAuth2 server with enterprise features, such as[LDAP integration](https://github.com/cloudfoundry/uaa/blob/develop/docs/UAA-LDAP.md).
##### Requirements
You need to check out, build and run UAA. To do so, make sure that you:
* Use Java 8.
* Have [Git](https://git-scm.com/) installed.
* Have the [CloudFoundry UAA Command Line Client](https://github.com/cloudfoundry/cf-uaac) installed.
* Use a different host name for UAA when running on the same machine — for example, `[uaa/](http://uaa/)`.
If you run into issues installing *uaac*, you may have to set the `GEM_HOME` environment
variable:
```
export GEM_HOME="$HOME/.gem"
```
You should also ensure that `~/.gem/gems/cf-uaac-4.2.0/bin` has been added to your path.
##### Prepare UAA for JWT
As the UAA is an OpenID provider and uses JSON Web Tokens (JWT), it needs to have
a private key for signing those JWTs:
```
openssl genrsa -out signingkey.pem 2048
openssl rsa -in signingkey.pem -pubout -out verificationkey.pem
export JWT_TOKEN_SIGNING_KEY=$(cat signingkey.pem)
export JWT_TOKEN_VERIFICATION_KEY=$(cat verificationkey.pem)
```
Later, once the UAA is started, you can see the keys when you access `[uaa:8080/uaa/token_keys](http://uaa:8080/uaa/token_keys)`.
| |Here, the `uaa` in the URL `[uaa:8080/uaa/token_keys](http://uaa:8080/uaa/token_keys)` is the hostname.|
|---|-------------------------------------------------------------------------------------------------------|
##### Download and Start UAA
To download and install UAA, run the following commands:
```
git clone https://github.com/pivotal/uaa-bundled.git
cd uaa-bundled
./mvnw clean install
java -jar target/uaa-bundled-1.0.0.BUILD-SNAPSHOT.jar
```
The configuration of the UAA is driven by a YAML file `uaa.yml`, or you can script the configuration
using the UAA Command Line Client:
```
uaac target http://uaa:8080/uaa
uaac token client get admin -s adminsecret
uaac client add dataflow \
--name dataflow \
--secret dataflow \
--scope cloud_controller.read,cloud_controller.write,openid,password.write,scim.userids,sample.create,sample.view,dataflow.create,dataflow.deploy,dataflow.destroy,dataflow.manage,dataflow.modify,dataflow.schedule,dataflow.view \
--authorized_grant_types password,authorization_code,client_credentials,refresh_token \
--authorities uaa.resource,dataflow.create,dataflow.deploy,dataflow.destroy,dataflow.manage,dataflow.modify,dataflow.schedule,dataflow.view,sample.view,sample.create\
--redirect_uri http://localhost:9393/login \
--autoapprove openid
uaac group add "sample.view"
uaac group add "sample.create"
uaac group add "dataflow.view"
uaac group add "dataflow.create"
uaac user add springrocks -p mysecret --emails [email protected]
uaac user add vieweronly -p mysecret --emails [email protected]
uaac member add "sample.view" springrocks
uaac member add "sample.create" springrocks
uaac member add "dataflow.view" springrocks
uaac member add "dataflow.create" springrocks
uaac member add "sample.view" vieweronly
```
The preceding script sets up the dataflow client as well as two users:
* User *springrocks* has have both scopes: `sample.view` and `sample.create`.
* User *vieweronly* has only one scope: `sample.view`.
Once added, you can quickly double-check that the UAA has the users created:
```
curl -v -d"username=springrocks&password=mysecret&client_id=dataflow&grant_type=password" -u "dataflow:dataflow" http://uaa:8080/uaa/oauth/token -d 'token_format=opaque'
```
The preceding command should produce output similar to the following:
```
* Trying 127.0.0.1...
* TCP_NODELAY set
* Connected to uaa (127.0.0.1) port 8080 (#0)
* Server auth using Basic with user 'dataflow'
> POST /uaa/oauth/token HTTP/1.1
> Host: uaa:8080
> Authorization: Basic ZGF0YWZsb3c6ZGF0YWZsb3c=
> User-Agent: curl/7.54.0
> Accept: */*
> Content-Length: 97
> Content-Type: application/x-www-form-urlencoded
>
* upload completely sent off: 97 out of 97 bytes
< HTTP/1.1 200
< Cache-Control: no-store
< Pragma: no-cache
< X-XSS-Protection: 1; mode=block
< X-Frame-Options: DENY
< X-Content-Type-Options: nosniff
< Content-Type: application/json;charset=UTF-8
< Transfer-Encoding: chunked
< Date: Thu, 31 Oct 2019 21:22:59 GMT
<
* Connection #0 to host uaa left intact
{"access_token":"0329c8ecdf594ee78c271e022138be9d","token_type":"bearer","id_token":"eyJhbGciOiJSUzI1NiIsImprdSI6Imh0dHBzOi8vbG9jYWxob3N0OjgwODAvdWFhL3Rva2VuX2tleXMiLCJraWQiOiJsZWdhY3ktdG9rZW4ta2V5IiwidHlwIjoiSldUIn0.eyJzdWIiOiJlZTg4MDg4Ny00MWM2LTRkMWQtYjcyZC1hOTQ4MmFmNGViYTQiLCJhdWQiOlsiZGF0YWZsb3ciXSwiaXNzIjoiaHR0cDovL2xvY2FsaG9zdDo4MDkwL3VhYS9vYXV0aC90b2tlbiIsImV4cCI6MTU3MjYwMDE3OSwiaWF0IjoxNTcyNTU2OTc5LCJhbXIiOlsicHdkIl0sImF6cCI6ImRhdGFmbG93Iiwic2NvcGUiOlsib3BlbmlkIl0sImVtYWlsIjoic3ByaW5ncm9ja3NAc29tZXBsYWNlLmNvbSIsInppZCI6InVhYSIsIm9yaWdpbiI6InVhYSIsImp0aSI6IjAzMjljOGVjZGY1OTRlZTc4YzI3MWUwMjIxMzhiZTlkIiwiZW1haWxfdmVyaWZpZWQiOnRydWUsImNsaWVudF9pZCI6ImRhdGFmbG93IiwiY2lkIjoiZGF0YWZsb3ciLCJncmFudF90eXBlIjoicGFzc3dvcmQiLCJ1c2VyX25hbWUiOiJzcHJpbmdyb2NrcyIsInJldl9zaWciOiJlOTkyMDQxNSIsInVzZXJfaWQiOiJlZTg4MDg4Ny00MWM2LTRkMWQtYjcyZC1hOTQ4MmFmNGViYTQiLCJhdXRoX3RpbWUiOjE1NzI1NTY5Nzl9.bqYvicyCPB5cIIu_2HEe5_c7nSGXKw7B8-reTvyYjOQ2qXSMq7gzS4LCCQ-CMcb4IirlDaFlQtZJSDE-_UsM33-ThmtFdx--TujvTR1u2nzot4Pq5A_ThmhhcCB21x6-RNNAJl9X9uUcT3gKfKVs3gjE0tm2K1vZfOkiGhjseIbwht2vBx0MnHteJpVW6U0pyCWG_tpBjrNBSj9yLoQZcqrtxYrWvPHaa9ljxfvaIsOnCZBGT7I552O1VRHWMj1lwNmRNZy5koJFPF7SbhiTM8eLkZVNdR3GEiofpzLCfoQXrr52YbiqjkYT94t3wz5C6u1JtBtgc2vq60HmR45bvg","refresh_token":"6ee95d017ada408697f2d19b04f7aa6c-r","expires_in":43199,"scope":"scim.userids openid sample.create cloud_controller.read password.write cloud_controller.write sample.view","jti":"0329c8ecdf594ee78c271e022138be9d"}
```
By using the `token_format` parameter, you can request the token to be either:
* opaque
* jwt
## 10. Configuration - Local
### 10.1. Feature Toggles
Spring Cloud Data Flow Server offers specific set of features that can be enabled/disabled when launching. These features include all the lifecycle operations and REST endpoints (server and client implementations, including the shell and the UI) for:
* Streams (requires Skipper)
* Tasks
* Task Scheduler
One can enable and disable these features by setting the following boolean properties when launching the Data Flow server:
* `spring.cloud.dataflow.features.streams-enabled`
* `spring.cloud.dataflow.features.tasks-enabled`
* `spring.cloud.dataflow.features.schedules-enabled`
By default, stream (requires Skipper), and tasks are enabled and Task Scheduler is disabled by default.
The REST `/about` endpoint provides information on the features that have been enabled and disabled.
### 10.2. Database
A relational database is used to store stream and task definitions as well as the state of executed tasks.
Spring Cloud Data Flow provides schemas for **H2**, **MySQL**, **Oracle**, **PostgreSQL**, **Db2**, and **SQL Server**. The schema is automatically created when the server starts.
By default, Spring Cloud Data Flow offers an embedded instance of the **H2** database. The **H2** database is good
for development purposes but is not recommended for production use.
| |**H2** database is not supported as an external mode.|
|---|-----------------------------------------------------|
The JDBC drivers for **MySQL** (through the MariaDB driver), **PostgreSQL**, **SQL Server**, and embedded **H2** are available without additional configuration.
If you are using any other database, then you need to put the corresponding JDBC driver jar on the classpath of the server.
The database properties can be passed as environment variables or command-line arguments to the Data Flow Server.
#### 10.2.1. MySQL
The following example shows how to define a MySQL database connection using MariaDB driver.
```
java -jar spring-cloud-dataflow-server/target/spring-cloud-dataflow-server-2.9.2.jar \
--spring.datasource.url=jdbc:mysql://localhost:3306/mydb \
--spring.datasource.username= \
--spring.datasource.password= \
--spring.datasource.driver-class-name=org.mariadb.jdbc.Driver
```
MySQL versions up to *5.7* can be used with a MariaDB driver. Starting from version *8.0* MySQL’s own driver has to be used.
```
java -jar spring-cloud-dataflow-server/target/spring-cloud-dataflow-server-2.9.2.jar \
--spring.datasource.url=jdbc:mysql://localhost:3306/mydb \
--spring.datasource.username= \
--spring.datasource.password= \
--spring.datasource.driver-class-name=com.mysql.jdbc.Driver
```
| |Due to licensing restrictions we’re unable to bundle MySQL driver. You need to add it to
server’s classpath yourself.|
|---|-------------------------------------------------------------------------------------------------------------------------|
#### 10.2.2. MariaDB
The following example shows how to define a MariaDB database connection with command Line arguments
```
java -jar spring-cloud-dataflow-server/target/spring-cloud-dataflow-server-2.9.2.jar \
--spring.datasource.url=jdbc:mariadb://localhost:3306/mydb?useMysqlMetadata=true \
--spring.datasource.username= \
--spring.datasource.password= \
--spring.datasource.driver-class-name=org.mariadb.jdbc.Driver
```
Starting with MariaDB v2.4.1 connector release, it is required to also add `useMysqlMetadata=true`to the JDBC URL. This is a required workaround until when MySQL and MariaDB entirely switch as two
different databases.
MariaDB version *10.3* introduced a support for real database sequences which is yet another breaking
change while toolings around these databases fully support MySQL and MariaDB as a separate database
types. Workaround is to use older hibernate dialect which doesn’t try to use sequences.
```
java -jar spring-cloud-dataflow-server/target/spring-cloud-dataflow-server-2.9.2.jar \
--spring.datasource.url=jdbc:mariadb://localhost:3306/mydb?useMysqlMetadata=true \
--spring.datasource.username= \
--spring.datasource.password= \
--spring.jpa.properties.hibernate.dialect=org.hibernate.dialect.MariaDB102Dialect \
--spring.datasource.driver-class-name=org.mariadb.jdbc.Driver
```
#### 10.2.3. PostgreSQL
The following example shows how to define a PostgreSQL database connection with command line arguments:
```
java -jar spring-cloud-dataflow-server/target/spring-cloud-dataflow-server-2.9.2.jar \
--spring.datasource.url=jdbc:postgresql://localhost:5432/mydb \
--spring.datasource.username= \
--spring.datasource.password= \
--spring.datasource.driver-class-name=org.postgresql.Driver
```
#### 10.2.4. SQL Server
The following example shows how to define a SQL Server database connection with command line arguments:
```
java -jar spring-cloud-dataflow-server/target/spring-cloud-dataflow-server-2.9.2.jar \
--spring.datasource.url='jdbc:sqlserver://localhost:1433;databaseName=mydb' \
--spring.datasource.username= \
--spring.datasource.password= \
--spring.datasource.driver-class-name=com.microsoft.sqlserver.jdbc.SQLServerDriver
```
#### 10.2.5. Db2
The following example shows how to define a Db2 database connection with command line arguments:
```
java -jar spring-cloud-dataflow-server/target/spring-cloud-dataflow-server-2.9.2.jar \
--spring.datasource.url=jdbc:db2://localhost:50000/mydb \
--spring.datasource.username= \
--spring.datasource.password= \
--spring.datasource.driver-class-name=com.ibm.db2.jcc.DB2Driver
```
| |Due to licensing restrictions we’re unable to bundle Db2 driver. You need to add it to
server’s classpath yourself.|
|---|-----------------------------------------------------------------------------------------------------------------------|
#### 10.2.6. Oracle
The following example shows how to define a Oracle database connection with command line arguments:
```
java -jar spring-cloud-dataflow-server/target/spring-cloud-dataflow-server-2.9.2.jar \
--spring.datasource.url=jdbc:oracle:thin:@localhost:1521/MYDB \
--spring.datasource.username= \
--spring.datasource.password= \
--spring.datasource.driver-class-name=oracle.jdbc.OracleDriver
```
| |Due to licensing restrictions we’re unable to bundle Oracle driver. You need to add it to
server’s classpath yourself.|
|---|--------------------------------------------------------------------------------------------------------------------------|
#### 10.2.7. Adding a Custom JDBC Driver
To add a custom driver for the database (for example, Oracle), you should rebuild the Data Flow Server and add the dependency to the Maven `pom.xml` file.
You need to modify the maven `pom.xml` of `spring-cloud-dataflow-server` module.
There are GA release tags in GitHub repository, so you can switch to desired GA tags to add the drivers on the production-ready codebase.
To add a custom JDBC driver dependency for the Spring Cloud Data Flow server:
1. Select the tag that corresponds to the version of the server you want to rebuild and clone the github repository.
2. Edit the spring-cloud-dataflow-server/pom.xml and, in the `dependencies` section, add the dependency for the database driver required. In the following example , an Oracle driver has been chosen:
```
...
com.oracle.jdbc
ojdbc8
12.2.0.1
...
```
1. Build the application as described in [Building Spring Cloud Data Flow](#building)
You can also provide default values when rebuilding the server by adding the necessary properties to the dataflow-server.yml file,
as shown in the following example for PostgreSQL:
```
spring:
datasource:
url: jdbc:postgresql://localhost:5432/mydb
username: myuser
password: mypass
driver-class-name:org.postgresql.Driver
```
1. Alternatively, you can build a custom Spring Cloud Data Flow server with your build files.
There are examples of a custom server builds in our [samples repo](https://github.com/spring-cloud/spring-cloud-dataflow-samples/tree/master/custom-dataflow-builds) if there is a need to add a driver jars.
#### 10.2.8. Schema Handling
On default database schema is managed with *Flyway* which is convenient if it’s
possible to give enough permissions to a database user.
Here’s a description what happens when *Skipper* server is started:
* Flyway checks if `flyway_schema_history` table exists.
* Does a baseline(to version 1) if schema is not empty as *Dataflow* tables
may be in place if a shared DB is used.
* If schema is empty, flyway assumes to start from a scratch.
* Goes through all needed schema migrations.
Here’s a description what happens when *Dataflow* server is started:
* Flyway checks if `flyway_schema_history_dataflow` table exists.
* Does a baseline(to version 1) if schema is not empty as *Skipper* tables
may be in place if a shared DB is used.
* If schema is empty, flyway assumes to start from a scratch.
* Goes through all needed schema migrations.
* Due to historical reasons, if we detect that schema is from *1.7.x* line
we convert these to structures needed from *2.0.x* onwards and fully
continue with flyway.
| |We have schema ddl’s in our source code[schemas](https://github.com/spring-cloud/spring-cloud-dataflow/tree/master/spring-cloud-dataflow-server-core/src/main/resources/schemas)which can be used manually if *Flyway* is disabled by using configuration`spring.flyway.enabled=false`. This is a good option if company’s databases
are restricted and i.e. applications itself cannot create schemas.|
|---|-----------------------------------------------------------------------------------------------------------------------------------------------------------------------------------------------------------------------------------------------------------------------------------------------------------------------------------------------------------------------------------------------------------|
### 10.3. Deployer Properties
You can use the following configuration properties of the [Local deployer](https://github.com/spring-cloud/spring-cloud-deployer-local) to customize how Streams and Tasks are deployed.
When deploying using the Data Flow shell, you can use the syntax `deployer..local.`. See below for an example shell usage.
These properties are also used when configuring [Local Task Platforms](#configuration-local-tasks) in the Data Flow server and local platforms in Skipper for deploying Streams.
|Deployer Property Name| Description | Default Value |
|----------------------|--------------------------------------------------------------------------------------------------------|-----------------------------------------------------------------------------------------------------------------------------------------------------|
|workingDirectoriesRoot| Directory in which all created processes will run and create log files. | java.io.tmpdir |
| envVarsToInherit |Array of regular expression patterns for environment variables that are passed to launched applications.|\<"TMP", "LANG", "LANGUAGE", "LC\_.\*", "PATH", "SPRING\_APPLICATION\_JSON"\> on windows and \<"TMP", "LANG", "LANGUAGE", "LC\_.\*", "PATH"\> on Unix|
| deleteFilesOnExit | Whether to delete created files and directories on JVM exit. | true |
| javaCmd | Command to run java | java |
| shutdownTimeout | Max number of seconds to wait for app shutdown. | 30 |
| javaOpts | The Java Options to pass to the JVM, e.g -Dtest=foo | \ |
| inheritLogging | allow logging to be redirected to the output stream of the process that triggered child process. | false |
| debugPort | Port for remote debugging | \ |
As an example, to set Java options for the time application in the `ticktock` stream, use the following stream deployment properties.
```
dataflow:> stream create --name ticktock --definition "time --server.port=9000 | log"
dataflow:> stream deploy --name ticktock --properties "deployer.time.local.javaOpts=-Xmx2048m -Dtest=foo"
```
As a convenience, you can set the `deployer.memory` property to set the Java option `-Xmx`, as shown in the following example:
```
dataflow:> stream deploy --name ticktock --properties "deployer.time.memory=2048m"
```
At deployment time, if you specify an `-Xmx` option in the `deployer..local.javaOpts` property in addition to a value of the `deployer..local.memory` option, the value in the `javaOpts` property has precedence. Also, the `javaOpts` property set when deploying the application has precedence over the Data Flow Server’s `spring.cloud.deployer.local.javaOpts` property.
### 10.4. Logging
Spring Cloud Data Flow `local` server is automatically configured to use `RollingFileAppender` for logging.
The logging configuration is located on the classpath contained in a file named `logback-spring.xml`.
By default, the log file is configured to use:
```
```
with the logback configuration for the `RollingPolicy`:
```
${LOG_FILE}.log
${LOG_FILE}.${LOG_FILE_ROLLING_FILE_NAME_PATTERN:-%d{yyyy-MM-dd}}.%i.gz
${LOG_FILE_MAX_SIZE:-100MB}
${LOG_FILE_MAX_HISTORY:-30}
${LOG_FILE_TOTAL_SIZE_CAP:-500MB}
${FILE_LOG_PATTERN}
```
To check the `java.io.tmpdir` for the current Spring Cloud Data Flow Server `local` server,
```
jinfo | grep "java.io.tmpdir"
```
If you want to change or override any of the properties `LOG_FILE`, `LOG_PATH`, `LOG_TEMP`, `LOG_FILE_MAX_SIZE`, `LOG_FILE_MAX_HISTORY` and `LOG_FILE_TOTAL_SIZE_CAP`, please set them as system properties.
### 10.5. Streams
Data Flow Server delegates to the Skipper server the management of the Stream’s lifecycle. Set the configuration property `spring.cloud.skipper.client.serverUri` to the location of Skipper, e.g.
```
$ java -jar spring-cloud-dataflow-server-2.9.2.jar --spring.cloud.skipper.client.serverUri=https://192.51.100.1:7577/api
```
The configuration of show streams are deployed and to which platforms, is done by configuration of `platform accounts` on the Skipper server.
See the documentation on [platforms](https://docs.spring.io/spring-cloud-skipper/docs/current/reference/htmlsingle/#platforms) for more information.
### 10.6. Tasks
The Data Flow server is responsible for deploying Tasks.
Tasks that are launched by Data Flow write their state to the same database that is used by the Data Flow server.
For Tasks which are Spring Batch Jobs, the job and step execution data is also stored in this database.
As with streams launched by Skipper, Tasks can be launched to multiple platforms.
If no platform is defined, a platform named `default` is created using the default values of the class [LocalDeployerProperties](https://github.com/spring-cloud/spring-cloud-deployer-local/blob/master/spring-cloud-deployer-local/src/main/java/org/springframework/cloud/deployer/spi/local/LocalDeployerProperties.java), which is summarized in the table [Local Deployer Properties](#configuration-local-deployer)
To configure new platform accounts for the local platform, provide an entry under the `spring.cloud.dataflow.task.platform.local` section in your `application.yaml` file for via another Spring Boot supported mechanism.
In the following example, two local platform accounts named `localDev` and `localDevDebug` are created.
The keys such as `shutdownTimeout` and `javaOpts` are local deployer properties.
```
spring:
cloud:
dataflow:
task:
platform:
local:
accounts:
localDev:
shutdownTimeout: 60
javaOpts: "-Dtest=foo -Xmx1024m"
localDevDebug:
javaOpts: "-Xdebug -Xmx2048m"
```
| |By defining one platform as `default` allows you to skip using `platformName` where its use would otherwise be required.|
|---|------------------------------------------------------------------------------------------------------------------------|
When launching a task, pass the value of the platform account name using the task launch option `--platformName` If you do not pass a value for `platformName`, the value `default` will be used.
| |When deploying a task to multiple platforms, the configuration of the task needs to connect to the same database as the Data Flow Server.|
|---|-----------------------------------------------------------------------------------------------------------------------------------------|
You can configure the Data Flow server that is running locally to deploy tasks to Cloud Foundry or Kubernetes. See the sections on [Cloud Foundry Task Platform Configuration](#configuration-cloudfoundry-tasks) and [Kubernetes Task Platform Configuration](#configuration-kubernetes-tasks) for more information.
Detailed examples for launching and scheduling tasks across multiple platforms, are available in this section [Multiple Platform Support for Tasks](https://dataflow.spring.io/docs/recipes/multi-platform-deployment/) on [dataflow.spring.io](http://dataflow.spring.io).
##### Start Skipper
```
git clone https://github.com/spring-cloud/spring-cloud-skipper.git
cd spring-cloud/spring-cloud-skipper
./mvnw clean package -DskipTests=true
java -jar spring-cloud-skipper-server/target/spring-cloud-skipper-server-2.2.0.BUILD-SNAPSHOT.jar
```
##### Start Spring Cloud Data Flow
```
git clone https://github.com/spring-cloud/spring-cloud-dataflow.git
cd spring-cloud-dataflow
./mvnw clean package -DskipTests=true
cd ..
```
Create a yaml file scdf.yml with the following contents:
```
spring:
cloud:
dataflow:
security:
authorization:
provider-role-mappings:
uaa:
map-oauth-scopes: true
role-mappings:
ROLE_CREATE: foo.create
ROLE_DEPLOY: foo.create
ROLE_DESTROY: foo.create
ROLE_MANAGE: foo.create
ROLE_MODIFY: foo.create
ROLE_SCHEDULE: foo.create
ROLE_VIEW: foo.view
security:
oauth2:
client:
registration:
uaa:
redirect-uri: '{baseUrl}/login/oauth2/code/{registrationId}'
authorization-grant-type: authorization_code
client-id: dataflow
client-secret: dataflow
scope: (1)
- openid
- foo.create
- foo.view
provider:
uaa:
jwk-set-uri: http://uaa:8080/uaa/token_keys
token-uri: http://uaa:8080/uaa/oauth/token
user-info-uri: http://uaa:8080/uaa/userinfo (2)
user-name-attribute: user_name
authorization-uri: http://uaa:8080/uaa/oauth/authorize
resourceserver:
opaquetoken: (3)
introspection-uri: http://uaa:8080/uaa/introspect
client-id: dataflow
client-secret: dataflow
```
|**1**|If you use scopes to identify roles, please make sure to also request
the relevant scopes, e.g `dataflow.view`, `dataflow.create` and don’t forget to request the `openid` scope|
|-----|------------------------------------------------------------------------------------------------------------------------------------------------------------------------------------|
|**2**| Used to retrieve profile information, e.g. username for display purposes (mandatory) |
|**3**| Used for token introspection and validation (mandatory) |
The `introspection-uri` property is especially important when passing an externally retrieved (opaque)
OAuth Access Token to Spring Cloud Data Flow. In that case Spring Cloud Data Flow will take the OAuth Access,
and use the UAA’s [Introspect Token Endpoint](https://docs.cloudfoundry.org/api/uaa/version/74.4.0/index.html#introspect-token)to not only check the validity of the token but also retrieve the associated OAuth scopes from the UAA
Finally startup Spring Cloud Data Flow:
```
java -jar spring-cloud-dataflow/spring-cloud-dataflow-server/target/spring-cloud-dataflow-server-2.4.0.BUILD-SNAPSHOT.jar --spring.config.additional-location=scdf.yml
```
##### Role Mappings
By default all roles are assigned to users that login to Spring Cloud Data Flow.
However, you can set the property:
`spring.cloud.dataflow.security.authorization.provider-role-mappings.uaa.map-oauth-scopes: true`
This will instruct the underlying `DefaultAuthoritiesExtractor` to map
OAuth scopes to the respective authorities. The following scopes are supported:
* Scope `dataflow.create` maps to the `CREATE` role
* Scope `dataflow.deploy` maps to the `DEPLOY` role
* Scope `dataflow.destroy` maps to the `DESTROY` role
* Scope `dataflow.manage` maps to the `MANAGE` role
* Scope `dataflow.modify` maps to the `MODIFY` role
* Scope `dataflow.schedule` maps to the `SCHEDULE` role
* Scope `dataflow.view` maps to the `VIEW` role
Additionally you can also map arbitrary scopes to each of the Data Flow roles:
```
spring:
cloud:
dataflow:
security:
authorization:
provider-role-mappings:
uaa:
map-oauth-scopes: true (1)
role-mappings:
ROLE_CREATE: dataflow.create (2)
ROLE_DEPLOY: dataflow.deploy
ROLE_DESTROY: dataflow.destoy
ROLE_MANAGE: dataflow.manage
ROLE_MODIFY: dataflow.modify
ROLE_SCHEDULE: dataflow.schedule
ROLE_VIEW: dataflow.view
```
|**1**| Enables explicit mapping support from OAuth scopes to Data Flow roles |
|-----|------------------------------------------------------------------------------------------------------------------------------------------------------------------------------------------------------------------------------------------|
|**2**|When role mapping support is enabled, you must provide a mapping for
all 7 Spring Cloud Data Flow roles **ROLE\_CREATE**, **ROLE\_DEPLOY**, **ROLE\_DESTROY**, **ROLE\_MANAGE**, **ROLE\_MODIFY**, **ROLE\_SCHEDULE**, **ROLE\_VIEW**.|
| |You can assign an OAuth scope to multiple Spring Cloud Data Flow roles, giving you flexible regarding the granularity of your authorization configuration.|
|---|----------------------------------------------------------------------------------------------------------------------------------------------------------|
#### 10.6.4. LDAP Authentication
LDAP Authentication (Lightweight Directory Access Protocol) is indirectly
provided by Spring Cloud Data Flow using the UAA. The UAA itself provides[comprehensive LDAP support](https://github.com/cloudfoundry/uaa/blob/develop/docs/UAA-LDAP.md).
| |While you may use your own OAuth2 authentication server, the LDAP support
documented here requires using the UAA as authentication server. For any
other provider, please consult the documentation for that particular provider.|
|---|-----------------------------------------------------------------------------------------------------------------------------------------------------------------------------------------------------------------------------------------|
The UAA supports authentication against an LDAP (Lightweight Directory Access Protocol)
server using the following modes:
* [Direct bind](https://github.com/cloudfoundry/uaa/blob/develop/docs/UAA-LDAP.md#ldap-search-and-bind)
* [Search and bind](https://github.com/cloudfoundry/uaa/blob/develop/docs/UAA-LDAP.md#ldap-bind)
* [Search and Compare](https://github.com/cloudfoundry/uaa/blob/develop/docs/UAA-LDAP.md#ldap-search-and-compare)
| |When integrating with an external identity provider such as LDAP, authentication
within the UAA becomes **chained**. UAA first attempts to authenticate with
a user’s credentials against the UAA user store before the external provider,
LDAP. For more information, see[Chained Authentication](https://github.com/cloudfoundry/uaa/blob/develop/docs/UAA-LDAP.md#chained-authentication)in the *User Account and Authentication LDAP Integration* GitHub documentation.|
|---|---------------------------------------------------------------------------------------------------------------------------------------------------------------------------------------------------------------------------------------------------------------------------------------------------------------------------------------------------------------------------------------------------------------------------------------------------------------------------------------|
##### LDAP Role Mapping
The OAuth2 authentication server (UAA), provides comprehensive support
for [mapping LDAP groups to OAuth scopes](https://github.com/cloudfoundry/uaa/blob/develop/docs/UAA-LDAP.md#scopes).
The following options exist:
* `ldap/ldap-groups-null.xml` No groups will be mapped
* `ldap/ldap-groups-as-scopes.xml` Group names will be retrieved from an LDAP attribute. E.g. `CN`
* `ldap/ldap-groups-map-to-scopes.xml` Groups will be mapped to UAA groups using the external\_group\_mapping table
These values are specified via the configuration property `ldap.groups.file controls`. Under the covers
these values reference a Spring XML configuration file.
| |During test and development it might be necessary to make frequent changes
to LDAP groups and users and see those reflected in the UAA. However, user
information is cached for the duration of the login. The following script
helps to retrieve the updated information quickly:
```
#!/bin/bash
uaac token delete --all
uaac target http://localhost:8080/uaa
uaac token owner get cf -s "" -p
uaac token client get admin -s adminsecret
uaac user get
```|
|---|-------------------------------------------------------------------------------------------------------------------------------------------------------------------------------------------------------------------------------------------------------------------------------------------------------------------------------------------------------------------------------------------------------------------------------------------------------------------------------------------------------------------------------------------------|
##### LDAP Security and UAA Example Application
In order to get up and running quickly and to help you understand the security architecture, we
provide the [LDAP Security and UAA Example](https://github.com/spring-cloud/spring-cloud-dataflow-samples/tree/master/security-ldap-uaa-example)on GitHub.
| |This is solely a demo/example application and shall not be used in production.|
|---|------------------------------------------------------------------------------|
The setup consists of:
* Spring Cloud Data Flow Server
* Skipper Server
* CloudFoundry User Account and Authentication (UAA) Server
* Lightweight Directory Access Protocol (LDAP) Server (provided by [Apache Directory Server](https://directory.apache.org/) (ApacheDS))
Ultimately, as part of this example, you will learn how to configure and launch
a Composed Task using this security setup.
#### 10.6.5. Spring Security OAuth2 Resource/Authorization Server Sample
For local testing and development, you may also use the Resource and Authorization
Server support provided by[Spring Security OAuth](https://projects.spring.io/spring-security-oauth/). It
allows you to easily create your own (very basic) OAuth2 Server with the following simple annotations:
* `@EnableResourceServer`
* `@EnableAuthorizationServer`
| |In fact the UAA uses Spring Security OAuth2 under the covers, thus the basic endpoints
are the same.|
|---|--------------------------------------------------------------------------------------------------------|
A working example application can be found at:[https://github.com/ghillert/oauth-test-server/](https://github.com/ghillert/oauth-test-server/)
Clone the project and configure Spring Cloud Data Flow with the respective Client ID and Client Secret:
```
security:
oauth2:
client:
client-id: myclient
client-secret: mysecret
access-token-uri: http://127.0.0.1:9999/oauth/token
user-authorization-uri: http://127.0.0.1:9999/oauth/authorize
resource:
user-info-uri: http://127.0.0.1:9999/me
token-info-uri: http://127.0.0.1:9999/oauth/check_token
```
| |This sample application is not intended for production use|
|---|----------------------------------------------------------|
#### 10.6.6. Data Flow Shell Authentication
When using the Shell, the credentials can either be provided via username and password
or by specifying a *credentials-provider* command. If your OAuth2 provider supports
the *Password* Grant Type you can start the *Data Flow Shell* with:
```
$ java -jar spring-cloud-dataflow-shell-2.9.2.jar \
--dataflow.uri=http://localhost:9393 \ (1)
--dataflow.username=my_username \ (2)
--dataflow.password=my_password \ (3)
--skip-ssl-validation true \ (4)
```
|**1**| Optional, defaults to [localhost:9393](http://localhost:9393). |
|-----|----------------------------------------------------------------------------------------------------------------|
|**2**| Mandatory. |
|**3**| If the password is not provided, the user is prompted for it. |
|**4**|Optional, defaults to `false`, ignores certificate errors (when using self-signed certificates). Use cautiously!|
| |Keep in mind that when authentication for Spring Cloud Data Flow is enabled,
the underlying OAuth2 provider **must** support the *Password* OAuth2 Grant Type
if you want to use the Shell via username/password authentication.|
|---|----------------------------------------------------------------------------------------------------------------------------------------------------------------------------------------------------------------------------------------|
From within the Data Flow Shell you can also provide credentials by using the following command:
```
server-unknown:>dataflow config server \
--uri http://localhost:9393 \ (1)
--username myuser \ (2)
--password mysecret \ (3)
--skip-ssl-validation true \ (4)
```
|**1**| Optional, defaults to [localhost:9393](http://localhost:9393). |
|-----|-------------------------------------------------------------------------------------------|
|**2**| Mandatory.. |
|**3**| If security is enabled, and the password is not provided, the user is prompted for it. |
|**4**|Optional, ignores certificate errors (when using self-signed certificates). Use cautiously!|
The following image shows a typical shell command to connect to and authenticate a Data
Flow Server:

Figure 1. Target and Authenticate with the Data Flow Server from within the Shell
Once successfully targeted, you should see the following output:
```
dataflow:>dataflow config info
dataflow config info
╔═══════════╤═══════════════════════════════════════╗
║Credentials│[username='my_username, password=****']║
╠═══════════╪═══════════════════════════════════════╣
║Result │ ║
║Target │http://localhost:9393 ║
╚═══════════╧═══════════════════════════════════════╝
```
Alternatively, you can specify the *credentials-provider* command in order to
pass-in a bearer token directly, instead of providing a username and password.
This works from within the shell or by providing the`--dataflow.credentials-provider-command` command-line argument when starting the Shell.
| |When using the *credentials-provider* command, please be aware that your
specified command **must** return a *Bearer token* (Access Token prefixed with *Bearer*).
For instance, in Unix environments the following simplistic command can be used:
```
$ java -jar spring-cloud-dataflow-shell-2.9.2.jar \
--dataflow.uri=http://localhost:9393 \
--dataflow.credentials-provider-command="echo Bearer 123456789"
```|
|---|-----------------------------------------------------------------------------------------------------------------------------------------------------------------------------------------------------------------------------------------------------------------------------------------------------------------------------------------------------------------------------------------------------------------------------------------------------------|
### 10.7. About Configuration
The Spring Cloud Data Flow About Restful API result contains a display name,
version, and, if specified, a URL for each of the major dependencies that
comprise Spring Cloud Data Flow. The result (if enabled) also contains the
sha1 and or sha256 checksum values for the shell dependency. The information
that is returned for each of the dependencies is configurable by setting the following
properties:
* spring.cloud.dataflow.version-info.spring-cloud-dataflow-core.name: the
name to be used for the core.
* spring.cloud.dataflow.version-info.spring-cloud-dataflow-core.version:
the version to be used for the core.
* spring.cloud.dataflow.version-info.spring-cloud-dataflow-dashboard.name: the
name to be used for the dashboard.
* spring.cloud.dataflow.version-info.spring-cloud-dataflow-dashboard.version:
the version to be used for the dashboard.
* spring.cloud.dataflow.version-info.spring-cloud-dataflow-implementation.name: the
name to be used for the implementation.
* spring.cloud.dataflow.version-info.spring-cloud-dataflow-implementation.version:
the version to be used for the implementation.
* spring.cloud.dataflow.version-info.spring-cloud-dataflow-shell.name: the
name to be used for the shell.
* spring.cloud.dataflow.version-info.spring-cloud-dataflow-shell.version:
the version to be used for the shell.
* spring.cloud.dataflow.version-info.spring-cloud-dataflow-shell.url:
the URL to be used for downloading the shell dependency.
* spring.cloud.dataflow.version-info.spring-cloud-dataflow-shell.checksum-sha1: the sha1
checksum value that is returned with the shell dependency info.
* spring.cloud.dataflow.version-info.spring-cloud-dataflow-shell.checksum-sha256:
the sha256 checksum value that is returned with the shell dependency info.
* spring.cloud.dataflow.version-info.spring-cloud-dataflow-shell.checksum-sha1-url:
if the `spring.cloud.dataflow.version-info.spring-cloud-dataflow-shell.checksum-sha1`is not specified, SCDF uses the contents of the file specified at this URL for the checksum.
* spring.cloud.dataflow.version-info.spring-cloud-dataflow-shell.checksum-sha256-url:
if the `spring.cloud.dataflow.version-info.spring-cloud-dataflow-shell.checksum-sha256`is not specified, SCDF uses the contents of the file specified at this URL for the checksum.
#### 10.7.1. Enabling Shell Checksum values
By default, checksum values are not displayed for the shell dependency. If
you need this feature enabled, set the`spring.cloud.dataflow.version-info.dependency-fetch.enabled` property to true.
#### 10.7.2. Reserved Values for URLs
There are reserved values (surrounded by curly braces) that you can insert into
the URL that will make sure that the links are up to date:
* repository: if using a build-snapshot, milestone, or release candidate of
Data Flow, the repository refers to the repo-spring-io repository. Otherwise, it
refers to Maven Central.
* version: Inserts the version of the jar/pom.
For example,`[myrepository/org/springframework/cloud/spring-cloud-dataflow-shell/{version}/spring-cloud-dataflow-shell-{version}.jar](https://myrepository/org/springframework/cloud/spring-cloud-dataflow-shell/{version}/spring-cloud-dataflow-shell-{version}.jar)`produces`[myrepository/org/springframework/cloud/spring-cloud-dataflow-shell/1.2.3.RELEASE/spring-cloud-dataflow-shell-1.2.3.RELEASE.jar](https://myrepository/org/springframework/cloud/spring-cloud-dataflow-shell/1.2.3.RELEASE/spring-cloud-dataflow-shell-1.2.3.RELEASE.jar)`if you were using the 1.2.3.RELEASE version of the Spring Cloud Data Flow Shell
## 11. Configuration - Cloud Foundry
This section describes how to configure Spring Cloud Data Flow server’s features, such as security and which relational database to use.
It also describes how to configure Spring Cloud Data Flow shell’s features.
### 11.1. Feature Toggles
Data Flow server offers a specific set of features that you can enable or disable when launching. These features include all the lifecycle operations and REST endpoints (server, client implementations including Shell and the UI) for:
* Streams
* Tasks
You can enable or disable these features by setting the following boolean properties when you launch the Data Flow server:
* `spring.cloud.dataflow.features.streams-enabled`
* `spring.cloud.dataflow.features.tasks-enabled`
By default, all features are enabled.
The REST endpoint (`/features`) provides information on the enabled and disabled features.
### 11.2. Deployer Properties
You can use the following configuration properties of the Data Flow server’s [Cloud Foundry deployer](https://github.com/spring-cloud/spring-cloud-deployer-cloudfoundry) to customize how applications are deployed.
When deploying with the Data Flow shell, you can use the syntax `deployer..cloudfoundry.`. See below for an example shell usage.
These properties are also used when configuring the [Cloud Foundry Task platforms](#configuration-cloudfoundry-tasks) in the Data Flow server and and Kubernetes platforms in Skipper for deploying Streams.
| Deployer Property Name | Description | Default Value |
|-------------------------|------------------------------------------------------------------------------------------------------------------------------------------------------------------------------------------------------------------------------------------------------------------------------------------------------------------------------------------------|---------------------------------------------------------------------------------------------------------------------------------------------------------------------------------------------------------------------------------------------------|
| services | The names of services to bind to the deployed application. | \ |
| host | The host name to use as part of the route. | hostname derived by Cloud Foundry |
| domain | The domain to use when mapping routes for the application. | \ |
| routes | The list of routes that the application should be bound to. Mutually exclusive with host and domain. | \ |
| buildpack | The buildpack to use for deploying the application. Deprecated use buildpacks. | [github.com/cloudfoundry/java-buildpack.git#v4.29.1](https://github.com/cloudfoundry/java-buildpack.git#v4.29.1) |
| buildpacks | The list of buildpacks to use for deploying the application. | [github.com/cloudfoundry/java-buildpack.git#v4.29.1](https://github.com/cloudfoundry/java-buildpack.git#v4.29.1) |
| memory | The amount of memory to allocate. Default unit is mebibytes, 'M' and 'G" suffixes supported | 1024m |
| disk | The amount of disk space to allocate. Default unit is mebibytes, 'M' and 'G" suffixes supported. | 1024m |
| healthCheck | The type of health check to perform on deployed application. Values can be HTTP, NONE, PROCESS, and PORT | PORT |
| healthCheckHttpEndpoint | The path that the http health check will use, | /health |
| healthCheckTimeout | The timeout value for health checks in seconds. | 120 |
| instances | The number of instances to run. | 1 |
|enableRandomAppNamePrefix| Flag to enable prefixing the app name with a random prefix. | true |
| apiTimeout | Timeout for blocking API calls, in seconds. | 360 |
| statusTimeout | Timeout for status API operations in milliseconds | 5000 |
|useSpringApplicationJson | Flag to indicate whether application properties are fed into `SPRING_APPLICATION_JSON` or as separate environment variables. | true |
| stagingTimeout | Timeout allocated for staging the application. | 15 minutes |
| startupTimeout | Timeout allocated for starting the application. | 5 minutes |
| appNamePrefix | String to use as prefix for name of deployed application | The Spring Boot property `spring.application.name` of the application that is using the deployer library. |
| deleteRoutes | Whether to also delete routes when un-deploying an application. | true |
| javaOpts | The Java Options to pass to the JVM, e.g -Dtest=foo | \ |
| pushTasksEnabled | Whether to push task applications or assume that the application already exists when launched. | true |
|autoDeleteMavenArtifacts | Whether to automatically delete Maven artifacts from the local repository when deployed. | true |
| env.\ |Defines a top level environment variable. This is useful for customizing [Java build pack configuration](https://github.com/cloudfoundry/java-buildpack#configuration-and-extension) which must be included as top level environment variables in the application manifest, as the Java build pack does not recognize `SPRING_APPLICATION_JSON`.|The deployer determines if the app has [Java CfEnv](https://github.com/pivotal-cf/java-cfenv) in its classpath. If so, it applies the required [configuration](https://github.com/pivotal-cf/java-cfenv#pushing-your-application-to-cloud-foundry).|
Here are some examples using the Cloud Foundry deployment properties:
* You can set the buildpack that is used to deploy each application. For example, to use the Java offline buildback,
set the following environment variable:
```
cf set-env dataflow-server SPRING_CLOUD_DATAFLOW_TASK_PLATFORM_CLOUDFOUNDRY_ACCOUNTS[default]_DEPLOYMENT_BUILDPACKS java_buildpack_offline
```
* Setting `buildpack` is now deprecated in favour of `buildpacks` which allows you to pass on more than one if needed. More about this can be found from [How Buildpacks Work](https://docs.cloudfoundry.org/buildpacks/understand-buildpacks.html).
* You can customize the health check mechanism used by Cloud Foundry to assert whether apps are running by using the `SPRING_CLOUD_DATAFLOW_TASK_PLATFORM_CLOUDFOUNDRY_ACCOUNTS[default]_DEPLOYMENT_HEALTH_CHECK` environment variable. The current supported options
are `http` (the default), `port`, and `none`.
You can also set environment variables that specify the HTTP-based health check endpoint and timeout: `SPRING_CLOUD_DATAFLOW_TASK_PLATFORM_CLOUDFOUNDRY_ACCOUNTS[default]_DEPLOYMENT_HEALTH_CHECK_ENDPOINT` and `SPRING_CLOUD_DATAFLOW_TASK_PLATFORM_CLOUDFOUNDRY_ACCOUNTS[default]_DEPLOYMENT_HEALTH_CHECK_TIMEOUT`, respectively. These default to `/health` (the Spring Boot default location) and `120` seconds.
* You can also specify deployment properties by using the DSL. For instance, if you want to set the allocated memory for the `http` application to 512m and also bind a mysql service to the `jdbc` application, you can run the following commands:
```
dataflow:> stream create --name mysqlstream --definition "http | jdbc --tableName=names --columns=name"
dataflow:> stream deploy --name mysqlstream --properties "deployer.http.memory=512, deployer.jdbc.cloudfoundry.services=mysql"
```
| |You can configure these settings separately for stream and task apps. To alter settings for tasks,
substitute `TASK` for `STREAM` in the property name, as the following example shows:
```
cf set-env dataflow-server SPRING_CLOUD_DATAFLOW_TASK_PLATFORM_CLOUDFOUNDRY_ACCOUNTS[default]_DEPLOYMENT_MEMORY 512
```|
|---|----------------------------------------------------------------------------------------------------------------------------------------------------------------------------------------------------------------------------------------------------------------------------------------------------------------------------------------|
### 11.3. Tasks
The Data Flow server is responsible for deploying Tasks.
Tasks that are launched by Data Flow write their state to the same database that is used by the Data Flow server.
For Tasks which are Spring Batch Jobs, the job and step execution data is also stored in this database.
As with Skipper, Tasks can be launched to multiple platforms.
When Data Flow is running on Cloud Foundry, a Task platfom must be defined.
To configure new platform accounts that target Cloud Foundry, provide an entry under the `spring.cloud.dataflow.task.platform.cloudfoundry` section in your `application.yaml` file for via another Spring Boot supported mechanism.
In the following example, two Cloud Foundry platform accounts named `dev` and `qa` are created.
The keys such as `memory` and `disk` are [Cloud Foundry Deployer Properties](#configuration-cloudfoundry-deployer).
```
spring:
cloud:
dataflow:
task:
platform:
cloudfoundry:
accounts:
dev:
connection:
url: https://api.run.pivotal.io
org: myOrg
space: mySpace
domain: cfapps.io
username: [email protected]
password: drowssap
skipSslValidation: false
deployment:
memory: 512m
disk: 2048m
instances: 4
services: rabbit,mysql
appNamePrefix: dev1
qa:
connection:
url: https://api.run.pivotal.io
org: myOrgQA
space: mySpaceQA
domain: cfapps.io
username: [email protected]
password: drowssap
skipSslValidation: true
deployment:
memory: 756m
disk: 724m
instances: 2
services: rabbitQA,mysqlQA
appNamePrefix: qa1
```
| |By defining one platform as `default` allows you to skip using `platformName` where its use would otherwise be required.|
|---|------------------------------------------------------------------------------------------------------------------------|
When launching a task, pass the value of the platform account name using the task launch option `--platformName` If you do not pass a value for `platformName`, the value `default` will be used.
| |When deploying a task to multiple platforms, the configuration of the task needs to connect to the same database as the Data Flow Server.|
|---|-----------------------------------------------------------------------------------------------------------------------------------------|
You can configure the Data Flow server that is on Cloud Foundry to deploy tasks to Cloud Foundry or Kubernetes. See the section on [Kubernetes Task Platform Configuration](#configuration-kubernetes-tasks) for more information.
Detailed examples for launching and scheduling tasks across multiple platforms, are available in this section [Multiple Platform Support for Tasks](https://dataflow.spring.io/docs/recipes/multi-platform-deployment/) on [dataflow.spring.io](http://dataflow.spring.io).
### 11.4. Application Names and Prefixes
To help avoid clashes with routes across spaces in Cloud Foundry, a naming strategy that provides a random prefix to a
deployed application is available and is enabled by default. You can override the [default configurations](https://github.com/spring-cloud/spring-cloud-deployer-cloudfoundry#application-name-settings-and-deployments)and set the respective properties by using `cf set-env` commands.
For instance, if you want to disable the randomization, you can override it by using the following command:
```
cf set-env dataflow-server SPRING_CLOUD_DATAFLOW_TASK_PLATFORM_CLOUDFOUNDRY_ACCOUNTS[default]_DEPLOYMENT_ENABLE_RANDOM_APP_NAME_PREFIX false
```
### 11.5. Custom Routes
As an alternative to a random name or to get even more control over the hostname used by the deployed apps, you can use
custom deployment properties, as the following example shows:
```
dataflow:>stream create foo --definition "http | log"
sdataflow:>stream deploy foo --properties "deployer.http.cloudfoundry.domain=mydomain.com,
deployer.http.cloudfoundry.host=myhost,
deployer.http.cloudfoundry.route-path=my-path"
```
The preceding example binds the `http` app to the `[myhost.mydomain.com/my-path](https://myhost.mydomain.com/my-path)` URL. Note that this
example shows **all** of the available customization options. In practice, you can use only one or two out of the three.
### 11.6. Docker Applications
Starting with version 1.2, it is possible to register and deploy Docker based apps as part of streams and tasks by using
Data Flow for Cloud Foundry.
If you use Spring Boot and RabbitMQ-based Docker images, you can provide a common deployment property
to facilitate binding the apps to the RabbitMQ service. Assuming your RabbitMQ service is named `rabbit`, you can provide the following:
```
cf set-env dataflow-server SPRING_APPLICATION_JSON '{"spring.cloud.dataflow.applicationProperties.stream.spring.rabbitmq.addresses": "${vcap.services.rabbit.credentials.protocols.amqp.uris}"}'
```
For Spring Cloud Task apps, you can use something similar to the following, if you use a database service instance named `mysql`:
```
cf set-env SPRING_DATASOURCE_URL '${vcap.services.mysql.credentials.jdbcUrl}'
cf set-env SPRING_DATASOURCE_USERNAME '${vcap.services.mysql.credentials.username}'
cf set-env SPRING_DATASOURCE_PASSWORD '${vcap.services.mysql.credentials.password}'
cf set-env SPRING_DATASOURCE_DRIVER_CLASS_NAME 'org.mariadb.jdbc.Driver'
```
For non-Java or non-Boot applications, your Docker app must parse the `VCAP_SERVICES` variable in order to bind to any available services.
| |Passing application properties
When using non-Boot applications, chances are that you want to pass the application properties by using traditional
environment variables, as opposed to using the special `SPRING_APPLICATION_JSON` variable. To do so, set the
following variables for streams and tasks, respectively:
```
SPRING_CLOUD_DATAFLOW_TASK_PLATFORM_CLOUDFOUNDRY_ACCOUNTS[default]_DEPLOYMENT_USE_SPRING_APPLICATION_JSON=false
```|
|---|----------------------------------------------------------------------------------------------------------------------------------------------------------------------------------------------------------------------------------------------------------------------------------------------------------------------------------------------------------------------------------------------------------------------------------------------------------------------------------|
### 11.7. Application-level Service Bindings
When deploying streams in Cloud Foundry, you can take advantage of application-specific service bindings, so not all
services are globally configured for all the apps orchestrated by Spring Cloud Data Flow.
For instance, if you want to provide a `mysql` service binding only for the `jdbc` application in the following stream
definition, you can pass the service binding as a deployment property:
```
dataflow:>stream create --name httptojdbc --definition "http | jdbc"
dataflow:>stream deploy --name httptojdbc --properties "deployer.jdbc.cloudfoundry.services=mysqlService"
```
where `mysqlService` is the name of the service specifically bound only to the `jdbc` application and the `http`application does not get the binding by this method.
If you have more than one service to bind, they can be passed as comma-separated items
(for example: `deployer.jdbc.cloudfoundry.services=mysqlService,someService`).
### 11.8. Configuring Service binding parameters
The CloudFoundry API supports providing configuration parameters when binding a service instance. Some service brokers require or
recommend binding configuration.
For example, binding the [Google Cloud Platform service](https://docs.pivotal.io/partners/gcp-sb/using.html) using the CF CLI looks something like:
```
cf bind-service my-app my-google-bigquery-example -c '{"role":"bigquery.user"}'
```
Likewise the [NFS Volume Service](https://docs.cloudfoundry.org/devguide/services/using-vol-services.html) supports binding configuration such as:
```
cf bind-service my-app nfs_service_instance -c '{"uid":"1000","gid":"1000","mount":"/var/volume1","readonly":true}'
```
Starting with version 2.0, Data Flow for Cloud Foundry allows you to provide binding configuration parameters may be provided in the app level or server level `cloudfoundry.services` deployment property. For example, to bind to the nfs service, as above :
```
dataflow:> stream deploy --name mystream --properties "deployer..cloudfoundry.services='nfs_service_instance uid:1000,gid:1000,mount:/var/volume1,readonly:true'"
```
The format is intended to be compatible with the Data Flow DSL parser.
Generally, the `cloudfoundry.services` deployment property accepts a comma delimited value.
Since a comma is also used to separate configuration parameters, and to avoid white space issues, any item including configuration parameters must be enclosed in singe quotes. Valid values incude things like:
```
rabbitmq,'nfs_service_instance uid:1000,gid:1000,mount:/var/volume1,readonly:true',mysql,'my-google-bigquery-example role:bigquery.user'
```
| |Spaces are permitted within single quotes and `=` may be used instead of `:` to delimit key-value pairs.|
|---|--------------------------------------------------------------------------------------------------------|
### 11.9. User-provided Services
In addition to marketplace services, Cloud Foundry supports[User-provided Services](https://docs.cloudfoundry.org/devguide/services/user-provided.html) (UPS). Throughout this reference manual,
regular services have been mentioned, but there is nothing precluding the use of User-provided Services as well, whether for use as the
messaging middleware (for example, if you want to use an external Apache Kafka installation) or for use by some
of the stream applications (for example, an Oracle Database).
Now we review an example of extracting and supplying the connection credentials from a UPS.
The following example shows a sample UPS setup for Apache Kafka:
```
cf create-user-provided-service kafkacups -p '{”brokers":"HOST:PORT","zkNodes":"HOST:PORT"}'
```
The UPS credentials are wrapped within `VCAP_SERVICES`, and they can be supplied directly in the stream definition, as
the following example shows.
```
stream create fooz --definition "time | log"
stream deploy fooz --properties "app.time.spring.cloud.stream.kafka.binder.brokers=${vcap.services.kafkacups.credentials.brokers},app.time.spring.cloud.stream.kafka.binder.zkNodes=${vcap.services.kafkacups.credentials.zkNodes},app.log.spring.cloud.stream.kafka.binder.brokers=${vcap.services.kafkacups.credentials.brokers},app.log.spring.cloud.stream.kafka.binder.zkNodes=${vcap.services.kafkacups.credentials.zkNodes}"
```
### 11.10. Database Connection Pool
As of Data Flow 2.0, the Spring Cloud Connector library is no longer used to create the DataSource.
The library [java-cfenv](https://github.com/pivotal-cf/java-cfenv) is now used which allows you to set [Spring Boot properties](https://docs.spring.io/spring-boot/docs/current/reference/htmlsingle/#boot-features-connect-to-production-database) to configure the connection pool.
### 11.11. Maximum Disk Quota
By default, every application in Cloud Foundry starts with 1G disk quota and this can be adjusted to a default maximum of
2G. The default maximum can also be overridden up to 10G by using Pivotal Cloud Foundry’s (PCF) Ops Manager GUI.
This configuration is relevant for Spring Cloud Data Flow because every task deployment is composed of applications
(typically Spring Boot uber-jar’s), and those applications are resolved from a remote maven repository. After resolution,
the application artifacts are downloaded to the local Maven Repository for caching and reuse. With this happening in the background,
the default disk quota (1G) can fill up rapidly, especially when we experiment with streams that
are made up of unique applications. In order to overcome this disk limitation and depending
on your scaling requirements, you may want to change the default maximum from 2G to 10G. Let’s review the
steps to change the default maximum disk quota allocation.
#### 11.11.1. PCF’s Operations Manager
From PCF’s Ops Manager, select the “Pivotal Elastic Runtime” tile and navigate to the “Application Developer Controls” tab.
Change the “Maximum Disk Quota per App (MB)” setting from 2048 (2G) to 10240 (10G). Save the disk quota update and click
“Apply Changes” to complete the configuration override.
### 11.12. Scale Application
Once the disk quota change has been successfully applied and assuming you have a [running application](#running-on-cloudfoundry),
you can scale the application with a new `disk_limit` through the CF CLI, as the following example shows:
```
→ cf scale dataflow-server -k 10GB
Scaling app dataflow-server in org ORG / space SPACE as user...
OK
....
....
....
....
state since cpu memory disk details
#0 running 2016-10-31 03:07:23 PM 1.8% 497.9M of 1.1G 193.9M of 10G
```
You can then list the applications and see the new maximum disk space, as the following example shows:
```
→ cf apps
Getting apps in org ORG / space SPACE as user...
OK
name requested state instances memory disk urls
dataflow-server started 1/1 1.1G 10G dataflow-server.apps.io
```
### 11.13. Managing Disk Use
Even when configuring the Data Flow server to use 10G of space, there is the possibility of exhausting
the available space on the local disk. To prevent this, `jar` artifacts downloaded from external sources, i.e., apps registered as `http` or `maven` resources, are automatically deleted whenever the application is deployed, whether or not the deployment request succeeds.
This behavior is optimal for production environments in which container runtime stability is more critical than I/O latency incurred during deployment.
In development environments deployment happens more frequently. Additionally, the `jar` artifact (or a lighter `metadata` jar) contains metadata describing application configuration properties
which is used by various operations related to application configuration, more frequently performed during pre-production activities (see [Application Metadata](https://dataflow.spring.io/docs/applications/application-metadata) for details).
To provide a more responsive interactive developer experience at the expense of more disk usage in pre-production environments, you can set the CloudFoundry deployer property `autoDeleteMavenArtifacts` to `false`.
If you deploy the Data Flow server by using the default `port` health check type, you must explicitly monitor the disk space on the server in order to avoid running out space.
If you deploy the server by using the `http` health check type (see the next example), the Data Flow server is restarted if there is low disk space.
This is due to Spring Boot’s [Disk Space Health Indicator](https://github.com/spring-projects/spring-boot/blob/v1.5.14.RELEASE/spring-boot-actuator/src/main/java/org/springframework/boot/actuate/health/DiskSpaceHealthIndicator.java).
You can [configure](https://docs.spring.io/spring-boot/docs/1.5.14.RELEASE/reference/htmlsingle/#common-application-properties) the settings of the Disk Space Health Indicator by using the properties that have the `management.health.diskspace` prefix.
For version 1.7, we are investigating the use of [Volume Services](https://docs.cloudfoundry.org/devguide/services/using-vol-services.html) for the Data Flow server to store `.jar` artifacts before pushing them to Cloud Foundry.
The following example shows how to deploy the `http` health check type to an endpoint called `/management/health`:
```
---
...
health-check-type: http
health-check-http-endpoint: /management/health
```
### 11.14. Application Resolution Alternatives
Though we recommend using a Maven Artifactory for application [Register a Stream Application](#spring-cloud-dataflow-register-stream-apps),
there might be situations where one of the following alternative approaches would make sense.
* We have custom-built and maintain a [SCDF APP Tool](https://github.com/spring-cloud-stream-app-starters/scdf-app-tool)that can run as a regular Spring Boot application in Cloud Foundry, but it will in turn host and serve the application
JARs for SCDF at runtime.
* With the help of Spring Boot, we can serve [static content](https://docs.spring.io/spring-boot/docs/current/reference/html/boot-features-developing-web-applications.html#boot-features-spring-mvc-static-content)in Cloud Foundry. A simple Spring Boot application can bundle all the required stream and task applications. By having it
run on Cloud Foundry, the static application can then serve the über-jar’s. From the shell, you can, for example, register the
application with the name `http-source.jar` by using `--uri=http:///http-source.jar`.
* The über-jar’s can be hosted on any external server that’s reachable over HTTP. They can be resolved from raw GitHub URIs
as well. From the shell, you can, for example, register the app with the name `http-source.jar` by using `--uri=http:///http-source.jar`.
* [Static Buildpack](https://docs.cloudfoundry.org/buildpacks/staticfile/index.html) support in Cloud Foundry is another
option. A similar HTTP resolution works on this model, too.
* [Volume Services](https://docs.cloudfoundry.org/devguide/services/using-vol-services.html) is another great option.
The required über-jars can be hosted in an external file system. With the help of volume-services, you can, for
example, register the application with the name `http-source.jar` by using `--uri=file:///http-source.jar`.
### 11.15. Security
By default, the Data Flow server is unsecured and runs on an unencrypted HTTP connection. You can secure your REST endpoints
(as well as the Data Flow Dashboard) by enabling HTTPS and requiring clients to authenticate.
For more details about securing the
REST endpoints and configuring to authenticate against an OAUTH backend (UAA and SSO running on Cloud Foundry),
see the security section from the core [[configuration-local-security]](#configuration-local-security). You can configure the security details in `dataflow-server.yml` or pass them as environment variables through `cf set-env` commands.
#### 11.15.1. Authentication
Spring Cloud Data Flow can either integrate with Pivotal Single Sign-On Service
(for example, on PWS) or Cloud Foundry User Account and Authentication (UAA) Server.
##### Pivotal Single Sign-On Service
When deploying Spring Cloud Data Flow to Cloud Foundry, you can bind the
application to the Pivotal Single Sign-On Service. By doing so, Spring Cloud
Data Flow takes advantage of the[Java CFEnv](https://github.com/pivotal-cf/java-cfenv),
which provides Cloud Foundry-specific auto-configuration support for OAuth 2.0.
To do so, bind the Pivotal Single Sign-On Service to your Data Flow Server application and
provide the following properties:
```
SPRING_CLOUD_DATAFLOW_SECURITY_CFUSEUAA: false (1)
SECURITY_OAUTH2_CLIENT_CLIENTID: "${security.oauth2.client.clientId}"
SECURITY_OAUTH2_CLIENT_CLIENTSECRET: "${security.oauth2.client.clientSecret}"
SECURITY_OAUTH2_CLIENT_ACCESSTOKENURI: "${security.oauth2.client.accessTokenUri}"
SECURITY_OAUTH2_CLIENT_USERAUTHORIZATIONURI: "${security.oauth2.client.userAuthorizationUri}"
SECURITY_OAUTH2_RESOURCE_USERINFOURI: "${security.oauth2.resource.userInfoUri}"
```
|**1**|It is important that the property `spring.cloud.dataflow.security.cf-use-uaa` is set to `false`|
|-----|-----------------------------------------------------------------------------------------------|
Authorization is similarly supported for non-Cloud Foundry security scenarios.
See the security section from the core Data Flow [[configuration-local-security]](#configuration-local-security).
As the provisioning of roles can vary widely across environments, we by
default assign all Spring Cloud Data Flow roles to users.
You can customize this behavior by providing your own [`AuthoritiesExtractor`](https://docs.spring.io/spring-boot/docs/current/api/org/springframework/boot/autoconfigure/security/oauth2/resource/AuthoritiesExtractor.html).
The following example shows one possible approach to set the custom `AuthoritiesExtractor` on the `UserInfoTokenServices`:
```
public class MyUserInfoTokenServicesPostProcessor
implements BeanPostProcessor {
@Override
public Object postProcessBeforeInitialization(Object bean, String beanName) {
if (bean instanceof UserInfoTokenServices) {
final UserInfoTokenServices userInfoTokenServices == (UserInfoTokenServices) bean;
userInfoTokenServices.setAuthoritiesExtractor(ctx.getBean(AuthoritiesExtractor.class));
}
return bean;
}
@Override
public Object postProcessAfterInitialization(Object bean, String beanName) {
return bean;
}
}
```
Then you can declare it in your configuration class as follows:
```
@Bean
public BeanPostProcessor myUserInfoTokenServicesPostProcessor() {
BeanPostProcessor postProcessor == new MyUserInfoTokenServicesPostProcessor();
return postProcessor;
}
```
##### Cloud Foundry UAA
The availability of Cloud Foundry User Account and Authentication (UAA) depends on the Cloud Foundry environment.
In order to provide UAA integration, you have to provide the necessary
OAuth2 configuration properties (for example, by setting the `SPRING_APPLICATION_JSON`property).
The following JSON example shows how to create a security configuration:
```
{
"security.oauth2.client.client-id": "scdf",
"security.oauth2.client.client-secret": "scdf-secret",
"security.oauth2.client.access-token-uri": "https://login.cf.myhost.com/oauth/token",
"security.oauth2.client.user-authorization-uri": "https://login.cf.myhost.com/oauth/authorize",
"security.oauth2.resource.user-info-uri": "https://login.cf.myhost.com/userinfo"
}
```
By default, the `spring.cloud.dataflow.security.cf-use-uaa` property is set to `true`. This property activates a special[`AuthoritiesExtractor`](https://docs.spring.io/spring-boot/docs/current/api/org/springframework/boot/autoconfigure/security/oauth2/resource/AuthoritiesExtractor.html) called `CloudFoundryDataflowAuthoritiesExtractor`.
If you do not use CloudFoundry UAA, you should set `spring.cloud.dataflow.security.cf-use-uaa` to `false`.
Under the covers, this `AuthoritiesExtractor` calls out to the[Cloud Foundry
Apps API](https://apidocs.cloudfoundry.org/253/apps/retrieving_permissions_on_a_app.html) and ensure that users are in fact Space Developers.
If the authenticated user is verified as a Space Developer, all roles are assigned.
### 11.16. Configuration Reference
You must provide several pieces of configuration. These are Spring Boot `@ConfigurationProperties`, so you can set
them as environment variables or by any other means that Spring Boot supports. The following listing is in environment
variable format, as that is an easy way to get started configuring Boot applications in Cloud Foundry.
Note that in the future, you will be able to deploy tasks to multiple platforms, but for 2.0.0.M1 you can deploy only to a single platform and the name must be `default`.
```
# Default values appear after the equal signs.
# Example values, typical for Pivotal Web Services, are included as comments.
# URL of the CF API (used when using cf login -a for example) - for example, https://api.run.pivotal.io
SPRING_CLOUD_DATAFLOW_TASK_PLATFORM_CLOUDFOUNDRY_ACCOUNTS[default]_CONNECTION_URL=
# The name of the organization that owns the space above - for example, youruser-org
SPRING_CLOUD_DATAFLOW_TASK_PLATFORM_CLOUDFOUNDRY_ACCOUNTS[default]_CONNECTION_ORG=
# The name of the space into which modules will be deployed - for example, development
SPRING_CLOUD_DATAFLOW_TASK_PLATFORM_CLOUDFOUNDRY_ACCOUNTS[default]_CONNECTION_SPACE=
# The root domain to use when mapping routes - for example, cfapps.io
SPRING_CLOUD_DATAFLOW_TASK_PLATFORM_CLOUDFOUNDRY_ACCOUNTS[default]_CONNECTION_DOMAIN=
# The user name and password of the user to use to create applications
SPRING_CLOUD_DATAFLOW_TASK_PLATFORM_CLOUDFOUNDRY_ACCOUNTS[default]_CONNECTION_USERNAME=
SPRING_CLOUD_DATAFLOW_TASK_PLATFORM_CLOUDFOUNDRY_ACCOUNTS[default]_CONNECTION_PASSWORD
# The identity provider to be used when accessing the Cloud Foundry API (optional).
# The passed string has to be a URL-Encoded JSON Object, containing the field origin with value as origin_key of an identity provider - for example, {"origin":"uaa"}
SPRING_CLOUD_DATAFLOW_TASK_PLATFORM_CLOUDFOUNDRY_ACCOUNTS[default]_CONNECTION_LOGIN_HINT=
# Whether to allow self-signed certificates during SSL validation (you should NOT do so in production)
SPRING_CLOUD_DATAFLOW_TASK_PLATFORM_CLOUDFOUNDRY_ACCOUNTS[default]_CONNECTION_SKIP_SSL_VALIDATION
# A comma-separated set of service instance names to bind to every deployed task application.
# Among other things, this should include an RDBMS service that is used
# for Spring Cloud Task execution reporting, such as my_postgres
SPRING_CLOUD_DATAFLOW_TASK_PLATFORM_CLOUDFOUNDRY_ACCOUNTS[default]_DEPLOYMENT_SERVICES
spring.cloud.deployer.cloudfoundry.task.services=
# Timeout, in seconds, to use when doing blocking API calls to Cloud Foundry
SPRING_CLOUD_DATAFLOW_TASK_PLATFORM_CLOUDFOUNDRY_ACCOUNTS[default]_DEPLOYMENT_API_TIMEOUT=
# Timeout, in milliseconds, to use when querying the Cloud Foundry API to compute app status
SPRING_CLOUD_DATAFLOW_TASK_PLATFORM_CLOUDFOUNDRY_ACCOUNTS[default]_DEPLOYMENT_STATUS_TIMEOUT
```
Note that you can set `spring.cloud.deployer.cloudfoundry.services`,`spring.cloud.deployer.cloudfoundry.buildpacks`, or the Spring Cloud Deployer-standard`spring.cloud.deployer.memory` and `spring.cloud.deployer.disk`as part of an individual deployment request by using the `deployer.` shortcut, as the following example shows:
```
stream create --name ticktock --definition "time | log"
stream deploy --name ticktock --properties "deployer.time.memory=2g"
```
The commands in the preceding example deploy the time source with 2048MB of memory, while the log sink uses the default 1024MB.
When you deploy a stream, you can also pass `JAVA_OPTS` as a deployment property, as the following example shows:
```
stream deploy --name ticktock --properties "deployer.time.cloudfoundry.javaOpts=-Duser.timezone=America/New_York"
```
### 11.17. Debugging
If you want to get better insights into what is happening when your streams and tasks are being deployed, you may want
to turn on the following features:
* Reactor “stacktraces”, showing which operators were involved before an error occurred. This feature is helpful, as the deployer
relies on project reactor and regular stacktraces may not always allow understanding the flow before an error happened.
Note that this comes with a performance penalty, so it is disabled by default.
```
spring.cloud.dataflow.server.cloudfoundry.debugReactor == true
```
* Deployer and Cloud Foundry client library request and response logs. This feature allows seeing a detailed conversation between
the Data Flow server and the Cloud Foundry Cloud Controller.
```
logging.level.cloudfoundry-client == DEBUG
```
### 11.18. Spring Cloud Config Server
You can use Spring Cloud Config Server to centralize configuration properties for Spring Boot applications. Likewise,
both Spring Cloud Data Flow and the applications orchestrated by Spring Cloud Data Flow can be integrated with
a configuration server to use the same capabilities.
#### 11.18.1. Stream, Task, and Spring Cloud Config Server
Similar to Spring Cloud Data Flow server, you can configure both the stream and task applications to resolve the centralized properties from the configuration server.
Setting the `spring.cloud.config.uri` property for the deployed applications is a common way to bind to the configuration server.
See the [Spring Cloud Config Client](https://cloud.spring.io/spring-cloud-config/spring-cloud-config.html#_spring_cloud_config_client) reference guide for more information.
Since this property is likely to be used across all applications deployed by the Data Flow server, the Data Flow server’s `spring.cloud.dataflow.applicationProperties.stream` property for stream applications and `spring.cloud.dataflow.applicationProperties.task` property for task applications can be used to pass the `uri` of the Config Server to each deployed stream or task application. See the section on [Common Application Properties](#spring-cloud-dataflow-global-properties) for more information.
Note that, if you use applications from the [App Starters project](https://cloud.spring.io/spring-cloud-stream-app-starters/), these applications already embed the `spring-cloud-services-starter-config-client` dependency.
If you build your application from scratch and want to add the client side support for config server, you can add a dependency reference to the config server client library. The following snippet shows a Maven example:
```
...
io.pivotal.spring.cloud
spring-cloud-services-starter-config-client
CONFIG_CLIENT_VERSION
...
```
where `CONFIG_CLIENT_VERSION` can be the latest release of the [Spring Cloud Config Server](https://github.com/pivotal-cf/spring-cloud-services-connector/releases)client for Pivotal Cloud Foundry.
| |You may see a `WARN` logging message if the application that uses this library cannot connect to the configuration
server when the application starts and whenever the `/health` endpoint is accessed.
If you know that you are not using config server functionality, you can disable the client library by setting the`SPRING_CLOUD_CONFIG_ENABLED` environment variable to `false`.|
|---|----------------------------------------------------------------------------------------------------------------------------------------------------------------------------------------------------------------------------------------------------------------------------------------------------------------------------------------------------------------------------------------------|
#### 11.18.2. Sample Manifest Template
The following SCDF and Skipper `manifest.yml` templates includes the required environment variables for the Skipper and Spring Cloud Data Flow server and deployed applications and tasks to successfully run on Cloud Foundry and automatically resolve centralized properties from `my-config-server` at runtime:
```
---
applications:
- name: data-flow-server
host: data-flow-server
memory: 2G
disk_quota: 2G
instances: 1
path: {PATH TO SERVER UBER-JAR}
env:
SPRING_APPLICATION_NAME: data-flow-server
MAVEN_REMOTE_REPOSITORIES_REPO1_URL: https://repo.spring.io/libs-snapshot
SPRING_CLOUD_DATAFLOW_TASK_PLATFORM_CLOUDFOUNDRY_ACCOUNTS[default]_CONNECTION_URL: https://api.sys.huron.cf-app.com
SPRING_CLOUD_DATAFLOW_TASK_PLATFORM_CLOUDFOUNDRY_ACCOUNTS[default]_CONNECTION_ORG: sabby20
SPRING_CLOUD_DATAFLOW_TASK_PLATFORM_CLOUDFOUNDRY_ACCOUNTS[default]_CONNECTION_SPACE: sabby20
SPRING_CLOUD_DATAFLOW_TASK_PLATFORM_CLOUDFOUNDRY_ACCOUNTS[default]_CONNECTION_DOMAIN: apps.huron.cf-app.com
SPRING_CLOUD_DATAFLOW_TASK_PLATFORM_CLOUDFOUNDRY_ACCOUNTS[default]_CONNECTION_USERNAME: admin
SPRING_CLOUD_DATAFLOW_TASK_PLATFORM_CLOUDFOUNDRY_ACCOUNTS[default]_CONNECTION_PASSWORD: ***
SPRING_CLOUD_DATAFLOW_TASK_PLATFORM_CLOUDFOUNDRY_ACCOUNTS[default]_CONNECTION_SKIP_SSL_VALIDATION: true
SPRING_CLOUD_DATAFLOW_TASK_PLATFORM_CLOUDFOUNDRY_ACCOUNTS[default]_DEPLOYMENT_SERVICES: mysql
SPRING_CLOUD_SKIPPER_CLIENT_SERVER_URI: https:///api
services:
- mysql
- my-config-server
---
applications:
- name: skipper-server
host: skipper-server
memory: 1G
disk_quota: 1G
instances: 1
timeout: 180
buildpack: java_buildpack
path:
env:
SPRING_APPLICATION_NAME: skipper-server
SPRING_CLOUD_SKIPPER_SERVER_ENABLE_LOCAL_PLATFORM: false
SPRING_CLOUD_SKIPPER_SERVER_STRATEGIES_HEALTHCHECK_TIMEOUTINMILLIS: 300000
SPRING_CLOUD_SKIPPER_SERVER_PLATFORM_CLOUDFOUNDRY_ACCOUNTS[default]_CONNECTION_URL: https://api.local.pcfdev.io
SPRING_CLOUD_SKIPPER_SERVER_PLATFORM_CLOUDFOUNDRY_ACCOUNTS[default]_CONNECTION_ORG: pcfdev-org
SPRING_CLOUD_SKIPPER_SERVER_PLATFORM_CLOUDFOUNDRY_ACCOUNTS[default]_CONNECTION_SPACE: pcfdev-space
SPRING_CLOUD_SKIPPER_SERVER_PLATFORM_CLOUDFOUNDRY_ACCOUNTS[default]_DEPLOYMENT_DOMAIN: cfapps.io
SPRING_CLOUD_SKIPPER_SERVER_PLATFORM_CLOUDFOUNDRY_ACCOUNTS[default]_CONNECTION_USERNAME: admin
SPRING_CLOUD_SKIPPER_SERVER_PLATFORM_CLOUDFOUNDRY_ACCOUNTS[default]_CONNECTION_PASSWORD: admin
SPRING_CLOUD_SKIPPER_SERVER_PLATFORM_CLOUDFOUNDRY_ACCOUNTS[default]_CONNECTION_SKIP_SSL_VALIDATION: false
SPRING_CLOUD_SKIPPER_SERVER_PLATFORM_CLOUDFOUNDRY_ACCOUNTS[default]_DEPLOYMENT_DELETE_ROUTES: false
SPRING_CLOUD_SKIPPER_SERVER_PLATFORM_CLOUDFOUNDRY_ACCOUNTS[default]_DEPLOYMENT_SERVICES: rabbit, my-config-server
services:
- mysql
my-config-server
```
where `my-config-server` is the name of the Spring Cloud Config Service instance running on Cloud Foundry.
By binding the service to Spring Cloud Data Flow server, Spring Cloud Task and via Skipper to all the Spring Cloud Stream applications respectively, we can now resolve centralized properties backed by this service.
#### 11.18.3. Self-signed SSL Certificate and Spring Cloud Config Server
Often, in a development environment, we may not have a valid certificate to enable SSL communication between clients and the backend services.
However, the configuration server for Pivotal Cloud Foundry uses HTTPS for all client-to-service communication, so we need to add a self-signed SSL certificate in environments with no valid certificates.
By using the same `manifest.yml` templates listed in the previous section for the server, we can provide the self-signed SSL certificate by setting `TRUST_CERTS: `.
However, the deployed applications also require `TRUST_CERTS` as a flat environment variable (as opposed to being wrapped inside `SPRING_APPLICATION_JSON`), so we must instruct the server with yet another set of tokens (`SPRING_CLOUD_DATAFLOW_TASK_PLATFORM_CLOUDFOUNDRY_ACCOUNTS[default]_DEPLOYMENT_USE_SPRING_APPLICATION_JSON: false`) for tasks.
With this setup, the applications receive their application properties as regular environment variables.
The following listing shows the updated `manifest.yml` with the required changes. Both the Data Flow server and deployed applications
get their configuration from the `my-config-server` Cloud Config server (deployed as a Cloud Foundry service).
```
---
applications:
- name: test-server
host: test-server
memory: 1G
disk_quota: 1G
instances: 1
path: spring-cloud-dataflow-server-VERSION.jar
env:
SPRING_APPLICATION_NAME: test-server
MAVEN_REMOTE_REPOSITORIES_REPO1_URL: https://repo.spring.io/libs-snapshot
SPRING_CLOUD_DATAFLOW_TASK_PLATFORM_CLOUDFOUNDRY_ACCOUNTS[default]_CONNECTION_URL: https://api.sys.huron.cf-app.com
SPRING_CLOUD_DATAFLOW_TASK_PLATFORM_CLOUDFOUNDRY_ACCOUNTS[default]_CONNECTION_ORG: sabby20
SPRING_CLOUD_DATAFLOW_TASK_PLATFORM_CLOUDFOUNDRY_ACCOUNTS[default]_CONNECTION_SPACE: sabby20
SPRING_CLOUD_DATAFLOW_TASK_PLATFORM_CLOUDFOUNDRY_ACCOUNTS[default]_CONNECTION_DOMAIN: apps.huron.cf-app.com
SPRING_CLOUD_DATAFLOW_TASK_PLATFORM_CLOUDFOUNDRY_ACCOUNTS[default]_CONNECTION_USERNAME: admin
SPRING_CLOUD_DATAFLOW_TASK_PLATFORM_CLOUDFOUNDRY_ACCOUNTS[default]_CONNECTION_PASSWORD: ***
SPRING_CLOUD_DATAFLOW_TASK_PLATFORM_CLOUDFOUNDRY_ACCOUNTS[default]_CONNECTION_SKIP_SSL_VALIDATION: true
SPRING_CLOUD_DATAFLOW_TASK_PLATFORM_CLOUDFOUNDRY_ACCOUNTS[default]_DEPLOYMENT_SERVICES: mysql, config-server
SPRING_CLOUD_SKIPPER_CLIENT_SERVER_URI: https:///api
TRUST_CERTS: #this is for the server
SPRING_CLOUD_DATAFLOW_APPLICATION_PROPERTIES_TASK_TRUST_CERTS: #this propagates to all tasks
services:
- mysql
- my-config-server #this is for the server
```
Also add the `my-config-server` service to the Skipper’s manifest environment
```
---
applications:
- name: skipper-server
host: skipper-server
memory: 1G
disk_quota: 1G
instances: 1
timeout: 180
buildpack: java_buildpack
path:
env:
SPRING_APPLICATION_NAME: skipper-server
SPRING_CLOUD_SKIPPER_SERVER_ENABLE_LOCAL_PLATFORM: false
SPRING_CLOUD_SKIPPER_SERVER_STRATEGIES_HEALTHCHECK_TIMEOUTINMILLIS: 300000
SPRING_CLOUD_SKIPPER_SERVER_PLATFORM_CLOUDFOUNDRY_ACCOUNTS[default]_CONNECTION_URL:
SPRING_CLOUD_SKIPPER_SERVER_PLATFORM_CLOUDFOUNDRY_ACCOUNTS[default]_CONNECTION_ORG:
SPRING_CLOUD_SKIPPER_SERVER_PLATFORM_CLOUDFOUNDRY_ACCOUNTS[default]_CONNECTION_SPACE:
SPRING_CLOUD_SKIPPER_SERVER_PLATFORM_CLOUDFOUNDRY_ACCOUNTS[default]_DEPLOYMENT_DOMAIN:
SPRING_CLOUD_SKIPPER_SERVER_PLATFORM_CLOUDFOUNDRY_ACCOUNTS[default]_CONNECTION_USERNAME:
SPRING_CLOUD_SKIPPER_SERVER_PLATFORM_CLOUDFOUNDRY_ACCOUNTS[default]_CONNECTION_PASSWORD:
SPRING_CLOUD_SKIPPER_SERVER_PLATFORM_CLOUDFOUNDRY_ACCOUNTS[default]_DEPLOYMENT_SERVICES: rabbit, my-config-server #this is so all stream applications bind to my-config-server
services:
- mysql
my-config-server
```
### 11.19. Configure Scheduling
This section discusses how to configure Spring Cloud Data Flow to connect to the [PCF-Scheduler](https://www.cloudfoundry.org/the-foundry/scheduler/) as its agent to execute tasks.
| |Before following these instructions, be sure to have an instance of the PCF-Scheduler service running in your Cloud Foundry space.
To create a PCF-Scheduler in your space (assuming it is in your Market Place) execute the following from the CF CLI: `cf create-service scheduler-for-pcf standard `.
Name of a service is later used to bound running application in *PCF*.|
|---|--------------------------------------------------------------------------------------------------------------------------------------------------------------------------------------------------------------------------------------------------------------------------------------------------------------------------------------------------------------------------------------------------------|
For scheduling, you must add (or update) the following environment variables in your environment:
* Enable scheduling for Spring Cloud Data Flow by setting `spring.cloud.dataflow.features.schedules-enabled` to `true`.
* Bind the task deployer to your instance of PCF-Scheduler by adding the PCF-Scheduler service name to the `SPRING_CLOUD_DATAFLOW_TASK_PLATFORM_CLOUDFOUNDRY_ACCOUNTS[default]_DEPLOYMENT_SERVICES` environment variable.
* Establish the URL to the PCF-Scheduler by setting the `SPRING_CLOUD_DATAFLOW_TASK_PLATFORM_CLOUDFOUNDRY_ACCOUNTS[default]_SCHEDULER_SCHEDULER_URL` environment variable.
| |After creating the preceding configurations, you must create any task definitions that need to be scheduled.|
|---|------------------------------------------------------------------------------------------------------------|
The following sample manifest shows both environment properties configured (assuming you have a PCF-Scheduler service available with the name `myscheduler`):
```
---
applications:
- name: data-flow-server
host: data-flow-server
memory: 2G
disk_quota: 2G
instances: 1
path: {PATH TO SERVER UBER-JAR}
env:
SPRING_APPLICATION_NAME: data-flow-server
SPRING_CLOUD_SKIPPER_SERVER_ENABLE_LOCAL_PLATFORM: false
SPRING_CLOUD_SKIPPER_SERVER_PLATFORM_CLOUDFOUNDRY_ACCOUNTS[default]_CONNECTION_URL:
SPRING_CLOUD_SKIPPER_SERVER_PLATFORM_CLOUDFOUNDRY_ACCOUNTS[default]_CONNECTION_ORG:
SPRING_CLOUD_SKIPPER_SERVER_PLATFORM_CLOUDFOUNDRY_ACCOUNTS[default]_CONNECTION_SPACE:
SPRING_CLOUD_SKIPPER_SERVER_PLATFORM_CLOUDFOUNDRY_ACCOUNTS[default]_DEPLOYMENT_DOMAIN:
SPRING_CLOUD_SKIPPER_SERVER_PLATFORM_CLOUDFOUNDRY_ACCOUNTS[default]_CONNECTION_USERNAME:
SPRING_CLOUD_SKIPPER_SERVER_PLATFORM_CLOUDFOUNDRY_ACCOUNTS[default]_CONNECTION_PASSWORD:
SPRING_CLOUD_SKIPPER_SERVER_PLATFORM_CLOUDFOUNDRY_ACCOUNTS[default]_DEPLOYMENT_SERVICES: rabbit, myscheduler
SPRING_CLOUD_DATAFLOW_FEATURES_SCHEDULES_ENABLED: true
SPRING_CLOUD_SKIPPER_CLIENT_SERVER_URI: https:///api
SPRING_CLOUD_DATAFLOW_TASK_PLATFORM_CLOUDFOUNDRY_ACCOUNTS[default]_SCHEDULER_SCHEDULER_URL: https://scheduler.local.pcfdev.io
services:
- mysql
```
Where the `SPRING_CLOUD_DATAFLOW_TASK_PLATFORM_CLOUDFOUNDRY_ACCOUNTS[default]*SCHEDULER_SCHEDULER_URL*` *has the following format: `scheduler.` (for
example, `[scheduler.local.pcfdev.io](https://scheduler.local.pcfdev.io)`). Check the actual address from your \_PCF* environment.
| |Detailed examples for launching and scheduling tasks across multiple platforms, are available in this section [Multiple Platform Support for Tasks](https://dataflow.spring.io/docs/recipes/multi-platform-deployment/) on [dataflow.spring.io](http://dataflow.spring.io).|
|---|---------------------------------------------------------------------------------------------------------------------------------------------------------------------------------------------------------------------------------------------------------------------------|
## 12. Configuration - Kubernetes
This section describes how to configure Spring Cloud Data Flow features, such as deployer properties, tasks, and which relational database to use.
### 12.1. Feature Toggles
Data Flow server offers specific set of features that can be enabled or disabled when launching. These features include all the lifecycle operations, REST endpoints (server and client implementations including Shell and the UI) for:
* Streams
* Tasks
* Schedules
You can enable or disable these features by setting the following boolean environment variables when launching the Data Flow server:
* `SPRING_CLOUD_DATAFLOW_FEATURES_STREAMS_ENABLED`
* `SPRING_CLOUD_DATAFLOW_FEATURES_TASKS_ENABLED`
* `SPRING_CLOUD_DATAFLOW_FEATURES_SCHEDULES_ENABLED`
By default, all the features are enabled.
The `/features` REST endpoint provides information on the features that have been enabled and disabled.
### 12.2. Deployer Properties
You can use the following configuration properties the [Kubernetes deployer](https://github.com/spring-cloud/spring-cloud-deployer-kubernetes) to customize how Streams and Tasks are deployed.
When deploying with the Data Flow shell, you can use the syntax `deployer..kubernetes.`.
These properties are also used when configuring the [Kubernetes task platforms](#configuration-kubernetes-tasks) in the Data Flow server and Kubernetes platforms in Skipper for deploying Streams.
| Deployer Property Name | Description | Default Value |
|------------------------------------------------|-----------------------------------------------------------------------------------------------------------------------------------------------------------------------------------------------------------------------------------------------------------------------------------------------------------------------------------------------------------------------------------------------------------------------------------------------------------------------------------------|----------------------------------------------------------------|
| namespace | Namespace to use |environment variable `KUBERNETES_NAMESPACE`, otherwise `default`|
| deployment.nodeSelector | The node selectors to apply to the deployment in `key:value` format. Multiple node selectors are comma separated. | \ |
| imagePullSecret | Secrets for a access a private registry to pull images. | \ |
| imagePullPolicy | The Image Pull Policy to apply when pulling images. Valid options are `Always`, `IfNotPresent`, and `Never`. | IfNotPresent |
| livenessProbeDelay | Delay in seconds when the Kubernetes liveness check of the app container should start checking its health status. | 10 |
| livenessProbePeriod | Period in seconds for performing the Kubernetes liveness check of the app container. | 60 |
| livenessProbeTimeout | Timeout in seconds for the Kubernetes liveness check of the app container. If the health check takes longer than this value to return it is assumed as 'unavailable'. | 2 |
| livenessProbePath | Path that app container has to respond to for liveness check. | \ |
| livenessProbePort | Port that app container has to respond on for liveness check. | \ |
| readinessProbeDelay | Delay in seconds when the readiness check of the app container should start checking if the module is fully up and running. | 10 |
| readinessProbePeriod | Period in seconds to perform the readiness check of the app container. | 10 |
| readinessProbeTimeout | Timeout in seconds that the app container has to respond to its health status during the readiness check. | 2 |
| readinessProbePath | Path that app container has to respond to for readiness check. | \ |
| readinessProbePort | Port that app container has to respond on for readiness check. | \ |
| probeCredentialsSecret | The secret name containing the credentials to use when accessing secured probe endpoints. | \ |
| limits.memory | The memory limit, maximum needed value to allocate a pod, Default unit is mebibytes, 'M' and 'G" suffixes supported | \ |
| limits.cpu | The CPU limit, maximum needed value to allocate a pod | \ |
| requests.memory | The memory request, guaranteed needed value to allocate a pod. | \ |
| requests.cpu | The CPU request, guaranteed needed value to allocate a pod. | \ |
|statefulSet.volumeClaimTemplate.storageClassName| Name of the storage class for a stateful set | \ |
| statefulSet.volumeClaimTemplate.storage | The storage amount. Default unit is mebibytes, 'M' and 'G" suffixes supported | \ |
| environmentVariables | List of environment variables to set for any deployed app container | \ |
| entryPointStyle | Entry point style used for the Docker image. Used to determine how to pass in properties. Can be `exec`, `shell`, and `boot` | `exec` |
| createLoadBalancer | Create a "LoadBalancer" for the service created for each app. This facilitates assignment of external IP to app. | false |
| serviceAnnotations | Service annotations to set for the service created for each application. String of the format `annotation1:value1,annotation2:value2` | \ |
| podAnnotations | Pod annotations to set for the pod created for each deployment. String of the format `annotation1:value1,annotation2:value2` | \ |
| jobAnnotations | Job annotations to set for the pod or job created for a job. String of the format `annotation1:value1,annotation2:value2` | \ |
| minutesToWaitForLoadBalancer | Time to wait for load balancer to be available before attempting delete of service (in minutes). | 5 |
| maxTerminatedErrorRestarts | Maximum allowed restarts for app that fails due to an error or excessive resource use. | 2 |
| maxCrashLoopBackOffRestarts | Maximum allowed restarts for app that is in a CrashLoopBackOff. Values are `Always`, `IfNotPresent`, `Never` | `IfNotPresent` |
| volumeMounts | volume mounts expressed in YAML format. e.g. ``[{name: 'testhostpath', mountPath: '/test/hostPath'}, {name: 'testpvc', mountPath: '/test/pvc'}, {name: 'testnfs', mountPath: '/test/nfs'}]`` | \ |
| volumes | The volumes that a Kubernetes instance supports specifed in YAML format. e.g. ``[{name: testhostpath, hostPath: { path: '/test/override/hostPath' }},{name: 'testpvc', persistentVolumeClaim: { claimName: 'testClaim', readOnly: 'true' }}, {name: 'testnfs', nfs: { server: '10.0.0.1:111', path: '/test/nfs' }}]`` | \ |
| hostNetwork | The hostNetwork setting for the deployments, see [kubernetes.io/docs/api-reference/v1/definitions/#\_v1\_podspec](https://kubernetes.io/docs/api-reference/v1/definitions/#_v1_podspec) | false |
| createDeployment | Create a "Deployment" with a "Replica Set" instead of a "Replication Controller". | true |
| createJob | Create a "Job" instead of just a "Pod" when launching tasks. | false |
| containerCommand | Overrides the default entry point command with the provided command and arguments. | \ |
| containerPorts | Adds additional ports to expose on the container. | \ |
| createNodePort | The explicit port to use when `NodePort` is the `Service` type. | \ |
| deploymentServiceAccountName | Service account name used in app deployments. Note: The service account name used for app deployments is derived from the Data Flow servers deployment. | \ |
| deploymentLabels | Additional labels to add to the deployment in `key:value` format. Multiple labels are comma separated. | \ |
| bootMajorVersion | The Spring Boot major version to use. Currently only used to configure Spring Boot version specific probe paths automatically. Valid options are `1` or `2`. | 2 |
| tolerations.key | The key to use for the toleration. | \ |
| tolerations.effect | The toleration effect. See [kubernetes.io/docs/concepts/configuration/taint-and-toleration](https://kubernetes.io/docs/concepts/configuration/taint-and-toleration) for valid options. | \ |
| tolerations.operator | The toleration operator. See [kubernetes.io/docs/concepts/configuration/taint-and-toleration/](https://kubernetes.io/docs/concepts/configuration/taint-and-toleration/) for valid options. | \ |
| tolerations.tolerationSeconds | The number of seconds defining how long the pod will stay bound to the node after a taint is added. | \ |
| tolerations.value | The toleration value to apply, used in conjunction with `operator` to select to appropriate `effect`. | \ |
| secretRefs | The name of the secret(s) to load the entire data contents into individual environment variables. Multiple secrets may be comma separated. | \ |
| secretKeyRefs.envVarName | The environment variable name to hold the secret data | \ |
| secretKeyRefs.secretName | The secret name to access | \ |
| secretKeyRefs.dataKey | The key name to obtain secret data from | \ |
| configMapRefs | The name of the ConfigMap(s) to load the entire data contents into individual environment variables. Multiple ConfigMaps be comma separated. | \ |
| configMapKeyRefs.envVarName | The environment variable name to hold the ConfigMap data | \ |
| configMapKeyRefs.configMapName | The ConfigMap name to access | \ |
| configMapKeyRefs.dataKey | The key name to obtain ConfigMap data from | \ |
| maximumConcurrentTasks | The maximum concurrent tasks allowed for this platform instance. | 20 |
| podSecurityContext.runAsUser | The numeric user ID to run pod container processes under | \ |
| podSecurityContext.fsGroup | The numeric group ID to run pod container processes under | \ |
| affinity.nodeAffinity | The node affinity expressed in YAML format. e.g. ``{ requiredDuringSchedulingIgnoredDuringExecution: { nodeSelectorTerms: [ { matchExpressions: [ { key: 'kubernetes.io/e2e-az-name', operator: 'In', values: [ 'e2e-az1', 'e2e-az2']}]}]}, preferredDuringSchedulingIgnoredDuringExecution: [ { weight: 1, preference: { matchExpressions: [ { key: 'another-node-label-key', operator: 'In', values: [ 'another-node-label-value' ]}]}}]}`` | \ |
| affinity.podAffinity | The pod affinity expressed in YAML format. e.g. ``{ requiredDuringSchedulingIgnoredDuringExecution: { labelSelector: [ { matchExpressions: [ { key: 'app', operator: 'In', values: [ 'store']}]}], topologyKey: 'kubernetes.io/hostnam'}, preferredDuringSchedulingIgnoredDuringExecution: [ { weight: 1, podAffinityTerm: { labelSelector: { matchExpressions: [ { key: 'security', operator: 'In', values: [ 'S2' ]}]}, topologyKey: 'failure-domain.beta.kubernetes.io/zone'}}]}`` | \ |
| affinity.podAntiAffinity |The pod anti-affinity expressed in YAML format. e.g. ``{ requiredDuringSchedulingIgnoredDuringExecution: { labelSelector: { matchExpressions: [ { key: 'app', operator: 'In', values: [ 'store']}]}], topologyKey: 'kubernetes.io/hostname'}, preferredDuringSchedulingIgnoredDuringExecution: [ { weight: 1, podAffinityTerm: { labelSelector: { matchExpressions: [ { key: 'security', operator: 'In', values: [ 'S2' ]}]}, topologyKey: 'failure-domain.beta.kubernetes.io/zone'}}]}``| \ |
| statefulSetInitContainerImageName | A custom image name to use for the StatefulSet Init Container | \ |
| initContainer | An Init Container expressed in YAML format to be applied to a pod. e.g. ``{containerName: 'test', imageName: 'busybox:latest', commands: ['sh', '-c', 'echo hello']}`` | \ |
| additionalContainers | Additional containers expressed in YAML format to be applied to a pod. e.g. ``[{name: 'c1', image: 'busybox:latest', command: ['sh', '-c', 'echo hello1'], volumeMounts: [{name: 'test-volume', mountPath: '/tmp', readOnly: true}]}, {name: 'c2', image: 'busybox:1.26.1', command: ['sh', '-c', 'echo hello2']}]`` | \ |
### 12.3. Tasks
The Data Flow server is responsible for deploying Tasks.
Tasks that are launched by Data Flow write their state to the same database that is used by the Data Flow server.
For Tasks which are Spring Batch Jobs, the job and step execution data is also stored in this database.
As with Skipper, Tasks can be launched to multiple platforms.
When Data Flow is running on Kubernetes, a Task platfom must be defined.
To configure new platform accounts that target Kubernetes, provide an entry under the `spring.cloud.dataflow.task.platform.kubernetes` section in your `application.yaml` file for via another Spring Boot supported mechanism.
In the following example, two Kubernetes platform accounts named `dev` and `qa` are created.
The keys such as `memory` and `disk` are [Cloud Foundry Deployer Properties](#configuration-cloudfoundry-deployer).
```
spring:
cloud:
dataflow:
task:
platform:
kubernetes:
accounts:
dev:
namespace: devNamespace
imagePullPolicy: Always
entryPointStyle: exec
limits:
cpu: 4
qa:
namespace: qaNamespace
imagePullPolicy: IfNotPresent
entryPointStyle: boot
limits:
memory: 2048m
```
| |By defining one platform as `default` allows you to skip using `platformName` where its use would otherwise be required.|
|---|------------------------------------------------------------------------------------------------------------------------|
When launching a task, pass the value of the platform account name using the task launch option `--platformName` If you do not pass a value for `platformName`, the value `default` will be used.
| |When deploying a task to multiple platforms, the configuration of the task needs to connect to the same database as the Data Flow Server.|
|---|-----------------------------------------------------------------------------------------------------------------------------------------|
You can configure the Data Flow server that is on Kubernetes to deploy tasks to Cloud Foundry and Kubernetes. See the section on [Cloud Foundry Task Platform Configuration](#configuration-cloudfoundry-tasks) for more information.
Detailed examples for launching and scheduling tasks across multiple platforms, are available in this section [Multiple Platform Support for Tasks](https://dataflow.spring.io/docs/recipes/multi-platform-deployment/) on [dataflow.spring.io](http://dataflow.spring.io).
### 12.4. General Configuration
The Spring Cloud Data Flow server for Kubernetes uses the [`spring-cloud-kubernetes`](https://github.com/fabric8io/spring-cloud-kubernetes) module to process secrets that are mounted under `/etc/secrets`. ConfigMaps must be mounted as `application.yaml` in the `/config` directory that is processed by Spring Boot. To avoid access to the Kubernetes API server the `SPRING_CLOUD_KUBERNETES_CONFIG_ENABLE_API` and `SPRING_CLOUD_KUBERNETES_SECRETS_ENABLE_API` are set to `false`.
#### 12.4.1. Using ConfigMap and Secrets
You can pass configuration properties to the Data Flow Server by using Kubernetes [ConfigMap](https://kubernetes.io/docs/tasks/configure-pod-container/configmap/) and [secrets](https://kubernetes.io/docs/concepts/configuration/secret/).
The following example shows one possible configuration, which enables MySQL and sets a memory limit:
```
apiVersion: v1
kind: ConfigMap
metadata:
name: scdf-server
labels:
app: scdf-server
data:
application.yaml: |-
spring:
cloud:
dataflow:
task:
platform:
kubernetes:
accounts:
default:
limits:
memory: 1024Mi
datasource:
url: jdbc:mysql://${MYSQL_SERVICE_HOST}:${MYSQL_SERVICE_PORT}/mysql
username: root
password: ${mysql-root-password}
driverClassName: org.mariadb.jdbc.Driver
testOnBorrow: true
validationQuery: "SELECT 1"
```
The preceding example assumes that MySQL is deployed with `mysql` as the service name. Kubernetes publishes the host and port values of these services as environment variables that we can use when configuring the apps we deploy.
We prefer to provide the MySQL connection password in a Secrets file, as the following example shows:
```
apiVersion: v1
kind: Secret
metadata:
name: mysql
labels:
app: mysql
data:
mysql-root-password: eW91cnBhc3N3b3Jk
```
The password is a base64-encoded value.
### 12.5. Database Configuration
Spring Cloud Data Flow provides schemas for H2, HSQLDB, MySQL, Oracle, PostgreSQL, DB2, and SQL Server. The appropriate schema is automatically created when the server starts, provided the right database driver and appropriate credentials are in the classpath.
The JDBC drivers for MySQL (via MariaDB driver), HSQLDB, PostgreSQL, and embedded H2 are available out of the box.
If you use any other database, you need to put the corresponding JDBC driver jar on the classpath of the server.
For instance, if you use MySQL in addition to a password in the secrets file, you could provide the following properties in the ConfigMap:
```
data:
application.yaml: |-
spring:
datasource:
url: jdbc:mysql://${MYSQL_SERVICE_HOST}:${MYSQL_SERVICE_PORT}/mysql
username: root
password: ${mysql-root-password}
driverClassName: org.mariadb.jdbc.Driver
url: jdbc:mysql://${MYSQL_SERVICE_HOST}:${MYSQL_SERVICE_PORT}/test
driverClassName: org.mariadb.jdbc.Driver
```
For PostgreSQL, you could use the following configuration:
```
data:
application.yaml: |-
spring:
datasource:
url: jdbc:postgresql://${PGSQL_SERVICE_HOST}:${PGSQL_SERVICE_PORT}/database
username: root
password: ${postgres-password}
driverClassName: org.postgresql.Driver
```
For HSQLDB, you could use the following configuration:
```
data:
application.yaml: |-
spring:
datasource:
url: jdbc:hsqldb:hsql://${HSQLDB_SERVICE_HOST}:${HSQLDB_SERVICE_PORT}/database
username: sa
driverClassName: org.hsqldb.jdbc.JDBCDriver
```
The following YAML snippet from a Deployment is an example of mounting a ConfigMap as `application.yaml` under `/config` where Spring Boot will process it plus a Secret mounted under `/etc/secrets` where it will get picked up by the spring-cloud-kubernetes library due to the environment variable `SPRING_CLOUD_KUBERNETES_SECRETS_PATHS` being set to `/etc/secrets`.
```
...
containers:
- name: scdf-server
image: springcloud/spring-cloud-dataflow-server:2.5.0.BUILD-SNAPSHOT
imagePullPolicy: Always
volumeMounts:
- name: config
mountPath: /config
readOnly: true
- name: database
mountPath: /etc/secrets/database
readOnly: true
ports:
...
volumes:
- name: config
configMap:
name: scdf-server
items:
- key: application.yaml
path: application.yaml
- name: database
secret:
secretName: mysql
```
You can find migration scripts for specific database types in the [spring-cloud-task](https://github.com/spring-cloud/spring-cloud-task/tree/master/spring-cloud-task-core/src/main/resources/org/springframework/cloud/task/migration) repo.
### 12.6. Monitoring and Management
We recommend using the `kubectl` command for troubleshooting streams and tasks.
You can list all artifacts and resources used by using the following command:
```
kubectl get all,cm,secrets,pvc
```
You can list all resources used by a specific application or service by using a label to select resources. The following command lists all resources used by the `mysql` service:
```
kubectl get all -l app=mysql
```
You can get the logs for a specific pod by issuing the following command:
```
kubectl logs pod
```
If the pod is continuously getting restarted, you can add `-p` as an option to see the previous log, as follows:
```
kubectl logs -p
```
You can also tail or follow a log by adding an `-f` option, as follows:
```
kubectl logs -f
```
A useful command to help in troubleshooting issues, such as a container that has a fatal error when starting up, is to use the `describe` command, as the following example shows:
```
kubectl describe pod ticktock-log-0-qnk72
```
#### 12.6.1. Inspecting Server Logs
You can access the server logs by using the following command:
```
kubectl get pod -l app=scdf=server
kubectl logs
```
#### 12.6.2. Streams
Stream applications are deployed with the stream name followed by the name of the application. For processors and sinks, an instance index is also appended.
To see all the pods that are deployed by the Spring Cloud Data Flow server, you can specify the `role=spring-app` label, as follows:
```
kubectl get pod -l role=spring-app
```
To see details for a specific application deployment you can use the following command:
```
kubectl describe pod
```
To view the application logs, you can use the following command:
```
kubectl logs
```
If you would like to tail a log you can use the following command:
```
kubectl logs -f
```
#### 12.6.3. Tasks
Tasks are launched as bare pods without a replication controller. The pods remain after the tasks complete, which gives you an opportunity to review the logs.
To see all pods for a specific task, use the following command:
```
kubectl get pod -l task-name=
```
To review the task logs, use the following command:
```
kubectl logs
```
You have two options to delete completed pods. You can delete them manually once they are no longer needed or you can use the Data Flow shell `task execution cleanup` command to remove the completed pod for a task execution.
To delete the task pod manually, use the following command:
```
kubectl delete pod
```
To use the `task execution cleanup` command, you must first determine the `ID` for the task execution. To do so, use the `task execution list` command, as the following example (with output) shows:
```
dataflow:>task execution list
╔═════════╤══╤════════════════════════════╤════════════════════════════╤═════════╗
║Task Name│ID│ Start Time │ End Time │Exit Code║
╠═════════╪══╪════════════════════════════╪════════════════════════════╪═════════╣
║task1 │1 │Fri May 05 18:12:05 EDT 2017│Fri May 05 18:12:05 EDT 2017│0 ║
╚═════════╧══╧════════════════════════════╧════════════════════════════╧═════════╝
```
Once you have the ID, you can issue the command to cleanup the execution artifacts (the completed pod), as the following example shows:
```
dataflow:>task execution cleanup --id 1
Request to clean up resources for task execution 1 has been submitted
```
##### Database Credentials for Tasks
By default Spring Cloud Data Flow passes database credentials as properties to the pod at task launch time.
If using the `exec` or `shell` entry point styles the DB credentials will be viewable if the user does a `kubectl describe` on the task’s pod.
To configure Spring Cloud Data Flow to use Kubernetes Secrets: Set `spring.cloud.dataflow.task.use.kubernetes.secrets.for.db.credentials` property to `true`. If using the yaml files provided by Spring Cloud Data Flow update the `src/kubernetes/server/server-deployment.yaml to add the following environment variable:
```
- name: SPRING_CLOUD_DATAFLOW_TASK_USE_KUBERNETES_SECRETS_FOR_DB_CREDENTIALS
value: 'true'
```
If upgrading from a previous version of SCDF be sure to verify that `spring.datasource.username` and `spring.datasource.password` environment variables are present in the `secretKeyRefs` in the server-config.yaml. If not, add it as shown in the example below:
```
...
task:
platform:
kubernetes:
accounts:
default:
secretKeyRefs:
- envVarName: "spring.datasource.password"
secretName: mysql
dataKey: mysql-root-password
- envVarName: "spring.datasource.username"
secretName: mysql
dataKey: mysql-root-username
...
```
Also verify that the associated secret(dataKey) is also available in secrets. SCDF provides an example of this for MySql here: `src/kubernetes/mysql/mysql-svc.yaml`.
| |Passing of DB credentials via properties by default is to preserve to backwards compatibility. This will be feature will be removed in future release.|
|---|------------------------------------------------------------------------------------------------------------------------------------------------------|
### 12.7. Scheduling
This section covers customization of how scheduled tasks are configured. Scheduling of tasks is enabled by default in the Spring Cloud Data Flow Kubernetes Server. Properties are used to influence settings for scheduled tasks and can be configured on a global or per-schedule basis.
| |Unless noted, properties set on a per-schedule basis always take precedence over properties set as the server configuration. This arrangement allows for the ability to override global server level properties for a specific schedule.|
|---|----------------------------------------------------------------------------------------------------------------------------------------------------------------------------------------------------------------------------------------|
See [`KubernetesSchedulerProperties`](https://github.com/spring-cloud/spring-cloud-scheduler-kubernetes/blob/master/src/main/java/org/springframework/cloud/scheduler/spi/kubernetes/KubernetesSchedulerProperties.java) for more on the supported options.
#### 12.7.1. Entry Point Style
An Entry Point Style affects how application properties are passed to the task container to be deployed. Currently, three styles are supported:
* `exec`: (default) Passes all application properties as command line arguments.
* `shell`: Passes all application properties as environment variables.
* `boot`: Creates an environment variable called `SPRING_APPLICATION_JSON` that contains a JSON representation of all application properties.
You can configure the entry point style as follows:
```
deployer.kubernetes.entryPointStyle=
```
Replace `` with your desired Entry Point Style.
You can also configure the Entry Point Style at the server level in the container `env` section of a deployment YAML, as the following example shows:
```
env:
- name: SPRING_CLOUD_SCHEDULER_KUBERNETES_ENTRY_POINT_STYLE
value: entryPointStyle
```
Replace `entryPointStyle` with the desired Entry Point Style.
You should choose an Entry Point Style of either `exec` or `shell`, to correspond to how the `ENTRYPOINT` syntax is defined in the container’s `Dockerfile`. For more information and uses cases on `exec` vs `shell`, see the [ENTRYPOINT](https://docs.docker.com/engine/reference/builder/#entrypoint) section of the Docker documentation.
Using the `boot` Entry Point Style corresponds to using the `exec` style `ENTRYPOINT`. Command line arguments from the deployment request are passed to the container, with the addition of application properties mapped into the `SPRING_APPLICATION_JSON` environment variable rather than command line arguments.
#### 12.7.2. Environment Variables
To influence the environment settings for a given application, you can take advantage of the `spring.cloud.deployer.kubernetes.environmentVariables` property.
For example, a common requirement in production settings is to influence the JVM memory arguments.
You can achieve this by using the `JAVA_TOOL_OPTIONS` environment variable, as the following example shows:
```
deployer.kubernetes.environmentVariables=JAVA_TOOL_OPTIONS=-Xmx1024m
```
| |When deploying stream applications or launching task applications where some of the properties may contain sensitive information, use the `shell` or `boot` as the `entryPointStyle`. This is because the `exec` (default) converts all properties to command line arguments and thus may not be secure in some environments.|
|---|-----------------------------------------------------------------------------------------------------------------------------------------------------------------------------------------------------------------------------------------------------------------------------------------------------------------------------|
Additionally you can configure environment variables at the server level in the container `env` section of a deployment YAML, as the following example shows:
| |When specifying environment variables in the server configuration and on a per-schedule basis, environment variables will be merged. This allows for the ability to set common environment variables in the server configuration and more specific at the specific schedule level.|
|---|----------------------------------------------------------------------------------------------------------------------------------------------------------------------------------------------------------------------------------------------------------------------------------|
```
env:
- name: SPRING_CLOUD_SCHEDULER_KUBERNETES_ENVIRONMENT_VARIABLES
value: myVar=myVal
```
Replace `myVar=myVal` with your desired environment variables.
#### 12.7.3. Image Pull Policy
An image pull policy defines when a Docker image should be pulled to the local registry. Currently, three policies are supported:
* `IfNotPresent`: (default) Do not pull an image if it already exists.
* `Always`: Always pull the image regardless of whether it already exists.
* `Never`: Never pull an image. Use only an image that already exists.
The following example shows how you can individually configure containers:
```
deployer.kubernetes.imagePullPolicy=Always
```
Replace `Always` with your desired image pull policy.
You can configure an image pull policy at the server level in the container `env` section of a deployment YAML, as the following example shows:
```
env:
- name: SPRING_CLOUD_SCHEDULER_KUBERNETES_IMAGE_PULL_POLICY
value: Always
```
Replace `Always` with your desired image pull policy.
#### 12.7.4. Private Docker Registry
Docker images that are private and require authentication can be pulled by configuring a Secret. First, you must create a Secret in the cluster. Follow the [Pull an Image from a Private Registry](https://kubernetes.io/docs/tasks/configure-pod-container/pull-image-private-registry/) guide to create the Secret.
Once you have created the secret, use the `imagePullSecret` property to set the secret to use, as the following example shows:
```
deployer.kubernetes.imagePullSecret=mysecret
```
Replace `mysecret` with the name of the secret you created earlier.
You can also configure the image pull secret at the server level in the container `env` section of a deployment YAML, as the following example shows:
```
env:
- name: SPRING_CLOUD_SCHEDULER_KUBERNETES_IMAGE_PULL_SECRET
value: mysecret
```
Replace `mysecret` with the name of the secret you created earlier.
#### 12.7.5. Namespace
By default the namespace used for scheduled tasks is `default`. This value can be set at the server level configuration in the container `env` section of a deployment YAML, as the following example shows:
```
env:
- name: SPRING_CLOUD_SCHEDULER_KUBERNETES_NAMESPACE
value: mynamespace
```
#### 12.7.6. Service Account
You can configure a custom service account for scheduled tasks through properties. An existing service account can be used or a new one created. One way to create a service account is by using `kubectl`, as the following example shows:
```
$ kubectl create serviceaccount myserviceaccountname
serviceaccount "myserviceaccountname" created
```
Then you can configure the service account to use on a per-schedule basis as follows:
```
deployer.kubernetes.taskServiceAccountName=myserviceaccountname
```
Replace `myserviceaccountname` with your service account name.
You can also configure the service account name at the server level in the container `env` section of a deployment YAML, as the following example shows:
```
env:
- name: SPRING_CLOUD_SCHEDULER_KUBERNETES_TASK_SERVICE_ACCOUNT_NAME
value: myserviceaccountname
```
Replace `myserviceaccountname` with the service account name to be applied to all deployments.
For more information on scheduling tasks see [Scheduling Tasks](#spring-cloud-dataflow-schedule-launch-tasks).
### 12.8. Debug Support
Debugging the Spring Cloud Data Flow Kubernetes Server and included components (such as the [Spring Cloud Kubernetes Deployer](https://github.com/spring-cloud/spring-cloud-deployer-kubernetes)) is supported through the [Java Debug Wire Protocol (JDWP)](https://docs.oracle.com/javase/8/docs/technotes/guides/jpda/jdwp-spec.html). This section outlines an approach to manually enable debugging and another approach that uses configuration files provided with Spring Cloud Data Flow Server Kubernetes to “patch” a running deployment.
| |JDWP itself does not use any authentication. This section assumes debugging is being done on a local development environment (such as Minikube), so guidance on securing the debug port is not provided.|
|---|--------------------------------------------------------------------------------------------------------------------------------------------------------------------------------------------------------|
#### 12.8.1. Enabling Debugging Manually
To manually enable JDWP, first edit `src/kubernetes/server/server-deployment.yaml` and add an additional `containerPort` entry under `spec.template.spec.containers.ports` with a value of `5005`. Additionally, add the [`JAVA_TOOL_OPTIONS`](https://docs.oracle.com/javase/8/docs/platform/jvmti/jvmti.html#tooloptions) environment variable under `spec.template.spec.containers.env` as the following example shows:
```
spec:
...
template:
...
spec:
containers:
- name: scdf-server
...
ports:
...
- containerPort: 5005
env:
- name: JAVA_TOOL_OPTIONS
value: '-agentlib:jdwp=transport=dt_socket,server=y,suspend=n,address=5005'
```
| |The preceding example uses port 5005, but it can be any number that does not conflict with another port. The chosen port number must also be the same for the added `containerPort` value and the `address` parameter of the `JAVA_TOOL_OPTIONS` `-agentlib` flag, as shown in the preceding example.|
|---|-----------------------------------------------------------------------------------------------------------------------------------------------------------------------------------------------------------------------------------------------------------------------------------------------------|
You can now start the Spring Cloud Data Flow Kubernetes Server. Once the server is up, you can verify the configuration changes on the `scdf-server` deployment, as the following example (with output) shows:
```
kubectl describe deployment/scdf-server
...
...
Pod Template:
...
Containers:
scdf-server:
...
Ports: 80/TCP, 5005/TCP
...
Environment:
JAVA_TOOL_OPTIONS: -agentlib:jdwp=transport=dt_socket,server=y,suspend=n,address=5005
...
```
With the server started and JDWP enabled, you need to configure access to the port. In this example, we use the [`port-forward`](https://kubernetes.io/docs/tasks/access-application-cluster/port-forward-access-application-cluster/) subcommand of `kubectl`. The following example (with output) shows how to expose a local port to your debug target by using `port-forward`:
```
$ kubectl get pod -l app=scdf-server
NAME READY STATUS RESTARTS AGE
scdf-server-5b7cfd86f7-d8mj4 1/1 Running 0 10m
$ kubectl port-forward scdf-server-5b7cfd86f7-d8mj4 5005:5005
Forwarding from 127.0.0.1:5005 -> 5005
Forwarding from [::1]:5005 -> 5005
```
You can now attach a debugger by pointing it to `127.0.0.1` as the host and `5005` as the port. The `port-forward` subcommand runs until stopped (by pressing `CTRL+c`, for example).
You can remove debugging support by reverting the changes to `src/kubernetes/server/server-deployment.yaml`. The reverted changes are picked up on the next deployment of the Spring Cloud Data Flow Kubernetes Server. Manually adding debug support to the configuration is useful when debugging should be enabled by default each time the server is deployed.
#### 12.8.2. Enabling Debugging with Patching
Rather than manually changing the `server-deployment.yaml`, Kubernetes objects can be “patched” in place. For convenience, patch files that provide the same configuration as the manual approach are included. To enable debugging by patching, use the following command:
```
kubectl patch deployment scdf-server -p "$(cat src/kubernetes/server/server-deployment-debug.yaml)"
```
Running the preceding command automatically adds the `containerPort` attribute and the `JAVA_TOOL_OPTIONS` environment variable. The following example (with output) shows how toverify changes to the `scdf-server` deployment:
```
$ kubectl describe deployment/scdf-server
...
...
Pod Template:
...
Containers:
scdf-server:
...
Ports: 5005/TCP, 80/TCP
...
Environment:
JAVA_TOOL_OPTIONS: -agentlib:jdwp=transport=dt_socket,server=y,suspend=n,address=5005
...
```
To enable access to the debug port, rather than using the `port-forward` subcommand of `kubectl`, you can patch the `scdf-server` Kubernetes service object. You must first ensure that the `scdf-server` Kubernetes service object has the proper configuration. The following example (with output) shows how to do so:
```
kubectl describe service/scdf-server
Port: 80/TCP
TargetPort: 80/TCP
NodePort: 30784/TCP
```
If the output contains ``, you must patch the service to add a name for this port. The following example shows how to do so:
```
$ kubectl patch service scdf-server -p "$(cat src/kubernetes/server/server-svc.yaml)"
```
| |A port name should only be missing if the target cluster had been created prior to debug functionality being added. Since multiple ports are being added to the `scdf-server` Kubernetes Service Object, each needs to have its own name.|
|---|-----------------------------------------------------------------------------------------------------------------------------------------------------------------------------------------------------------------------------------------|
Now you can add the debug port, as the following example shows:
```
kubectl patch service scdf-server -p "$(cat src/kubernetes/server/server-svc-debug.yaml)"
```
The following example (with output) shows how to verify the mapping:
```
$ kubectl describe service scdf-server
Name: scdf-server
...
...
Port: scdf-server-jdwp 5005/TCP
TargetPort: 5005/TCP
NodePort: scdf-server-jdwp 31339/TCP
...
...
Port: scdf-server 80/TCP
TargetPort: 80/TCP
NodePort: scdf-server 30883/TCP
...
...
```
The output shows that container port 5005 has been mapped to the NodePort of 31339. The following example (with output) shows how to get the IP address of the Minikube node:
```
$ minikube ip
192.168.99.100
```
With this information, you can create a debug connection by using a host of 192.168.99.100 and a port of 31339.
The following example shows how to disable JDWP:
```
$ kubectl rollout undo deployment/scdf-server
$ kubectl patch service scdf-server --type json -p='[{"op": "remove", "path": "/spec/ports/0"}]'
```
The Kubernetes deployment object is rolled back to its state before being patched. The Kubernetes service object is then patched with a `remove` operation to remove port 5005 from the `containerPorts` list.
| |`kubectl rollout undo` forces the pod to restart. Patching the Kubernetes Service Object does not re-create the service, and the port mapping to the `scdf-server` deployment remains the same.|
|---|-----------------------------------------------------------------------------------------------------------------------------------------------------------------------------------------------|
See [Rolling Back a Deployment](https://kubernetes.io/docs/concepts/workloads/controllers/deployment/#rolling-back-a-deployment) for more information on deployment rollbacks, including managing history and [Updating API Objects in Place Using kubectl Patch](https://kubernetes.io/docs/tasks/run-application/update-api-object-kubectl-patch/).
# Shell
This section covers the options for starting the shell and more advanced functionality relating to how the shell handles whitespace, quotes, and interpretation of SpEL expressions.
The introductory chapters to the[Stream DSL](#spring-cloud-dataflow-stream-intro) and [Composed Task DSL](#spring-cloud-dataflow-composed-tasks) are good places to start for the most common usage of shell commands.
## 13. Shell Options
The shell is built upon the [Spring Shell](https://projects.spring.io/spring-shell/) project.
Some command-line options come from Spring Shell, and some are specific to Data Flow.
The shell takes the following command line options:
```
unix:>java -jar spring-cloud-dataflow-shell-2.9.2.jar --help
Data Flow Options:
--dataflow.uri= Address of the Data Flow Server [default: http://localhost:9393].
--dataflow.username= Username of the Data Flow Server [no default].
--dataflow.password= Password of the Data Flow Server [no default].
--dataflow.credentials-provider-command= Executes an external command which must return an
OAuth Bearer Token (Access Token prefixed with 'Bearer '),
e.g. 'Bearer 12345'), [no default].
--dataflow.skip-ssl-validation= Accept any SSL certificate (even self-signed) [default: no].
--dataflow.proxy.uri= Address of an optional proxy server to use [no default].
--dataflow.proxy.username= Username of the proxy server (if required by proxy server) [no default].
--dataflow.proxy.password= Password of the proxy server (if required by proxy server) [no default].
--spring.shell.historySize= Default size of the shell log file [default: 3000].
--spring.shell.commandFile= Data Flow Shell executes commands read from the file(s) and then exits.
--help This message.
```
You can use the `spring.shell.commandFile` option to point to an existing file that contains
all the shell commands to deploy one or many related streams and tasks.
Running multiple files is also supported. They should be passed as a comma-delimited string:
`--spring.shell.commandFile=file1.txt,file2.txt`
This option is useful when creating some scripts to help automate deployment.
Also, the following shell command helps to modularize a complex script into multiple independent files:
`dataflow:>script --file `
## 14. Listing Available Commands
Typing `help` at the command prompt gives a listing of all available commands.
Most of the commands are for Data Flow functionality, but a few are general purpose.
The following listing shows the output of the `help` command:
```
! - Allows execution of operating system (OS) commands
clear - Clears the console
cls - Clears the console
date - Displays the local date and time
exit - Exits the shell
http get - Make GET request to http endpoint
http post - POST data to http endpoint
quit - Exits the shell
system properties - Shows the shells properties {JB - restore the apostrophe}
version - Displays shell version
```
Adding the name of the command to `help` shows additional information on how to invoke the command:
```
dataflow:>help stream create
Keyword: stream create
Description: Create a new stream definition
Keyword: ** default **
Keyword: name
Help: the name to give to the stream
Mandatory: true
Default if specified: '__NULL__'
Default if unspecified: '__NULL__'
Keyword: definition
Help: a stream definition, using the DSL (e.g. "http --port=9000 | hdfs")
Mandatory: true
Default if specified: '__NULL__'
Default if unspecified: '__NULL__'
Keyword: deploy
Help: whether to deploy the stream immediately
Mandatory: false
Default if specified: 'true'
Default if unspecified: 'false'
```
## 15. Tab Completion
You can complete the shell command options in the shell by pressing the `TAB` key after the leading `--`. For example, pressing `TAB` after `stream create --` results in the following pair of suggestions:
```
dataflow:>stream create --
stream create --definition stream create --name
```
If you type `--de` and then press tab, `--definition` expands.
Tab completion is also available inside the stream or composed task DSL expression for application or task properties. You can also use `TAB` to get hints in a stream DSL expression for the available sources, processors, or sinks that you can use.
## 16. Whitespace and Quoting Rules
You need to quote parameter values only if they contain spaces or the `|` character. The following example passes a SpEL expression (which is applied to any data it encounters) to a transform processor:
```
transform --expression='new StringBuilder(payload).reverse()'
```
If the parameter value needs to embed a single quote, use two single quotes, as follows:
```
// Query is: Select * from /Customers where name='Smith'
scan --query='Select * from /Customers where name=''Smith'''
```
### 16.1. Quotes and Escaping
There is a Spring Shell-based client that talks to the Data Flow Server and is responsible for **parsing** the DSL.
In turn, applications may have application properties that rely on embedded languages, such as the **Spring Expression Language**.
The Shell, Data Flow DSL parser, and SpEL have rules about how they handle quotes and how syntax escaping works.
When combined together, confusion may arise.
This section explains the rules that apply and provides examples of the most complicated situations you may encounter when all three components are involved.
| |It is not always that complicated
If you do not use the Data Flow Shell (for example, if you use the REST API directly) or if application properties are not SpEL expressions, the escaping rules are simpler.|
|---|-----------------------------------------------------------------------------------------------------------------------------------------------------------------------------------------------------------------------|
#### 16.1.1. Shell Rules
Arguably, the most complex component when it comes to quotes is the Shell. The rules can be laid out quite simply, though:
* A shell command is made of keys (`--something`) and corresponding values. There is a special, keyless mapping, though, which is described later.
* A value cannot normally contain spaces, as space is the default delimiter for commands.
* Spaces can be added though, by surrounding the value with quotes (either single (`'`) or double (`"`) quotes).
* Values passed inside deployment properties (for example, `deployment --properties " …"`) should not be quoted again.
* If surrounded with quotes, a value can embed a literal quote of the same kind by prefixing it with a backslash (`\`).
* Other escapes are available, such as `\t`, `\n`, `\r`, `\f` and unicode escapes of the form `\uxxxx`.
* The keyless mapping is handled in a special way such that it does not need quoting to contain spaces.
For example, the shell supports the `!` command to execute native shell commands. The `!` accepts a single keyless argument. This is why the following example works:
```
dataflow:>! rm something
```
The argument here is the whole `rm something` string, which is passed as is to the underlying shell.
As another example, the following commands are strictly equivalent, and the argument value is `something` (without the quotes):
```
dataflow:>stream destroy something
dataflow:>stream destroy --name something
dataflow:>stream destroy "something"
dataflow:>stream destroy --name "something"
```
#### 16.1.2. Property Files Rules
The rules are relaxed when loading the properties from files.
* The special characters used in property files (both Java and YAML) need to be escaped. For example `\` should be replaced by `\\`, `\t` by `\\t` and so forth.
* For Java property files (`--propertiesFile .properties`), the property values should not be surrounded by quotes. It is not needed even if they contain spaces.
```
filter.expression=payload > 5
```
* For YAML property files (`--propertiesFile .yaml`), though, the values need to be surrounded by double quotes.
```
app:
filter:
filter:
expression: "payload > 5"
```
#### 16.1.3. DSL Parsing Rules
At the parser level (that is, inside the body of a stream or task definition), the rules are as follows:
* Option values are normally parsed until the first space character.
* They can be made of literal strings, though, surrounded by single or double quotes.
* To embed such a quote, use two consecutive quotes of the desired kind.
As such, the values of the `--expression` option to the filter application are semantically equivalent in the following examples:
```
filter --expression=payload>5
filter --expression="payload>5"
filter --expression='payload>5'
filter --expression='payload > 5'
```
Arguably, the last one is more readable. It is made possible thanks to the surrounding quotes. The actual expression is `payload > 5`.
Now, imagine that we want to test against string messages. If we want to compare the payload to the SpEL literal string, `"something"`, we could use the following:
```
filter --expression=payload=='something' (1)
filter --expression='payload == ''something''' (2)
filter --expression='payload == "something"' (3)
```
|**1**| This works because there are no spaces. It is not very legible, though. |
|-----|-----------------------------------------------------------------------------------------------------------------------|
|**2**| This uses single quotes to protect the whole argument. Hence, the actual single quotes need to be doubled. |
|**3**|SpEL recognizes String literals with either single or double quotes, so this last method is arguably the most readable.|
Note that the preceding examples are to be considered outside of the shell (for example, when calling the REST API directly).
When entered inside the shell, chances are that the whole stream definition is itself inside double quotes, which would need to be escaped. The whole example then becomes the following:
```
dataflow:>stream create something --definition "http | filter --expression=payload='something' | log"
dataflow:>stream create something --definition "http | filter --expression='payload == ''something''' | log"
dataflow:>stream create something --definition "http | filter --expression='payload == \"something\"' | log"
```
#### 16.1.4. SpEL Syntax and SpEL Literals
The last piece of the puzzle is about SpEL expressions.
Many applications accept options that are to be interpreted as SpEL expressions, and, as seen earlier, String literals are handled in a special way there, too. The rules are as follows:
* Literals can be enclosed in either single or double quotes.
* Quotes need to be doubled to embed a literal quote. Single quotes inside double quotes need no special treatment, and the reverse is also true.
As a last example, assume you want to use the [transform processor]($https://docs.spring.io/spring-cloud-stream-app-starters/docs/current/reference/html/spring-cloud-stream-modules-processors.html#spring-clound-stream-modules-transform-processor).
This processor accepts an `expression` option which is a SpEL expression. It is to be evaluated against the incoming message, with a default of `payload` (which forwards the message payload untouched).
It is important to understand that the following statements are equivalent:
```
transform --expression=payload
transform --expression='payload'
```
However, they are different from the following (and variations upon them):
```
transform --expression="'payload'"
transform --expression='''payload'''
```
The first series evaluates to the message payload, while the latter examples evaluate to the literal string, `payload`.
#### 16.1.5. Putting It All Together
As a last, complete example, consider how you could force the transformation of all messages to the string literal, `hello world`, by creating a stream in the context of the Data Flow shell:
```
dataflow:>stream create something --definition "http | transform --expression='''hello world''' | log" (1)
dataflow:>stream create something --definition "http | transform --expression='\"hello world\"' | log" (2)
dataflow:>stream create something --definition "http | transform --expression=\"'hello world'\" | log" (2)
```
|**1**| In the first line, single quotes surround the string (at the Data Flow parser level), but they need to be doubled because they are inside a string literal (started by the first single quote after the equals sign). |
|-----|----------------------------------------------------------------------------------------------------------------------------------------------------------------------------------------------------------------------------------------------------------------------------------------------------------------------------------------------------------------------------|
|**2**|The second and third lines use single and double quotes, respectively, to encompass the whole string at the Data Flow parser level. Consequently, the other kind of quote can be used inside the string. The whole thing is inside the `--definition` argument to the shell, though, which uses double quotes. Consequently, double quotes are escaped (at the shell level).|
# Streams
This section goes into more detail about how you can create Streams, which are collections of[Spring Cloud Stream](https://cloud.spring.io/spring-cloud-stream/) applications. It covers topics such as
creating and deploying Streams.
If you are just starting out with Spring Cloud Data Flow, you should probably read the[Getting Started](#getting-started) guide before diving into
this section.
## 17. Introduction
A Stream is a collection of long-lived [Spring Cloud Stream](https://cloud.spring.io/spring-cloud-stream/) applications that communicate with each other over messaging middleware.
A text-based DSL defines the configuration and data flow between the applications. While many applications are provided for you to implement common use-cases, you typically create a custom Spring Cloud Stream application to implement custom business logic.
The general lifecycle of a Stream is:
1. Register applications.
2. Create a Stream Definition.
3. Deploy the Stream.
4. Undeploy or destroy the Stream.
5. Upgrade or roll back applications in the Stream.
For deploying Streams, the Data Flow Server has to be configured to delegate the deployment to a new server in the Spring Cloud ecosystem named [Skipper](https://cloud.spring.io/spring-cloud-skipper/).
Furthermore, you can configure Skipper to deploy applications to one or more Cloud Foundry orgs and spaces, one or more namespaces on a Kubernetes cluster, or to the local machine.
When deploying a stream in Data Flow, you can specify which platform to use at deployment time.
Skipper also provides Data Flow with the ability to perform updates to deployed streams.
There are many ways the applications in a stream can be updated, but one of the most common examples is to upgrade a processor application with new custom business logic while leaving the existing source and sink applications alone.
### 17.1. Stream Pipeline DSL
A stream is defined by using a Unix-inspired [Pipeline syntax](https://en.wikipedia.org/wiki/Pipeline_(Unix)).
The syntax uses vertical bars, known as “pipes”, to connect multiple commands.
The command `ls -l | grep key | less` in Unix takes the output of the `ls -l` process and pipes it to the input of the `grep key` process.
The output of `grep` is, in turn, sent to the input of the `less` process.
Each `|` symbol connects the standard output of the command on the left to the standard input of the command on the right.
Data flows through the pipeline from left to right.
In Data Flow, the Unix command is replaced by a [Spring Cloud Stream](https://cloud.spring.io/spring-cloud-stream/) application and each pipe symbol represents connecting the input and output of applications over messaging middleware, such as RabbitMQ or Apache Kafka.
Each Spring Cloud Stream application is registered under a simple name.
The registration process specifies where the application can be obtained (for example, in a Maven Repository or a Docker registry). You can find out more about how to register Spring Cloud Stream applications in this [section](#spring-cloud-dataflow-register-stream-apps).
In Data Flow, we classify the Spring Cloud Stream applications as Sources, Processors, or Sinks.
As a simple example, consider the collection of data from an HTTP Source and writing to a File Sink.
Using the DSL, the stream description is:
`http | file`
A stream that involves some processing would be expressed as:
`http | filter | transform | file`
Stream definitions can be created by using the shell’s `stream create` command, as shown in the following example:
`dataflow:> stream create --name httpIngest --definition "http | file"`
The Stream DSL is passed in to the `--definition` command option.
The deployment of stream definitions is done through the Shell’s `stream deploy` command, as follows:
`dataflow:> stream deploy --name ticktock`
The [Getting Started](#getting-started) section shows you how to start the server and how to start and use the Spring Cloud Data Flow shell.
Note that the shell calls the Data Flow Server’s REST API. For more information on making HTTP requests directly to the server, see the [REST API Guide](#api-guide).
| |When naming a stream definition, keep in mind that each application in the stream will be created on the platform with the name in the format of `-`. Thus, the total length of the generated application name can’t exceed 58 characters.|
|---|-----------------------------------------------------------------------------------------------------------------------------------------------------------------------------------------------------------------------------------------------------------------|
### 17.2. Stream Application DSL
You can use the Stream Application DSL to define custom binding properties for each of the Spring Cloud Stream applications.
See the [Stream Application DSL](https://dataflow.spring.io/docs/feature-guides/streams/stream-application-dsl/) section of the microsite for more information.
Consider the following Java interface, which defines an input method and two output methods:
```
public interface Barista {
@Input
SubscribableChannel orders();
@Output
MessageChannel hotDrinks();
@Output
MessageChannel coldDrinks();
}
```
Further consider the following Java interface, which is typical for creating a Kafka Streams application:
```
interface KStreamKTableBinding {
@Input
KStream inputStream();
@Input
KTable inputTable();
}
```
In these cases with multiple input and output bindings, Data Flow cannot make any assumptions about the flow of data from one application to another.
Therefore, you need to set the binding properties to “wire up” the application.
The **Stream Application DSL** uses a “double pipe”, instead of the “pipe symbol”, to indicate that Data Flow should not configure the binding properties of the application. Think of `||` as meaning “in parallel”.
The following example shows such a “parallel” definition:
```
dataflow:> stream create --definition "orderGeneratorApp || baristaApp || hotDrinkDeliveryApp || coldDrinkDeliveryApp" --name myCafeStream
```
| |Breaking Change! Versions of SCDF Local, Cloud Foundry 1.7.0 to 1.7.2 and SCDF Kubernetes 1.7.0 to 1.7.1 used the `comma` character as the separator between applications. This caused breaking changes in the traditional Stream DSL. While not ideal, changing the separator character was felt to be the best solution with the least impact on existing users.|
|---|------------------------------------------------------------------------------------------------------------------------------------------------------------------------------------------------------------------------------------------------------------------------------------------------------------------------------------------------------------------|
This stream has four applications.`baristaApp` has two output destinations, `hotDrinks` and `coldDrinks`, intended to be consumed by the `hotDrinkDeliveryApp` and `coldDrinkDeliveryApp`, respectively.
When deploying this stream, you need to set the binding properties so that the `baristaApp` sends hot drink messages to the `hotDrinkDeliveryApp` destination and cold drink messages to the `coldDrinkDeliveryApp` destination.
The following listing does so:
```
app.baristaApp.spring.cloud.stream.bindings.hotDrinks.destination=hotDrinksDest
app.baristaApp.spring.cloud.stream.bindings.coldDrinks.destination=coldDrinksDest
app.hotDrinkDeliveryApp.spring.cloud.stream.bindings.input.destination=hotDrinksDest
app.coldDrinkDeliveryApp.spring.cloud.stream.bindings.input.destination=coldDrinksDest
```
If you want to use consumer groups, you need to set the Spring Cloud Stream application properties, `spring.cloud.stream.bindings..producer.requiredGroups` and `spring.cloud.stream.bindings..group`, on the producer and consumer applications respectively.
Another common use case for the Stream Application DSL is to deploy a HTTP gateway application that sends a synchronous request or reply message to a Kafka or RabbitMQ application.
In this case, both the HTTP gateway application and the Kafka or RabbitMQ application can be a Spring Integration application that does not make use of the Spring Cloud Stream library.
It is also possible to deploy only a single application using the Stream application DSL.
### 17.3. Application Properties
Each application takes properties to customize its behavior. As an example, the `http` source module exposes a `port` setting that lets the data ingestion port be changed from the default value:
```
dataflow:> stream create --definition "http --port=8090 | log" --name myhttpstream
```
This `port` property is actually the same as the standard Spring Boot `server.port` property.
Data Flow adds the ability to use the shorthand form `port` instead of `server.port`.
You can also specify the longhand version:
```
dataflow:> stream create --definition "http --server.port=8000 | log" --name myhttpstream
```
This shorthand behavior is discussed more in the section on [Stream Application Properties](#spring-cloud-dataflow-application-properties).
If you have [registered application property metadata](https://dataflow.spring.io/docs/applications/application-metadata/#using-application-metadata), you can use tab completion in the shell after typing `--` to get a list of candidate property names.
The shell provides tab completion for application properties. The `app info --name --type ` shell command provides additional documentation for all the supported properties.
| |Supported Stream `` possibilities are: `source`, `processor`, and `sink`.|
|---|----------------------------------------------------------------------------------|
## 18. Stream Lifecycle
The lifecycle of a stream goes through the following stages:
1. [Register a Stream Application](#spring-cloud-dataflow-register-stream-apps)
2. [Creating a Stream](#spring-cloud-dataflow-create-stream)
3. [Deploying a Stream](#spring-cloud-dataflow-deploy-stream)
4. [Destroying a Stream](#spring-cloud-dataflow-destroy-stream) or [Undeploying a Stream](#spring-cloud-dataflow-undeploy-stream)
5. [Upgrade](#spring-cloud-dataflow-streams-upgrading) or [roll back](#spring-cloud-dataflow-streams-rollback) applications in the Stream.
[Skipper](https://cloud.spring.io/spring-cloud-skipper/) is a server that lets you discover Spring Boot applications and manage their lifecycle on multiple Cloud Platforms.
Applications in Skipper are bundled as packages that contain the application’s resource location, application properties, and deployment properties.
You can think of Skipper packages as being analogous to packages found in tools such as `apt-get` or `brew`.
When Data Flow deploys a Stream, it generates and upload a package to Skipper that represents the applications in the Stream.
Subsequent commands to upgrade or roll back the applications within the Stream are passed through to Skipper.
In addition, the Stream definition is reverse-engineered from the package, and the status of the Stream is also delegated to Skipper.
### 18.1. Register a Stream Application
You can register a versioned stream application by using the `app register` command. You must provide a unique name, an application type, and a URI that can be resolved to the application artifact.
For the type, specify `source`, `processor`, or `sink`. The version is resolved from the URI. Here are a few examples:
```
dataflow:>app register --name mysource --type source --uri maven://com.example:mysource:0.0.1
dataflow:>app register --name mysource --type source --uri maven://com.example:mysource:0.0.2
dataflow:>app register --name mysource --type source --uri maven://com.example:mysource:0.0.3
dataflow:>app list --id source:mysource
╔═══╤══════════════════╤═════════╤════╤════╗
║app│ source │processor│sink│task║
╠═══╪══════════════════╪═════════╪════╪════╣
║ │> mysource-0.0.1 <│ │ │ ║
║ │mysource-0.0.2 │ │ │ ║
║ │mysource-0.0.3 │ │ │ ║
╚═══╧══════════════════╧═════════╧════╧════╝
dataflow:>app register --name myprocessor --type processor --uri file:///Users/example/myprocessor-1.2.3.jar
dataflow:>app register --name mysink --type sink --uri https://example.com/mysink-2.0.1.jar
```
The application URI should conform to one the following schema formats:
* Maven schema:
```
maven://:[:[:]]:
```
* HTTP schema:
```
http:///-.jar
```
* File schema:
```
file:////-.jar
```
* Docker schema:
```
docker:/:
```
| |The URI `` part is compulsory for versioned stream applications.
Skipper uses the multi-versioned stream applications to allow upgrading or rolling back those applications at runtime by using the deployment properties.|
|---|---------------------------------------------------------------------------------------------------------------------------------------------------------------------------------------------------------------------------------------|
If you would like to register the snapshot versions of the `http` and `log`applications built with the RabbitMQ binder, you could do the following:
```
dataflow:>app register --name http --type source --uri maven://org.springframework.cloud.stream.app:http-source-rabbit:1.2.1.BUILD-SNAPSHOT
dataflow:>app register --name log --type sink --uri maven://org.springframework.cloud.stream.app:log-sink-rabbit:1.2.1.BUILD-SNAPSHOT
```
If you would like to register multiple applications at one time, you can store them in a properties file,
where the keys are formatted as `.` and the values are the URIs.
For example, to register the snapshot versions of the `http` and `log`applications built with the RabbitMQ binder, you could have the following in a properties file (for example, `stream-apps.properties`):
```
source.http=maven://org.springframework.cloud.stream.app:http-source-rabbit:1.2.1.BUILD-SNAPSHOT
sink.log=maven://org.springframework.cloud.stream.app:log-sink-rabbit:1.2.1.BUILD-SNAPSHOT
```
Then, to import the applications in bulk, use the `app import` command and provide the location of the properties file with the `--uri` switch, as follows:
```
dataflow:>app import --uri file:////stream-apps.properties
```
Registering an application by using `--type app` is the same as registering a `source`, `processor` or `sink`.
Applications of the type `app` can be used only in the Stream Application DSL (which uses double pipes `||` instead of single pipes `|` in the DSL) and instructs Data Flow not to configure the Spring Cloud Stream binding properties of the application.
The application that is registered using `--type app` does not have to be a Spring Cloud Stream application. It can be any Spring Boot application.
See the [Stream Application DSL introduction](#spring-cloud-dataflow-stream-app-dsl) for more about using this application type.
You can register multiple versions of the same applications (for example, the same name and type), but you can set only one as the default.
The default version is used for deploying Streams.
The first time an application is registered, it is marked as default. The default application version can be altered with the `app default` command:
```
dataflow:>app default --id source:mysource --version 0.0.2
dataflow:>app list --id source:mysource
╔═══╤══════════════════╤═════════╤════╤════╗
║app│ source │processor│sink│task║
╠═══╪══════════════════╪═════════╪════╪════╣
║ │mysource-0.0.1 │ │ │ ║
║ │> mysource-0.0.2 <│ │ │ ║
║ │mysource-0.0.3 │ │ │ ║
╚═══╧══════════════════╧═════════╧════╧════╝
```
The `app list --id ` command lists all versions for a given stream application.
The `app unregister` command has an optional `--version` parameter to specify the application version to unregister:
```
dataflow:>app unregister --name mysource --type source --version 0.0.1
dataflow:>app list --id source:mysource
╔═══╤══════════════════╤═════════╤════╤════╗
║app│ source │processor│sink│task║
╠═══╪══════════════════╪═════════╪════╪════╣
║ │> mysource-0.0.2 <│ │ │ ║
║ │mysource-0.0.3 │ │ │ ║
╚═══╧══════════════════╧═════════╧════╧════╝
```
If `--version` is not specified, the default version is unregistered.
| |All applications in a stream should have a default version set for the stream to be deployed.
Otherwise, they are treated as unregistered application during the deployment.
Use the `app default` command to set the defaults.|
|---|---------------------------------------------------------------------------------------------------------------------------------------------------------------------------------------------------------------------------------------|
```
app default --id source:mysource --version 0.0.3
dataflow:>app list --id source:mysource
╔═══╤══════════════════╤═════════╤════╤════╗
║app│ source │processor│sink│task║
╠═══╪══════════════════╪═════════╪════╪════╣
║ │mysource-0.0.2 │ │ │ ║
║ │> mysource-0.0.3 <│ │ │ ║
╚═══╧══════════════════╧═════════╧════╧════╝
```
The `stream deploy` necessitates default application versions being set.
The `stream update` and `stream rollback` commands, though, can use all (default and non-default) registered application versions.
The following command creates a stream that uses the default mysource version (0.0.3):
```
dataflow:>stream create foo --definition "mysource | log"
```
Then we can update the version to 0.0.2:
```
dataflow:>stream update foo --properties version.mysource=0.0.2
```
| |Only pre-registered applications can be used to `deploy`, `update`, or `rollback` a Stream.|
|---|-------------------------------------------------------------------------------------------|
An attempt to update the `mysource` to version `0.0.1` (not registered) fails.
#### 18.1.1. Register Supported Applications and Tasks
For convenience, we have the static files with application-URIs (for both Maven and Docker) available
for all the out-of-the-box stream and task or batch app-starters. You can point to this file and import
all the application-URIs in bulk. Otherwise, as explained previously, you can register them individually or have your own
custom property file with only the required application-URIs in it. We recommend, however, having a “focused”
list of desired application-URIs in a custom property file.
##### Spring Cloud Stream App Starters
The following table includes the `dataflow.spring.io` links to the available Stream Application Starters based on Spring Cloud Stream 2.1.x
and Spring Boot 2.1.x:
| Artifact Type | Stable Release | SNAPSHOT Release |
|---------------------|----------------------------------------------------------------------------------------------|--------------------------------------------------------------------------------------------------------------------------------------------------------------------|
| RabbitMQ + Maven | [dataflow.spring.io/rabbitmq-maven-latest](https://dataflow.spring.io/rabbitmq-maven-latest) | [dataflow.spring.io/Einstein-BUILD-SNAPSHOT-stream-applications-rabbit-maven](https://dataflow.spring.io/Einstein-BUILD-SNAPSHOT-stream-applications-rabbit-maven) |
| RabbitMQ + Docker |[dataflow.spring.io/rabbitmq-docker-latest](https://dataflow.spring.io/rabbitmq-docker-latest)|[dataflow.spring.io/Einstein-BUILD-SNAPSHOT-stream-applications-rabbit-docker](https://dataflow.spring.io/Einstein-BUILD-SNAPSHOT-stream-applications-rabbit-docker)|
|Apache Kafka + Maven | [dataflow.spring.io/kafka-maven-latest](https://dataflow.spring.io/kafka-maven-latest) | [dataflow.spring.io/Einstein-BUILD-SNAPSHOT-stream-applications-kafka-maven](https://dataflow.spring.io/Einstein-BUILD-SNAPSHOT-stream-applications-kafka-maven) |
|Apache Kafka + Docker| [dataflow.spring.io/kafka-docker-latest](https://dataflow.spring.io/kafka-docker-latest) | [dataflow.spring.io/Einstein-BUILD-SNAPSHOT-stream-applications-kafka-docker](https://dataflow.spring.io/Einstein-BUILD-SNAPSHOT-stream-applications-kafka-docker) |
| |By default, App Starter actuator endpoints are secured. You can disable security by deploying streams with the`app.*.spring.autoconfigure.exclude=org.springframework.boot.autoconfigure.security.servlet.SecurityAutoConfiguration` property.
On Kubernetes, see the [Liveness and readiness probes](#getting-started-kubernetes-probes) section for how to configure
security for actuator endpoints.|
|---|---------------------------------------------------------------------------------------------------------------------------------------------------------------------------------------------------------------------------------------------------------------------------------------------------------------------------------------------------------------------------------------------------------------|
| |Starting with the Spring Cloud Stream 2.1 GA release, we now have robust interoperability with the Spring Cloud Function
programming model. Building on that, with the Einstein release-train, it is now possible to pick a few Stream App
Starters and compose them into a single application by using the functional-style programming model. Check out the["Composed Function Support in
Spring Cloud Data Flow"](https://spring.io/blog/2019/01/09/composed-function-support-in-spring-cloud-data-flow) blog to learn more about the developer and orchestration-experience with an example.|
|---|------------------------------------------------------------------------------------------------------------------------------------------------------------------------------------------------------------------------------------------------------------------------------------------------------------------------------------------------------------------------------------------------------------------------------------------------------------------------------------------------------------------------------------------------------------------------------------------------------------|
##### Spring Cloud Task App Starters
The following table includes the available Task Application Starters based on Spring Cloud Task 2.1.x and Spring Boot 2.1.x:
|Artifact Type| Stable Release | SNAPSHOT Release |
|-------------|--------------------------------------------------------------------------------------|----------------------------------------------------------------------------------------------------------------------------------------------|
| Maven | [dataflow.spring.io/task-maven-latest](https://dataflow.spring.io/task-maven-latest) | [dataflow.spring.io/Elston-BUILD-SNAPSHOT-task-applications-maven](https://dataflow.spring.io/Elston-BUILD-SNAPSHOT-task-applications-maven) |
| Docker |[dataflow.spring.io/task-docker-latest](https://dataflow.spring.io/task-docker-latest)|[dataflow.spring.io/Elston-BUILD-SNAPSHOT-task-applications-docker](https://dataflow.spring.io/Elston-BUILD-SNAPSHOT-task-applications-docker)|
You can find more information about the available task starters in the [Task App Starters Project Page](https://cloud.spring.io/spring-cloud-task-app-starters/) and
related reference documentation. For more information about the available stream starters, look at the [Stream App Starters Project Page](https://cloud.spring.io/spring-cloud-stream-app-starters/)and related reference documentation.
As an example, if you would like to register all out-of-the-box stream applications built with the Kafka binder in bulk, you can use the following command:
```
$ dataflow:>app import --uri https://dataflow.spring.io/kafka-maven-latest
```
Alternatively, you can register all the stream applications with the Rabbit binder, as follows:
```
$ dataflow:>app import --uri https://dataflow.spring.io/rabbitmq-maven-latest
```
You can also pass the `--local` option (which is `true` by default) to indicate whether the
properties file location should be resolved within the shell process itself. If the location should
be resolved from the Data Flow Server process, specify `--local false`.
| |When you use either `app register` or `app import`, if an application is already registered with
the provided name and type and version, it is, by default, not overridden. If you would like to override the
pre-existing application `uri` or `metadata-uri` coordinates, include the `--force` option.
Note, however, that, once downloaded, applications may be cached locally on the Data Flow server, based on the resource
location. If the resource location does not change (even though the actual resource *bytes* may be different), it
is not re-downloaded. When using `maven://` resources, on the other hand, using a constant location may still circumvent
caching (if using `-SNAPSHOT` versions).
Moreover, if a stream is already deployed and uses some version of a registered app, then (forcibly) re-registering a
different application has no effect until the stream is deployed again.|
|---|-------------------------------------------------------------------------------------------------------------------------------------------------------------------------------------------------------------------------------------------------------------------------------------------------------------------------------------------------------------------------------------------------------------------------------------------------------------------------------------------------------------------------------------------------------------------------------------------------------------------------------------------------------------------------------------------------------------------------------------------------------------------------------------------------------------------------------------------------------------------------------------------------------------------------------------------------------------|
| |In some cases, the resource is resolved on the server side. In others, the
URI is passed to a runtime container instance, where it is resolved. See
the specific documentation of each Data Flow Server for more detail.|
|---|--------------------------------------------------------------------------------------------------------------------------------------------------------------------------------------------------------------------------------|
#### 18.1.2. Creating Custom Applications
While Data Flow includes source, processor, sink applications, you can extend these applications or write a custom [Spring Cloud Stream](https://github.com/spring-cloud/spring-cloud-stream) application.
The process of creating Spring Cloud Stream applications with [Spring Initializr](https://start.spring.io/) is detailed in the Spring Cloud Stream [documentation](https://docs.spring.io/spring-cloud-stream/docs/current/reference/htmlsingle/index.html#_getting_started).
You can include multiple binders to an application.
If you do so, see the instructions in [[passing\_producer\_consumer\_properties]](#passing_producer_consumer_properties) for how to configure them.
To support allowing properties, Spring Cloud Stream applications running in Spring Cloud Data Flow can include the Spring Boot `configuration-processor` as an optional dependency, as shown in the following example:
```
org.springframework.boot
spring-boot-configuration-processor
true
```
NOTE:Make sure that the `spring-boot-maven-plugin` is included in the POM.
The plugin is necessary for creating the executable jar that is registered with Spring Cloud Data Flow.
Spring Initialzr includes the plugin in the generated POM.
Once you have created a custom application, you can register it, as described in [Register a Stream Application](#spring-cloud-dataflow-register-stream-apps).
### 18.2. Creating a Stream
The Spring Cloud Data Flow Server exposes a full RESTful API for managing the lifecycle of stream definitions, but the easiest way to use is it is through the Spring Cloud Data Flow shell. The [Getting Started](#getting-started) section describes how to start the shell.
New streams are created with the help of stream definitions. The definitions are built from a simple DSL. For example, consider what happens if we run the following shell command:
```
dataflow:> stream create --definition "time | log" --name ticktock
```
This defines a stream named `ticktock` that is based off of the DSL expression `time | log`. The DSL uses the “pipe” symbol (`|`), to connect a source to a sink.
The `stream info` command shows useful information about the stream, as shown (with its output) in the following example:
```
dataflow:>stream info ticktock
╔═══════════╤═════════════════╤══════════╗
║Stream Name│Stream Definition│ Status ║
╠═══════════╪═════════════════╪══════════╣
║ticktock │time | log │undeployed║
╚═══════════╧═════════════════╧══════════╝
```
#### 18.2.1. Stream Application Properties
Application properties are the properties associated with each application in the stream. When the application is deployed, the application properties are applied to the application through
command-line arguments or environment variables, depending on the underlying deployment implementation.
The following stream can have application properties defined at the time of stream creation:
```
dataflow:> stream create --definition "time | log" --name ticktock
```
The `app info --name --type ` shell command displays the exposed application properties for the application.
For more about exposed properties, see [Application Metadata](https://dataflow.spring.io/docs/applications/application-metadata).
The following listing shows the exposed properties for the `time` application:
```
dataflow:> app info --name time --type source
╔══════════════════════════════╤══════════════════════════════╤══════════════════════════════╤══════════════════════════════╗
║ Option Name │ Description │ Default │ Type ║
╠══════════════════════════════╪══════════════════════════════╪══════════════════════════════╪══════════════════════════════╣
║trigger.time-unit │The TimeUnit to apply to delay│ │java.util.concurrent.TimeUnit ║
║ │values. │ │ ║
║trigger.fixed-delay │Fixed delay for periodic │1 │java.lang.Integer ║
║ │triggers. │ │ ║
║trigger.cron │Cron expression value for the │ │java.lang.String ║
║ │Cron Trigger. │ │ ║
║trigger.initial-delay │Initial delay for periodic │0 │java.lang.Integer ║
║ │triggers. │ │ ║
║trigger.max-messages │Maximum messages per poll, -1 │1 │java.lang.Long ║
║ │means infinity. │ │ ║
║trigger.date-format │Format for the date value. │ │java.lang.String ║
╚══════════════════════════════╧══════════════════════════════╧══════════════════════════════╧══════════════════════════════╝
```
The following listing shows the exposed properties for the `log` application:
```
dataflow:> app info --name log --type sink
╔══════════════════════════════╤══════════════════════════════╤══════════════════════════════╤══════════════════════════════╗
║ Option Name │ Description │ Default │ Type ║
╠══════════════════════════════╪══════════════════════════════╪══════════════════════════════╪══════════════════════════════╣
║log.name │The name of the logger to use.│ │java.lang.String ║
║log.level │The level at which to log │ │org.springframework.integratio║
║ │messages. │ │n.handler.LoggingHandler$Level║
║log.expression │A SpEL expression (against the│payload │java.lang.String ║
║ │incoming message) to evaluate │ │ ║
║ │as the logged message. │ │ ║
╚══════════════════════════════╧══════════════════════════════╧══════════════════════════════╧══════════════════════════════╝
```
You can specify the application properties for the `time` and `log` apps at the time of `stream` creation, as follows:
```
dataflow:> stream create --definition "time --fixed-delay=5 | log --level=WARN" --name ticktock
```
Note that, in the preceding example, the `fixed-delay` and `level` properties defined for the `time` and `log` applications are the “short-form” property names provided by the shell completion.
These “short-form” property names are applicable only for the exposed properties. In all other cases, you should use only fully qualified property names.
#### 18.2.2. Common Application Properties
In addition to configuration through DSL, Spring Cloud Data Flow provides a mechanism for setting common properties to all
the streaming applications that are launched by it.
This can be done by adding properties prefixed with `spring.cloud.dataflow.applicationProperties.stream` when starting
the server.
When doing so, the server passes all the properties, without the prefix, to the instances it launches.
For example, all the launched applications can be configured to use a specific Kafka broker by launching the
Data Flow server with the following options:
```
--spring.cloud.dataflow.applicationProperties.stream.spring.cloud.stream.kafka.binder.brokers=192.168.1.100:9092
--spring.cloud.dataflow.applicationProperties.stream.spring.cloud.stream.kafka.binder.zkNodes=192.168.1.100:2181
```
Doing so causes the `spring.cloud.stream.kafka.binder.brokers` and `spring.cloud.stream.kafka.binder.zkNodes` properties
to be passed to all the launched applications.
| |Properties configured with this mechanism have lower precedence than stream deployment properties.
They are overridden if a property with the same key is specified at stream deployment time (for example,`app.http.spring.cloud.stream.kafka.binder.brokers` overrides the common property).|
|---|--------------------------------------------------------------------------------------------------------------------------------------------------------------------------------------------------------------------------------------------------------------------------------------------------|
### 18.3. Deploying a Stream
This section describes how to deploy a Stream when the Spring Cloud Data Flow server is responsible for deploying the stream. It covers the deployment and upgrade of Streams by using the Skipper service. The description of how to set deployment properties applies to both approaches of Stream deployment.
Consider the `ticktock` stream definition:
```
dataflow:> stream create --definition "time | log" --name ticktock
```
To deploy the stream, use the following shell command:
```
dataflow:> stream deploy --name ticktock
```
The Data Flow Server delegates to Skipper the resolution and deployment of the `time` and `log` applications.
The `stream info` command shows useful information about the stream, including the deployment properties:
```
dataflow:>stream info --name ticktock
╔═══════════╤═════════════════╤═════════╗
║Stream Name│Stream Definition│ Status ║
╠═══════════╪═════════════════╪═════════╣
║ticktock │time | log │deploying║
╚═══════════╧═════════════════╧═════════╝
Stream Deployment properties: {
"log" : {
"resource" : "maven://org.springframework.cloud.stream.app:log-sink-rabbit",
"spring.cloud.deployer.group" : "ticktock",
"version" : "2.0.1.RELEASE"
},
"time" : {
"resource" : "maven://org.springframework.cloud.stream.app:time-source-rabbit",
"spring.cloud.deployer.group" : "ticktock",
"version" : "2.0.1.RELEASE"
}
}
```
There is an important optional command argument (called `--platformName`) to the `stream deploy` command.
Skipper can be configured to deploy to multiple platforms.
Skipper is pre-configured with a platform named `default`, which deploys applications to the local machine where Skipper is running.
The default value of the `--platformName` command line argument is `default`.
If you commonly deploy to one platform, when installing Skipper, you can override the configuration of the `default` platform.
Otherwise, specify the `platformName` to be one of the values returned by the `stream platform-list` command.
In the preceding example, the time source sends the current time as a message each second, and the log sink outputs it by using the logging framework.
You can tail the `stdout` log (which has an `` suffix). The log files are located within the directory displayed in the Data Flow Server’s log output, as shown in the following listing:
```
$ tail -f /var/folders/wn/8jxm_tbd1vj28c8vj37n900m0000gn/T/spring-cloud-dataflow-912434582726479179/ticktock-1464788481708/ticktock.log/stdout_0.log
2016-06-01 09:45:11.250 INFO 79194 --- [ kafka-binder-] log.sink : 06/01/16 09:45:11
2016-06-01 09:45:12.250 INFO 79194 --- [ kafka-binder-] log.sink : 06/01/16 09:45:12
2016-06-01 09:45:13.251 INFO 79194 --- [ kafka-binder-] log.sink : 06/01/16 09:45:13
```
You can also create and deploy the stream in one step by passing the `--deploy` flag when creating the stream, as follows:
```
dataflow:> stream create --definition "time | log" --name ticktock --deploy
```
However, it is not common in real-world use cases to create and deploy the stream in one step.
The reason is that when you use the `stream deploy` command, you can pass in properties that define how to map the applications onto the platform (for example, what is the memory size of the container to use, the number of each application to run, and whether to enable data partitioning features).
Properties can also override application properties that were set when creating the stream.
The next sections cover this feature in detail.
#### 18.3.1. Deployment Properties
When deploying a stream, you can specify properties that can control how applications are deployed and configured. See the [Deployment Properties](https://dataflow.spring.io/docs/feature-guides/streams/deployment-properties/) section of the microsite for more information.
### 18.4. Destroying a Stream
You can delete a stream by issuing the `stream destroy` command from the shell, as follows:
```
dataflow:> stream destroy --name ticktock
```
If the stream was deployed, it is undeployed before the stream definition is deleted.
### 18.5. Undeploying a Stream
Often, you want to stop a stream but retain the name and definition for future use. In that case, you can `undeploy` the stream by name:
```
dataflow:> stream undeploy --name ticktock
dataflow:> stream deploy --name ticktock
```
You can issue the `deploy` command at a later time to restart it:
```
dataflow:> stream deploy --name ticktock
```
### 18.6. Validating a Stream
Sometimes, an application contained within a stream definition contains an invalid URI in its registration.
This can caused by an invalid URI being entered at application registration time or by the application being removed from the repository from which it was to be drawn.
To verify that all the applications contained in a stream are resolve-able, a user can use the `validate` command:
```
dataflow:>stream validate ticktock
╔═══════════╤═════════════════╗
║Stream Name│Stream Definition║
╠═══════════╪═════════════════╣
║ticktock │time | log ║
╚═══════════╧═════════════════╝
ticktock is a valid stream.
╔═══════════╤═════════════════╗
║ App Name │Validation Status║
╠═══════════╪═════════════════╣
║source:time│valid ║
║sink:log │valid ║
╚═══════════╧═════════════════╝
```
In the preceding example, the user validated their ticktock stream. Both the `source:time` and `sink:log` are valid.
Now we can see what happens if we have a stream definition with a registered application with an invalid URI:
```
dataflow:>stream validate bad-ticktock
╔════════════╤═════════════════╗
║Stream Name │Stream Definition║
╠════════════╪═════════════════╣
║bad-ticktock│bad-time | log ║
╚════════════╧═════════════════╝
bad-ticktock is an invalid stream.
╔═══════════════╤═════════════════╗
║ App Name │Validation Status║
╠═══════════════╪═════════════════╣
║source:bad-time│invalid ║
║sink:log │valid ║
╚═══════════════╧═════════════════╝
```
In this case, Spring Cloud Data Flow states that the stream is invalid because `source:bad-time` has an invalid URI.
### 18.7. Updating a Stream
To update the stream, use the `stream update` command, which takes either `--properties` or `--propertiesFile` as a command argument.
Skipper has an important new top-level prefix: `version`.
The following commands deploy `http | log` stream (and the version of `log` which registered at the time of deployment was `1.1.0.RELEASE`):
```
dataflow:> stream create --name httptest --definition "http --server.port=9000 | log"
dataflow:> stream deploy --name httptest
dataflow:>stream info httptest
╔══════════════════════════════╤══════════════════════════════╤════════════════════════════╗
║ Name │ DSL │ Status ║
╠══════════════════════════════╪══════════════════════════════╪════════════════════════════╣
║httptest │http --server.port=9000 | log │deploying ║
╚══════════════════════════════╧══════════════════════════════╧════════════════════════════╝
Stream Deployment properties: {
"log" : {
"spring.cloud.deployer.indexed" : "true",
"spring.cloud.deployer.group" : "httptest",
"maven://org.springframework.cloud.stream.app:log-sink-rabbit" : "1.1.0.RELEASE"
},
"http" : {
"spring.cloud.deployer.group" : "httptest",
"maven://org.springframework.cloud.stream.app:http-source-rabbit" : "1.1.0.RELEASE"
}
}
```
Then the following command updates the stream to use the `1.2.0.RELEASE` version of the log application.
Before updating the stream with the specific version of the application, we need to make sure that the application is registered with that version:
```
dataflow:>app register --name log --type sink --uri maven://org.springframework.cloud.stream.app:log-sink-rabbit:1.2.0.RELEASE
Successfully registered application 'sink:log'
```
Then we can update the application:
```
dataflow:>stream update --name httptest --properties version.log=1.2.0.RELEASE
```
| |You can use only pre-registered application versions to `deploy`, `update`, or `rollback` a stream.|
|---|---------------------------------------------------------------------------------------------------|
To verify the deployment properties and the updated version, we can use `stream info`, as shown (with its output) in the following example:
```
dataflow:>stream info httptest
╔══════════════════════════════╤══════════════════════════════╤════════════════════════════╗
║ Name │ DSL │ Status ║
╠══════════════════════════════╪══════════════════════════════╪════════════════════════════╣
║httptest │http --server.port=9000 | log │deploying ║
╚══════════════════════════════╧══════════════════════════════╧════════════════════════════╝
Stream Deployment properties: {
"log" : {
"spring.cloud.deployer.indexed" : "true",
"spring.cloud.deployer.count" : "1",
"spring.cloud.deployer.group" : "httptest",
"maven://org.springframework.cloud.stream.app:log-sink-rabbit" : "1.2.0.RELEASE"
},
"http" : {
"spring.cloud.deployer.group" : "httptest",
"maven://org.springframework.cloud.stream.app:http-source-rabbit" : "1.1.0.RELEASE"
}
}
```
### 18.8. Forcing an Update of a Stream
When upgrading a stream, you can use the `--force` option to deploy new instances of currently deployed applications even if no application or deployment properties have changed.
This behavior is needed for when configuration information is obtained by the application itself at startup time — for example, from Spring Cloud Config Server.
You can specify the applications for which to force an upgrade by using the `--app-names` option.
If you do not specify any application names, all the applications are forced to upgrade.
You can specify the `--force` and `--app-names` options together with the `--properties` or `--propertiesFile` options.
### 18.9. Stream Versions
Skipper keeps a history of the streams that were deployed.
After updating a Stream, there is a second version of the stream.
You can query for the history of the versions by using the `stream history --name ` command:
```
dataflow:>stream history --name httptest
╔═══════╤════════════════════════════╤════════╤════════════╤═══════════════╤════════════════╗
║Version│ Last updated │ Status │Package Name│Package Version│ Description ║
╠═══════╪════════════════════════════╪════════╪════════════╪═══════════════╪════════════════╣
║2 │Mon Nov 27 22:41:16 EST 2017│DEPLOYED│httptest │1.0.0 │Upgrade complete║
║1 │Mon Nov 27 22:40:41 EST 2017│DELETED │httptest │1.0.0 │Delete complete ║
╚═══════╧════════════════════════════╧════════╧════════════╧═══════════════╧════════════════╝
```
### 18.10. Stream Manifests
Skipper keeps a “manifest” of the all of the applications, their application properties, and their deployment properties after all values have been substituted.
This represents the final state of what was deployed to the platform.
You can view the manifest for any of the versions of a Stream by using the following command:
```
stream manifest --name --releaseVersion
```
If the `--releaseVersion` is not specified, the manifest for the last version is returned.
The following example shows the use of the manifest:
```
dataflow:>stream manifest --name httptest
```
Using the command results in the following output:
```
# Source: log.yml
apiVersion: skipper.spring.io/v1
kind: SpringCloudDeployerApplication
metadata:
name: log
spec:
resource: maven://org.springframework.cloud.stream.app:log-sink-rabbit
version: 1.2.0.RELEASE
applicationProperties:
spring.cloud.dataflow.stream.app.label: log
spring.cloud.stream.bindings.input.group: httptest
spring.cloud.dataflow.stream.name: httptest
spring.cloud.dataflow.stream.app.type: sink
spring.cloud.stream.bindings.input.destination: httptest.http
deploymentProperties:
spring.cloud.deployer.indexed: true
spring.cloud.deployer.group: httptest
spring.cloud.deployer.count: 1
---
# Source: http.yml
apiVersion: skipper.spring.io/v1
kind: SpringCloudDeployerApplication
metadata:
name: http
spec:
resource: maven://org.springframework.cloud.stream.app:http-source-rabbit
version: 1.2.0.RELEASE
applicationProperties:
spring.cloud.dataflow.stream.app.label: http
spring.cloud.stream.bindings.output.producer.requiredGroups: httptest
server.port: 9000
spring.cloud.stream.bindings.output.destination: httptest.http
spring.cloud.dataflow.stream.name: httptest
spring.cloud.dataflow.stream.app.type: source
deploymentProperties:
spring.cloud.deployer.group: httptest
```
The majority of the deployment and application properties were set by Data Flow to enable the applications to talk to each other and to send application metrics with identifying labels.
### 18.11. Rollback a Stream
You can roll back to a previous version of the stream by using the `stream rollback` command:
```
dataflow:>stream rollback --name httptest
```
The optional `--releaseVersion` command argument adds the version of the stream.
If not specified, the rollback operation goes to the previous stream version.
### 18.12. Application Count
The application count is a dynamic property of the system used to specify the number of instances of applications. See the [Application Count](https://dataflow.spring.io/docs/feature-guides/streams/application-count/) section of the microsite for more information.
### 18.13. Skipper’s Upgrade Strategy
Skipper has a simple “red/black” upgrade strategy. It deploys the new version of the applications, using as many instances as the currently running version, and checks the `/health` endpoint of the application.
If the health of the new application is good, the previous application is undeployed.
If the health of the new application is bad, all new applications are undeployed, and the upgrade is considered to be not successful.
The upgrade strategy is not a rolling upgrade, so, if five instances of the application are running, then, in a sunny-day scenario, five of the new applications are also running before the older version is undeployed.
## 19. Stream DSL
This section covers additional features of the Stream DSL not covered in the [Stream DSL introduction](#spring-cloud-dataflow-stream-intro-dsl).
### 19.1. Tap a Stream
Taps can be created at various producer endpoints in a stream. See the [Tapping a Stream](https://dataflow.spring.io/docs/feature-guides/streams/taps/) section of the microsite for more information.
### 19.2. Using Labels in a Stream
When a stream is made up of multiple applications with the same name, they must be qualified with labels.
See the [Labeling Applications](https://dataflow.spring.io/docs/feature-guides/streams/labels/) section of the microsite for more information.
### 19.3. Named Destinations
Instead of referencing a source or sink application, you can use a named destination.
See the [Named Destinations](https://dataflow.spring.io/docs/feature-guides/streams/named-destinations/) section of the microsite for more information.
### 19.4. Fan-in and Fan-out
By using named destinations, you can support fan-in and fan-out use cases.
See the [Fan-in and Fan-out](https://dataflow.spring.io/docs/feature-guides/streams/fanin-fanout/) section of the microsite for more information.
## 20. Stream Java DSL
Instead of using the shell to create and deploy streams, you can use the Java-based DSL provided by the `spring-cloud-dataflow-rest-client` module.
See the [Java DSL](https://dataflow.spring.io/docs/feature-guides/streams/java-dsl/) section of the microsite for more information.
## 21. Stream Applications with Multiple Binder Configurations
In some cases, a stream can have its applications bound to multiple spring cloud stream binders when they are required to connect to different messaging
middleware configurations. In those cases, you should make sure the applications are configured appropriately with their binder
configurations. For example, a multi-binder transformer that supports both Kafka and Rabbit binders is the processor in the following stream:
```
http | multibindertransform --expression=payload.toUpperCase() | log
```
| |In the preceding example, you would write your own `multibindertransform` application.|
|---|--------------------------------------------------------------------------------------|
In this stream, each application connects to messaging middleware in the following way:
1. The HTTP source sends events to RabbitMQ (`rabbit1`).
2. The Multi-Binder Transform processor receives events from RabbitMQ (`rabbit1`) and sends the processed events into Kafka (`kafka1`).
3. The log sink receives events from Kafka (`kafka1`).
Here, `rabbit1` and `kafka1` are the binder names given in the Spring Cloud Stream application properties.
Based on this setup, the applications have the following binders in their classpaths with the appropriate configuration:
* HTTP: Rabbit binder
* Transform: Both Kafka and Rabbit binders
* Log: Kafka binder
The `spring-cloud-stream` `binder` configuration properties can be set within the applications themselves.
If not, they can be passed through `deployment` properties when the stream is deployed:
```
dataflow:>stream create --definition "http | multibindertransform --expression=payload.toUpperCase() | log" --name mystream
dataflow:>stream deploy mystream --properties "app.http.spring.cloud.stream.bindings.output.binder=rabbit1,app.multibindertransform.spring.cloud.stream.bindings.input.binder=rabbit1,
app.multibindertransform.spring.cloud.stream.bindings.output.binder=kafka1,app.log.spring.cloud.stream.bindings.input.binder=kafka1"
```
You can override any of the binder configuration properties by specifying them through deployment properties.
## 22. Function Composition
Function composition lets you attach a functional logic dynamically to an existing event streaming application. See the [Function Composition](https://dataflow.spring.io/docs/feature-guides/streams/function-composition/) section of the microsite for more details.
## 23. Functional Applications
With Spring Cloud Stream 3.x adding [functional support](https://cloud.spring.io/spring-cloud-static/spring-cloud-stream/current/reference/html/spring-cloud-stream.html#spring-cloud-stream-overview-producing-consuming-messages), you can build `Source`, `Sink` and `Processor` applications merely by implementing the Java Util’s `Supplier`, `Consumer`, and `Function` interfaces respectively.
See the [Functional Application Recipe](https://dataflow.spring.io/docs/recipes/functional-apps/) of the SCDF site for more about this feature.
## 24. Examples
This chapter includes the following examples:
* [Simple Stream Processing](#spring-cloud-dataflow-simple-stream)
* [Stateful Stream Processing](#spring-cloud-dataflow-stream-partitions)
* [Other Source and Sink Application Types](#spring-cloud-dataflow-stream-app-types)
You can find links to more samples in the “[Samples](#dataflow-samples)” chapter.
### 24.1. Simple Stream Processing
As an example of a simple processing step, we can transform the payload of the HTTP-posted data to upper case by using the following stream definition:
```
http | transform --expression=payload.toUpperCase() | log
```
To create this stream, enter the following command in the shell:
```
dataflow:> stream create --definition "http --server.port=9000 | transform --expression=payload.toUpperCase() | log" --name mystream --deploy
```
The following example uses a shell command to post some data:
```
dataflow:> http post --target http://localhost:9000 --data "hello"
```
The preceding example results in an upper-case `HELLO` in the log, as follows:
```
2016-06-01 09:54:37.749 INFO 80083 --- [ kafka-binder-] log.sink : HELLO
```
### 24.2. Stateful Stream Processing
To demonstrate the data partitioning functionality, the following listing deploys a stream with Kafka as the binder:
```
dataflow:>stream create --name words --definition "http --server.port=9900 | splitter --expression=payload.split(' ') | log"
Created new stream 'words'
dataflow:>stream deploy words --properties "app.splitter.producer.partitionKeyExpression=payload,deployer.log.count=2"
Deployed stream 'words'
dataflow:>http post --target http://localhost:9900 --data "How much wood would a woodchuck chuck if a woodchuck could chuck wood"
> POST (text/plain;Charset=UTF-8) http://localhost:9900 How much wood would a woodchuck chuck if a woodchuck could chuck wood
> 202 ACCEPTED
dataflow:>runtime apps
╔════════════════════╤═══════════╤═══════════════════════════════════════════════════════════════════════════════════════════════════════════════════════════════════════════════════════════╗
║App Id / Instance Id│Unit Status│ No. of Instances / Attributes ║
╠════════════════════╪═══════════╪═══════════════════════════════════════════════════════════════════════════════════════════════════════════════════════════════════════════════════════════╣
║words.log-v1 │ deployed │ 2 ║
╟┈┈┈┈┈┈┈┈┈┈┈┈┈┈┈┈┈┈┈┈┼┈┈┈┈┈┈┈┈┈┈┈┼┈┈┈┈┈┈┈┈┈┈┈┈┈┈┈┈┈┈┈┈┈┈┈┈┈┈┈┈┈┈┈┈┈┈┈┈┈┈┈┈┈┈┈┈┈┈┈┈┈┈┈┈┈┈┈┈┈┈┈┈┈┈┈┈┈┈┈┈┈┈┈┈┈┈┈┈┈┈┈┈┈┈┈┈┈┈┈┈┈┈┈┈┈┈┈┈┈┈┈┈┈┈┈┈┈┈┈┈┈┈┈┈┈┈┈┈┈┈┈┈┈┈┈┈┈┈┈┈┈┈┈┈┈┈┈┈┈┈┈┈┈┈┈┈┈┈┈┈┈┈┈┈┈┈┈╢
║ │ │ guid = 24166 ║
║ │ │ pid = 33097 ║
║ │ │ port = 24166 ║
║words.log-v1-0 │ deployed │ stderr = /var/folders/js/7b_pn0t575l790x7j61slyxc0000gn/T/spring-cloud-deployer-6467595568759190742/words-1542803461063/words.log-v1/stderr_0.log ║
║ │ │ stdout = /var/folders/js/7b_pn0t575l790x7j61slyxc0000gn/T/spring-cloud-deployer-6467595568759190742/words-1542803461063/words.log-v1/stdout_0.log ║
║ │ │ url = https://192.168.0.102:24166 ║
║ │ │working.dir = /var/folders/js/7b_pn0t575l790x7j61slyxc0000gn/T/spring-cloud-deployer-6467595568759190742/words-1542803461063/words.log-v1 ║
╟┈┈┈┈┈┈┈┈┈┈┈┈┈┈┈┈┈┈┈┈┼┈┈┈┈┈┈┈┈┈┈┈┼┈┈┈┈┈┈┈┈┈┈┈┈┈┈┈┈┈┈┈┈┈┈┈┈┈┈┈┈┈┈┈┈┈┈┈┈┈┈┈┈┈┈┈┈┈┈┈┈┈┈┈┈┈┈┈┈┈┈┈┈┈┈┈┈┈┈┈┈┈┈┈┈┈┈┈┈┈┈┈┈┈┈┈┈┈┈┈┈┈┈┈┈┈┈┈┈┈┈┈┈┈┈┈┈┈┈┈┈┈┈┈┈┈┈┈┈┈┈┈┈┈┈┈┈┈┈┈┈┈┈┈┈┈┈┈┈┈┈┈┈┈┈┈┈┈┈┈┈┈┈┈┈┈┈┈╢
║ │ │ guid = 41269 ║
║ │ │ pid = 33098 ║
║ │ │ port = 41269 ║
║words.log-v1-1 │ deployed │ stderr = /var/folders/js/7b_pn0t575l790x7j61slyxc0000gn/T/spring-cloud-deployer-6467595568759190742/words-1542803461063/words.log-v1/stderr_1.log ║
║ │ │ stdout = /var/folders/js/7b_pn0t575l790x7j61slyxc0000gn/T/spring-cloud-deployer-6467595568759190742/words-1542803461063/words.log-v1/stdout_1.log ║
║ │ │ url = https://192.168.0.102:41269 ║
║ │ │working.dir = /var/folders/js/7b_pn0t575l790x7j61slyxc0000gn/T/spring-cloud-deployer-6467595568759190742/words-1542803461063/words.log-v1 ║
╟────────────────────┼───────────┼───────────────────────────────────────────────────────────────────────────────────────────────────────────────────────────────────────────────────────────╢
║words.http-v1 │ deployed │ 1 ║
╟┈┈┈┈┈┈┈┈┈┈┈┈┈┈┈┈┈┈┈┈┼┈┈┈┈┈┈┈┈┈┈┈┼┈┈┈┈┈┈┈┈┈┈┈┈┈┈┈┈┈┈┈┈┈┈┈┈┈┈┈┈┈┈┈┈┈┈┈┈┈┈┈┈┈┈┈┈┈┈┈┈┈┈┈┈┈┈┈┈┈┈┈┈┈┈┈┈┈┈┈┈┈┈┈┈┈┈┈┈┈┈┈┈┈┈┈┈┈┈┈┈┈┈┈┈┈┈┈┈┈┈┈┈┈┈┈┈┈┈┈┈┈┈┈┈┈┈┈┈┈┈┈┈┈┈┈┈┈┈┈┈┈┈┈┈┈┈┈┈┈┈┈┈┈┈┈┈┈┈┈┈┈┈┈┈┈┈┈╢
║ │ │ guid = 9900 ║
║ │ │ pid = 33094 ║
║ │ │ port = 9900 ║
║words.http-v1-0 │ deployed │ stderr = /var/folders/js/7b_pn0t575l790x7j61slyxc0000gn/T/spring-cloud-deployer-6467595568759190742/words-1542803461054/words.http-v1/stderr_0.log ║
║ │ │ stdout = /var/folders/js/7b_pn0t575l790x7j61slyxc0000gn/T/spring-cloud-deployer-6467595568759190742/words-1542803461054/words.http-v1/stdout_0.log ║
║ │ │ url = https://192.168.0.102:9900 ║
║ │ │working.dir = /var/folders/js/7b_pn0t575l790x7j61slyxc0000gn/T/spring-cloud-deployer-6467595568759190742/words-1542803461054/words.http-v1 ║
╟────────────────────┼───────────┼───────────────────────────────────────────────────────────────────────────────────────────────────────────────────────────────────────────────────────────╢
║words.splitter-v1 │ deployed │ 1 ║
╟┈┈┈┈┈┈┈┈┈┈┈┈┈┈┈┈┈┈┈┈┼┈┈┈┈┈┈┈┈┈┈┈┼┈┈┈┈┈┈┈┈┈┈┈┈┈┈┈┈┈┈┈┈┈┈┈┈┈┈┈┈┈┈┈┈┈┈┈┈┈┈┈┈┈┈┈┈┈┈┈┈┈┈┈┈┈┈┈┈┈┈┈┈┈┈┈┈┈┈┈┈┈┈┈┈┈┈┈┈┈┈┈┈┈┈┈┈┈┈┈┈┈┈┈┈┈┈┈┈┈┈┈┈┈┈┈┈┈┈┈┈┈┈┈┈┈┈┈┈┈┈┈┈┈┈┈┈┈┈┈┈┈┈┈┈┈┈┈┈┈┈┈┈┈┈┈┈┈┈┈┈┈┈┈┈┈┈┈╢
║ │ │ guid = 33963 ║
║ │ │ pid = 33093 ║
║ │ │ port = 33963 ║
║words.splitter-v1-0 │ deployed │ stderr = /var/folders/js/7b_pn0t575l790x7j61slyxc0000gn/T/spring-cloud-deployer-6467595568759190742/words-1542803437542/words.splitter-v1/stderr_0.log║
║ │ │ stdout = /var/folders/js/7b_pn0t575l790x7j61slyxc0000gn/T/spring-cloud-deployer-6467595568759190742/words-1542803437542/words.splitter-v1/stdout_0.log║
║ │ │ url = https://192.168.0.102:33963 ║
║ │ │working.dir = /var/folders/js/7b_pn0t575l790x7j61slyxc0000gn/T/spring-cloud-deployer-6467595568759190742/words-1542803437542/words.splitter-v1 ║
╚════════════════════╧═══════════╧═══════════════════════════════════════════════════════════════════════════════════════════════════════════════════════════════════════════════════════════╝
```
When you review the `words.log-v1-0` logs, you should see the following:
```
2016-06-05 18:35:47.047 INFO 58638 --- [ kafka-binder-] log.sink : How
2016-06-05 18:35:47.066 INFO 58638 --- [ kafka-binder-] log.sink : chuck
2016-06-05 18:35:47.066 INFO 58638 --- [ kafka-binder-] log.sink : chuck
```
When you review the `words.log-v1-1` logs, you should see the following:
```
2016-06-05 18:35:47.047 INFO 58639 --- [ kafka-binder-] log.sink : much
2016-06-05 18:35:47.066 INFO 58639 --- [ kafka-binder-] log.sink : wood
2016-06-05 18:35:47.066 INFO 58639 --- [ kafka-binder-] log.sink : would
2016-06-05 18:35:47.066 INFO 58639 --- [ kafka-binder-] log.sink : a
2016-06-05 18:35:47.066 INFO 58639 --- [ kafka-binder-] log.sink : woodchuck
2016-06-05 18:35:47.067 INFO 58639 --- [ kafka-binder-] log.sink : if
2016-06-05 18:35:47.067 INFO 58639 --- [ kafka-binder-] log.sink : a
2016-06-05 18:35:47.067 INFO 58639 --- [ kafka-binder-] log.sink : woodchuck
2016-06-05 18:35:47.067 INFO 58639 --- [ kafka-binder-] log.sink : could
2016-06-05 18:35:47.067 INFO 58639 --- [ kafka-binder-] log.sink : wood
```
This example has shown that payload splits that contain the same word are routed to the same application instance.
### 24.3. Other Source and Sink Application Types
This example shows something a bit more complicated: swapping out the `time` source for something else. Another supported source type is `http`, which accepts data for ingestion over HTTP POST requests. Note that the `http` source accepts data on a different port from the Data Flow Server (default 8080). By default, the port is randomly assigned.
To create a stream that uses an `http` source but still uses the same `log` sink, we would change the original command in the [Simple Stream Processing](#spring-cloud-dataflow-simple-stream) example to the following:
```
dataflow:> stream create --definition "http | log" --name myhttpstream --deploy
```
Note that, this time, we do not see any other output until we actually post some data (by using a shell command). To see the randomly assigned port on which the `http` source is listening, run the following command:
```
dataflow:>runtime apps
╔══════════════════════╤═══════════╤═════════════════════════════════════════════════════════════════════════════════════════════════════════════════════════════════════════════════════════════════════╗
║ App Id / Instance Id │Unit Status│ No. of Instances / Attributes ║
╠══════════════════════╪═══════════╪═════════════════════════════════════════════════════════════════════════════════════════════════════════════════════════════════════════════════════════════════════╣
║myhttpstream.log-v1 │ deploying │ 1 ║
╟┈┈┈┈┈┈┈┈┈┈┈┈┈┈┈┈┈┈┈┈┈┈┼┈┈┈┈┈┈┈┈┈┈┈┼┈┈┈┈┈┈┈┈┈┈┈┈┈┈┈┈┈┈┈┈┈┈┈┈┈┈┈┈┈┈┈┈┈┈┈┈┈┈┈┈┈┈┈┈┈┈┈┈┈┈┈┈┈┈┈┈┈┈┈┈┈┈┈┈┈┈┈┈┈┈┈┈┈┈┈┈┈┈┈┈┈┈┈┈┈┈┈┈┈┈┈┈┈┈┈┈┈┈┈┈┈┈┈┈┈┈┈┈┈┈┈┈┈┈┈┈┈┈┈┈┈┈┈┈┈┈┈┈┈┈┈┈┈┈┈┈┈┈┈┈┈┈┈┈┈┈┈┈┈┈┈┈┈┈┈┈┈┈┈┈┈┈┈┈┈╢
║ │ │ guid = 39628 ║
║ │ │ pid = 34403 ║
║ │ │ port = 39628 ║
║myhttpstream.log-v1-0 │ deploying │ stderr = /var/folders/js/7b_pn0t575l790x7j61slyxc0000gn/T/spring-cloud-deployer-6467595568759190742/myhttpstream-1542803867070/myhttpstream.log-v1/stderr_0.log ║
║ │ │ stdout = /var/folders/js/7b_pn0t575l790x7j61slyxc0000gn/T/spring-cloud-deployer-6467595568759190742/myhttpstream-1542803867070/myhttpstream.log-v1/stdout_0.log ║
║ │ │ url = https://192.168.0.102:39628 ║
║ │ │working.dir = /var/folders/js/7b_pn0t575l790x7j61slyxc0000gn/T/spring-cloud-deployer-6467595568759190742/myhttpstream-1542803867070/myhttpstream.log-v1 ║
╟──────────────────────┼───────────┼─────────────────────────────────────────────────────────────────────────────────────────────────────────────────────────────────────────────────────────────────────╢
║myhttpstream.http-v1 │ deploying │ 1 ║
╟┈┈┈┈┈┈┈┈┈┈┈┈┈┈┈┈┈┈┈┈┈┈┼┈┈┈┈┈┈┈┈┈┈┈┼┈┈┈┈┈┈┈┈┈┈┈┈┈┈┈┈┈┈┈┈┈┈┈┈┈┈┈┈┈┈┈┈┈┈┈┈┈┈┈┈┈┈┈┈┈┈┈┈┈┈┈┈┈┈┈┈┈┈┈┈┈┈┈┈┈┈┈┈┈┈┈┈┈┈┈┈┈┈┈┈┈┈┈┈┈┈┈┈┈┈┈┈┈┈┈┈┈┈┈┈┈┈┈┈┈┈┈┈┈┈┈┈┈┈┈┈┈┈┈┈┈┈┈┈┈┈┈┈┈┈┈┈┈┈┈┈┈┈┈┈┈┈┈┈┈┈┈┈┈┈┈┈┈┈┈┈┈┈┈┈┈┈┈┈┈╢
║ │ │ guid = 52143 ║
║ │ │ pid = 34401 ║
║ │ │ port = 52143 ║
║myhttpstream.http-v1-0│ deploying │ stderr = /var/folders/js/7b_pn0t575l790x7j61slyxc0000gn/T/spring-cloud-deployer-6467595568759190742/myhttpstream-1542803866800/myhttpstream.http-v1/stderr_0.log║
║ │ │ stdout = /var/folders/js/7b_pn0t575l790x7j61slyxc0000gn/T/spring-cloud-deployer-6467595568759190742/myhttpstream-1542803866800/myhttpstream.http-v1/stdout_0.log║
║ │ │ url = https://192.168.0.102:52143 ║
║ │ │working.dir = /var/folders/js/7b_pn0t575l790x7j61slyxc0000gn/T/spring-cloud-deployer-6467595568759190742/myhttpstream-1542803866800/myhttpstream.http-v1 ║
╚══════════════════════╧═══════════╧═════════════════════════════════════════════════════════════════════════════════════════════════════════════════════════════════════════════════════════════════════╝
```
You should see that the corresponding `http` source has a `url` property that contains the host and port information on which it is listening. You are now ready to post to that url, as shown in the following example:
```
dataflow:> http post --target http://localhost:1234 --data "hello"
dataflow:> http post --target http://localhost:1234 --data "goodbye"
```
The stream then funnels the data from the `http` source to the output log implemented by the `log` sink, yielding output similar to the following:
```
2016-06-01 09:50:22.121 INFO 79654 --- [ kafka-binder-] log.sink : hello
2016-06-01 09:50:26.810 INFO 79654 --- [ kafka-binder-] log.sink : goodbye
```
We could also change the sink implementation. You could pipe the output to a file (`file`), to hadoop (`hdfs`), or to any of the other sink applications that are available. You can also define your own applications.
# Stream Developer Guide
See the [Stream Developer Guides](https://dataflow.spring.io/docs/stream-developer-guides/) on the microsite for more about how to create, test, and run Spring Cloud Stream applications on your local machine.
# Stream Monitoring
See the [Stream Monitoring Guide](https://dataflow.spring.io/docs/feature-guides/streams/monitoring/) on the microsite for more about how to monitor the applications that were deployed as part of a Stream.
# Tasks
This section goes into more detail about how you can orchestrate [Spring Cloud Task](https://cloud.spring.io/spring-cloud-task/) applications on Spring Cloud Data Flow.
If you are just starting out with Spring Cloud Data Flow, you should probably read the Getting Started guide for “[Local](#getting-started-local)” , “[Cloud Foundry](#getting-started-cloudfoundry)”, or “[Kubernetes](#getting-started-kubernetes)” before diving into this section.
## 25. Introduction
A task application is short-lived, meaning that it stops running on purpose and can be run on demand or scheduled for later.
One use case might be to scrape a web page and write to the database.
The [Spring Cloud Task](https://cloud.spring.io/spring-cloud-task/) framework is based on Spring Boot and adds the ability for Boot applications to record the lifecycle events of a short-lived application, such as when it starts, when it ends, and the exit status.
The [`TaskExecution`](https://docs.spring.io/spring-cloud-task/docs/2.0.0.RELEASE/reference/htmlsingle/#features-task-execution-details) documentation shows which information is stored in the database.
The entry point for code execution in a Spring Cloud Task application is most often an implementation of Boot’s `CommandLineRunner` interface, as shown in this [example](https://docs.spring.io/spring-cloud-task/docs/2.0.0.RELEASE/reference/htmlsingle/#getting-started-writing-the-code).
The Spring Batch project is probably what comes to mind for Spring developers writing short-lived applications.
Spring Batch provides a much richer set of functionality than Spring Cloud Task and is recommended when processing large volumes of data.
One use case might be to read many CSV files, transform each row of data, and write each transformed row to a database.
Spring Batch provides its own database schema with a much more rich [set of information](https://docs.spring.io/spring-batch/4.1.x/reference/html/schema-appendix.html#metaDataSchema) about the execution of a Spring Batch job.
Spring Cloud Task is integrated with Spring Batch so that, if a Spring Cloud Task application defines a Spring Batch `Job`, a link between the Spring Cloud Task and Spring Cloud Batch execution tables is created.
When running Data Flow on your local machine, Tasks are launched in a separate JVM.
When running on Cloud Foundry, tasks are launched by using [Cloud Foundry’s Task](https://docs.cloudfoundry.org/devguide/using-tasks.html) functionality. When running on Kubernetes, tasks are launched by using either a `Pod` or a `Job` resource.
## 26. The Lifecycle of a Task
Before you dive deeper into the details of creating Tasks, you should understand the typical lifecycle for tasks in the context of Spring Cloud Data Flow:
1. [Creating a Task Application](#spring-cloud-dataflow-create-task-apps)
2. [Registering a Task Application](#spring-cloud-dataflow-register-task-apps)
3. [Creating a Task Definition](#spring-cloud-dataflow-create-task-definition)
4. [Launching a Task](#spring-cloud-dataflow-task-launch)
5. [Reviewing Task Executions](#spring-cloud-dataflow-task-review-executions)
6. [Destroying a Task Definition](#spring-cloud-dataflow-task-definition-destroying)
7. [Continuous Deployment](#spring-cloud-dataflow-task-cd)
### 26.1. Creating a Task Application
While Spring Cloud Task does provide a number of out-of-the-box applications (at [spring-cloud-task-app-starters](https://github.com/spring-cloud-task-app-starters)), most task applications require custom development.
To create a custom task application:
1. Use the [Spring Initializer](https://start.spring.io) to create a new project, making sure to select the following starters:
1. `Cloud Task`: This dependency is the `spring-cloud-starter-task`.
2. `JDBC`: This dependency is the `spring-jdbc` starter.
3. Select your database dependency: Enter the database dependency that Data Flow is currently using. For example: `H2`.
2. Within your new project, create a new class to serve as your main class, as follows:
```
@EnableTask
@SpringBootApplication
public class MyTask {
public static void main(String[] args) {
SpringApplication.run(MyTask.class, args);
}
}
```
3. With this class, you need one or more `CommandLineRunner` or `ApplicationRunner` implementations within your application. You can either implement your own or use the ones provided by Spring Boot (there is one for running batch jobs, for example).
4. Packaging your application with Spring Boot into an über jar is done through the standard [Spring Boot conventions](https://docs.spring.io/spring-boot/docs/2.1.1.RELEASE/reference/html/getting-started-first-application.html#getting-started-first-application-executable-jar).
The packaged application can be registered and deployed as noted below.
#### 26.1.1. Task Database Configuration
| |When launching a task application, be sure that the database driver that is being used by Spring Cloud Data Flow is also a dependency on the task application.
For example, if your Spring Cloud Data Flow is set to use Postgresql, be sure that the task application also has Postgresql as a dependency.|
|---|---------------------------------------------------------------------------------------------------------------------------------------------------------------------------------------------------------------------------------------------------------------------------------------------------------------|
| |When you run tasks externally (that is, from the command line) and you want Spring Cloud Data Flow to show the TaskExecutions in its UI, be sure that common datasource settings are shared among them both.
By default, Spring Cloud Task uses a local H2 instance, and the execution is recorded to the database used by Spring Cloud Data Flow.|
|---|------------------------------------------------------------------------------------------------------------------------------------------------------------------------------------------------------------------------------------------------------------------------------------------------------------------------------------------------------|
### 26.2. Registering a Task Application
You can register a Task application with the App Registry by using the Spring Cloud Data Flow Shell `app register` command.
You must provide a unique name and a URI that can be resolved to the application artifact. For the type, specify `task`.
The following listing shows three examples:
```
dataflow:>app register --name task1 --type task --uri maven://com.example:mytask:1.0.2
dataflow:>app register --name task2 --type task --uri file:///Users/example/mytask-1.0.2.jar
dataflow:>app register --name task3 --type task --uri https://example.com/mytask-1.0.2.jar
```
When providing a URI with the `maven` scheme, the format should conform to the following:
```
maven://:[:[:]]:
```
If you would like to register multiple applications at one time, you can store them in a properties file where the keys are formatted as `.` and the values are the URIs.
For example, the following listing would be a valid properties file:
```
task.cat=file:///tmp/cat-1.2.1.BUILD-SNAPSHOT.jar
task.hat=file:///tmp/hat-1.2.1.BUILD-SNAPSHOT.jar
```
Then you can use the `app import` command and provide the location of the properties file by using the `--uri` option, as follows:
```
app import --uri file:///tmp/task-apps.properties
```
For example, if you would like to register all the task applications that ship with Data Flow in a single operation, you can do so with the following command:
```
dataflow:>app import --uri https://dataflow.spring.io/task-maven-latest
```
You can also pass the `--local` option (which is `TRUE` by default) to indicate whether the properties file location should be resolved within the shell process itself.
If the location should be resolved from the Data Flow Server process, specify `--local false`.
When using either `app register` or `app import`, if a task application is already registered with
the provided name and version, it is not overridden by default. If you would like to override the
pre-existing task application with a different `uri` or `uri-metadata` location, include the `--force` option.
| |In some cases, the resource is resolved on the server side.
In other cases, the URI is passed to a runtime container instance, where it is resolved.
Consult the specific documentation of each Data Flow Server for more detail.|
|---|-----------------------------------------------------------------------------------------------------------------------------------------------------------------------------------------------------------------------------------------|
### 26.3. Creating a Task Definition
You can create a task definition from a task application by providing a definition name as well as
properties that apply to the task execution. You can create a task definition through
the RESTful API or the shell. To create a task definition by using the shell, use the`task create` command to create the task definition, as shown in the following example:
```
dataflow:>task create mytask --definition "timestamp --format=\"yyyy\""
Created new task 'mytask'
```
You can obtain a listing of the current task definitions through the RESTful API or the shell.
To get the task definition list by using the shell, use the `task list` command.
#### 26.3.1. Maximum Task Definition Name Length
The maximum character length of a task definition name is dependent on the platform.
| |Consult the platform documents for specifics on resource naming.
The Local platform stores the task definition name in a database column with a maximum size of 255.|
|---|------------------------------------------------------------------------------------------------------------------------------------------------------------------------|
|Kubernetes Bare Pods|Kubernetes Jobs|Cloud Foundry|Local|
|--------------------|---------------|-------------|-----|
| 63 | 52 | 63 | 255 |
#### 26.3.2. Automating the Creation of Task Definitions
As of version 2.3.0, you can configure the Data Flow server to automatically create task definitions by setting `spring.cloud.dataflow.task.autocreate-task-definitions` to `true`.
This is not the default behavior but is provided as a convenience.
When this property is enabled, a task launch request can specify the registered task application name as the task name.
If the task application is registered, the server creates a basic task definition that specifies only the application name, as required. This eliminates a manual step similar to:
```
dataflow:>task create mytask --definition "mytask"
```
You can still specify command-line arguments and deployment properties for each task launch request.
### 26.4. Launching a Task
An ad hoc task can be launched through the RESTful API or the shell.
To launch an ad hoc task through the shell, use the `task launch` command, as shown in the following example:
```
dataflow:>task launch mytask
Launched task 'mytask'
```
When a task is launched, you can set any properties that need to be passed as command-line arguments to the task application when you launch the task, as follows:
```
dataflow:>task launch mytask --arguments "--server.port=8080 --custom=value"
```
| |The arguments need to be passed as space-delimited values.|
|---|----------------------------------------------------------|
You can pass in additional properties meant for a `TaskLauncher` itself by using the `--properties` option.
The format of this option is a comma-separated string of properties prefixed with `app..`.
Properties are passed to `TaskLauncher` as application properties.
It is up to an implementation to choose how those are passed into an actual task application.
If the property is prefixed with `deployer` instead of `app`, it is passed to `TaskLauncher` as a deployment property, and its meaning may be `TaskLauncher` implementation specific.
```
dataflow:>task launch mytask --properties "deployer.timestamp.custom1=value1,app.timestamp.custom2=value2"
```
#### 26.4.1. Application properties
Each application takes properties to customize its behavior. For example, the `timestamp` task `format` setting establishes an output format that is different from the default value.
```
dataflow:> task create --definition "timestamp --format=\"yyyy\"" --name printTimeStamp
```
This `timestamp` property is actually the same as the `timestamp.format` property specified by the timestamp application.
Data Flow adds the ability to use the shorthand form `format` instead of `timestamp.format`.
You can also specify the longhand version as well, as shown in the following example:
```
dataflow:> task create --definition "timestamp --timestamp.format=\"yyyy\"" --name printTimeStamp
```
This shorthand behavior is discussed more in the section on [Stream Application Properties](#spring-cloud-dataflow-application-properties).
If you have [registered application property metadata](https://dataflow.spring.io/docs/applications/application-metadata/#using-application-metadata), you can use tab completion in the shell after typing `--` to get a list of candidate property names.
The shell provides tab completion for application properties. The `app info --name --type ` shell command provides additional documentation for all the supported properties. The supported task `` is `task`.
| |When restarting Spring Batch Jobs on Kubernetes, you must use the entry point of `shell` or `boot`.|
|---|---------------------------------------------------------------------------------------------------|
##### Application Properties With Sensitive Information on Kubernetes
When launching task applications where some of the properties may contain sensitive information, use the `shell` or `boot` as the `entryPointStyle`. This is because the `exec` (default) converts all properties to command-line arguments and, as a result, may not be secure in some environments.
#### 26.4.2. Common application properties
In addition to configuration through DSL, Spring Cloud Data Flow provides a mechanism for setting properties that are common to all the task applications that are launched by it.
You can do so by adding properties prefixed with `spring.cloud.dataflow.applicationProperties.task` when starting the server.
The server then passes all the properties, without the prefix, to the instances it launches.
For example, you can configure all the launched applications to use the `prop1` and `prop2` properties by launching the Data Flow server with the following options:
```
--spring.cloud.dataflow.applicationProperties.task.prop1=value1
--spring.cloud.dataflow.applicationProperties.task.prop2=value2
```
This causes the `prop1=value1` and `prop2=value2` properties to be passed to all the launched applications.
| |Properties configured by using this mechanism have lower precedence than task deployment properties.
They are overridden if a property with the same key is specified at task launch time (for example, `app.trigger.prop2`overrides the common property).|
|---|--------------------------------------------------------------------------------------------------------------------------------------------------------------------------------------------------------------------------------------------------------------|
### 26.5. Limit the number concurrent task launches
Spring Cloud Data Flow lets a user limit the maximum number of concurrently running tasks for each configured platform to prevent the saturation of IaaS or hardware resources.
By default, the limit is set to `20` for all supported platforms. If the number of concurrently running tasks on a platform instance is greater than or equal to the limit, the next task launch request fails, and an error message is returned through the RESTful API, the Shell, or the UI.
You can configure this limit for a platform instance by setting the corresponding deployer property, `spring.cloud.dataflow.task.platform..accounts[].maximumConcurrentTasks`, where `` is the name of a configured platform account (`default` if no accounts are explicitly configured).
The `` refers to one of the currently supported deployers: `local` or `kubernetes`. For `cloudfoundry`, the property is `spring.cloud.dataflow.task.platform..accounts[].deployment.maximumConcurrentTasks`. (The difference is that `deployment` has been added to the path).
The `TaskLauncher` implementation for each supported platform determines the number of currently running tasks by querying the underlying platform’s runtime state, if possible. The method for identifying a `task` varies by platform.
For example, launching a task on the local host uses the `LocalTaskLauncher`. `LocalTaskLauncher` runs a process for each launch request and keeps track of these processes in memory. In this case, we do not query the underlying OS, as it is impractical to identify tasks this way.
For Cloud Foundry, tasks are a core concept supported by its deployment model. The state of all tasks ) is available directly through the API.
This means that every running task container in the account’s organization and space is included in the running execution count, whether or not it was launched by using Spring Cloud Data Flow or by invoking the `CloudFoundryTaskLauncher` directly.
For Kubernetes, launching a task through the `KubernetesTaskLauncher`, if successful, results in a running pod, which we expect to eventually complete or fail.
In this environment, there is generally no easy way to identify pods that correspond to a task.
For this reason, we count only pods that were launched by the `KubernetesTaskLauncher`.
Since the task launcher provides `task-name` label in the pod’s metadata, we filter all running pods by the presence of this label.
### 26.6. Reviewing Task Executions
Once the task is launched, the state of the task is stored in a relational database. The state
includes:
* Task Name
* Start Time
* End Time
* Exit Code
* Exit Message
* Last Updated Time
* Parameters
You can check the status of your task executions through the RESTful API or the shell.
To display the latest task executions through the shell, use the `task execution list` command.
To get a list of task executions for just one task definition, add `--name` and
the task definition name — for example, `task execution list --name foo`. To retrieve full
details for a task execution, use the `task execution status` command with the ID of the task execution,
for example `task execution status --id 549`.
### 26.7. Destroying a Task Definition
Destroying a task definition removes the definition from the definition repository.
This can be done through the RESTful API or the shell.
To destroy a task through the shell, use the `task destroy` command, as shown in the following example:
```
dataflow:>task destroy mytask
Destroyed task 'mytask'
```
The `task destroy` command also has an option to `cleanup` the task executions of the task being destroyed, as shown in the following example:
```
dataflow:>task destroy mytask --cleanup
Destroyed task 'mytask'
```
By default, the `cleanup` option is set to `false` (that is, by default, the task executions are not cleaned up when the task is destroyed).
To destroy all tasks through the shell, use the `task all destroy` command as shown in the following example:
```
dataflow:>task all destroy
Really destroy all tasks? [y, n]: y
All tasks destroyed
```
If need be, you can use the force switch:
```
dataflow:>task all destroy --force
All tasks destroyed
```
The task execution information for previously launched tasks for the definition remains in the task repository.
| |This does not stop any currently running tasks for this definition. Instead, it removes the task definition from the database.|
|---|------------------------------------------------------------------------------------------------------------------------------|
| |`task destroy ` deletes only the definition and not the task deployed on Cloud Foundry.
The only way to do delete the task is through the CLI in two steps:
\+
. Obtain a list of the apps by using the `cf apps` command.
. Identify the task application to be deleted and run the `cf delete ` command.|
|---|-----------------------------------------------------------------------------------------------------------------------------------------------------------------------------------------------------------------------------------------------------------------------------------------------------------------------------------------------------|
### 26.8. Validating a Task
Sometimes, an application contained within a task definition has an invalid URI in its registration.
This can be caused by an invalid URI being entered at application-registration time or the by the application being removed from the repository from which it was to be drawn.
To verify that all the applications contained in a task are resolve-able, use the `validate` command, as follows:
```
dataflow:>task validate time-stamp
╔══════════╤═══════════════╗
║Task Name │Task Definition║
╠══════════╪═══════════════╣
║time-stamp│timestamp ║
╚══════════╧═══════════════╝
time-stamp is a valid task.
╔═══════════════╤═════════════════╗
║ App Name │Validation Status║
╠═══════════════╪═════════════════╣
║task:timestamp │valid ║
╚═══════════════╧═════════════════╝
```
In the preceding example, the user validated their time-stamp task. The `task:timestamp` application is valid.
Now we can see what happens if we have a stream definition with a registered application that has an invalid URI:
```
dataflow:>task validate bad-timestamp
╔═════════════╤═══════════════╗
║ Task Name │Task Definition║
╠═════════════╪═══════════════╣
║bad-timestamp│badtimestamp ║
╚═════════════╧═══════════════╝
bad-timestamp is an invalid task.
╔══════════════════╤═════════════════╗
║ App Name │Validation Status║
╠══════════════════╪═════════════════╣
║task:badtimestamp │invalid ║
╚══════════════════╧═════════════════╝
```
In this case, Spring Cloud Data Flow states that the task is invalid because `task:badtimestamp` has an invalid URI.
### 26.9. Stopping a Task Execution
In some cases, a task that is running on a platform may not stop because of a problem on the platform or the application business logic itself.
For such cases, Spring Cloud Data Flow offers the ability to send a request to the platform to end the task.
To do this, submit a `task execution stop` for a given set of task executions, as follows:
```
task execution stop --ids 5
Request to stop the task execution with id(s): 5 has been submitted
```
With the preceding command, the trigger to stop the execution of `id=5` is submitted to the underlying deployer implementation. As a result, the operation stops that task. When we view the result for the task execution, we see that the task execution completed with a 0 exit code:
```
dataflow:>task execution list
╔══════════╤══╤════════════════════════════╤════════════════════════════╤═════════╗
║Task Name │ID│ Start Time │ End Time │Exit Code║
╠══════════╪══╪════════════════════════════╪════════════════════════════╪═════════╣
║batch-demo│5 │Mon Jul 15 13:58:41 EDT 2019│Mon Jul 15 13:58:55 EDT 2019│0 ║
║timestamp │1 │Mon Jul 15 09:26:41 EDT 2019│Mon Jul 15 09:26:41 EDT 2019│0 ║
╚══════════╧══╧════════════════════════════╧════════════════════════════╧═════════╝
```
If you submit a stop for a task execution that has child task executions associated with it, such as a composed task, a stop request is sent for each of the child task executions.
| |When stopping a task execution that has a running Spring Batch job, the job is left with a batch status of `STARTED`.
Each of the supported platforms sends a SIG-INT to the task application when a stop is requested. That allows Spring Cloud Task to capture the state of the app. However, Spring Batch does not handle a SIG-INT and, as a result, the job stops but remains in the STARTED status.|
|---|-------------------------------------------------------------------------------------------------------------------------------------------------------------------------------------------------------------------------------------------------------------------------------------------------------------------------------------------------------------------------------------------------------------|
| |When launching Remote Partitioned Spring Batch Task applications, Spring Cloud Data Flow supports stopping a worker partition task directly for both Cloud Foundry and Kubernetes platforms. Stopping worker partition task is not supported for the local platform.|
|---|--------------------------------------------------------------------------------------------------------------------------------------------------------------------------------------------------------------------------------------------------------------------|
#### 26.9.1. Stopping a Task Execution that was Started Outside of Spring Cloud Data Flow
You may wish to stop a task that has been launched outside of Spring Cloud Data Flow. An example of this is the worker applications launched by a remote batch partitioned application.
In such cases, the remote batch partitioned application stores the `external-execution-id` for each of the worker applications. However, no platform information is stored.
So when Spring Cloud Data Flow has to stop a remote batch partitioned application and its worker applications, you need to specify the platform name, as follows:
```
dataflow:>task execution stop --ids 1 --platform myplatform
Request to stop the task execution with id(s): 1 for platform myplatform has been submitted
```
## 27. Subscribing to Task and Batch Events
You can also tap into various task and batch events when the task is launched.
If the task is enabled to generate task or batch events (with the additional dependencies of `spring-cloud-task-stream` and, in the case of Kafka as the binder, `spring-cloud-stream-binder-kafka`), those events are published during the task lifecycle.
By default, the destination names for those published events on the broker (Rabbit, Kafka, and others) are the event names themselves (for instance: `task-events`, `job-execution-events`, and so on).
```
dataflow:>task create myTask --definition "myBatchJob"
dataflow:>stream create task-event-subscriber1 --definition ":task-events > log" --deploy
dataflow:>task launch myTask
```
You can control the destination name for those events by specifying explicit names when launching the task, as follows:
```
dataflow:>stream create task-event-subscriber2 --definition ":myTaskEvents > log" --deploy
dataflow:>task launch myTask --properties "app.myBatchJob.spring.cloud.stream.bindings.task-events.destination=myTaskEvents"
```
The following table lists the default task and batch event and destination names on the broker:
| **Event** | **Destination** |
|---------------------|-----------------------|
| Task events | `task-events` |
|Job Execution events |`job-execution-events` |
|Step Execution events|`step-execution-events`|
| Item Read events | `item-read-events` |
| Item Process events | `item-process-events` |
| Item Write events | `item-write-events` |
| Skip events | `skip-events` |
## 28. Composed Tasks
Spring Cloud Data Flow lets you create a directed graph, where each node of the graph is a task application.
This is done by using the DSL for composed tasks.
You can create a composed task through the RESTful API, the Spring Cloud Data Flow Shell, or the Spring Cloud Data Flow UI.
### 28.1. The Composed Task Runner
Composed tasks are run through a task application called the Composed Task Runner. The Spring Cloud Data Flow server automatically deploys the Composed Task Runner when launching a composed task.
#### 28.1.1. Configuring the Composed Task Runner
The composed task runner application has a `dataflow-server-uri` property that is used for validation and for launching child tasks.
This defaults to `[localhost:9393](http://localhost:9393)`. If you run a distributed Spring Cloud Data Flow server, as you would if you deploy the server on Cloud Foundry or Kubernetes, you need to provide the URI that can be used to access the server.
You can either provide this by setting the `dataflow-server-uri` property for the composed task runner application when launching a composed task or by setting the `spring.cloud.dataflow.server.uri` property for the Spring Cloud Data Flow server when it is started.
For the latter case, the `dataflow-server-uri` composed task runner application property is automatically set when a composed task is launched.
##### Configuration Options
The `ComposedTaskRunner` task has the following options:
* `composed-task-arguments`The command line arguments to be used for each of the tasks. (String, default: \).
* `increment-instance-enabled`Allows a single `ComposedTaskRunner` instance to be run again without changing the parameters by adding a incremented number job parameter based on `run.id` from the previous execution. (Boolean, default: `true`).
ComposedTaskRunner is built by using [Spring Batch](https://github.com/spring-projects/spring-batch). As a result, upon a successful execution, the batch job is considered to be complete.
To launch the same `ComposedTaskRunner` definition multiple times, you must set either `increment-instance-enabled` or `uuid-instance-enabled` property to `true` or change the parameters for the definition for each launch.
When using this option, it must be applied for all task launches for the desired application, including the first launch.
* `uuid-instance-enabled`Allows a single `ComposedTaskRunner` instance to be run again without changing the parameters by adding a UUID to the `ctr.id` job parameter. (Boolean, default: `false`).
ComposedTaskRunner is built by using [Spring Batch](https://github.com/spring-projects/spring-batch). As a result, upon a successful execution, the batch job is considered to be complete.
To launch the same `ComposedTaskRunner` definition multiple times, you must set either `increment-instance-enabled` or `uuid-instance-enabled` property to `true` or change the parameters for the definition for each launch.
When using this option, it must be applied for all task launches for the desired application, including the first launch. This option when set to true will override the value of `increment-instance-id`.
Set this option to `true` when running multiple instances of the same composed task definition at the same time.
* `interval-time-between-checks`The amount of time, in milliseconds, that the `ComposedTaskRunner` waits between checks of the database to see if a task has completed. (Integer, default: `10000`).`ComposedTaskRunner` uses the datastore to determine the status of each child tasks. This interval indicates to `ComposedTaskRunner` how often it should check the status its child tasks.
* `transaction-isolation-level`Establish the transaction isolation level for the Composed Task Runner.
A list of available transaction isolation levels can be found [here](https://docs.spring.io/spring-framework/docs/current/javadoc-api/org/springframework/transaction/TransactionDefinition.html).
Default is `ISOLATION_REPEATABLE_READ`.
* `max-wait-time`The maximum amount of time, in milliseconds, that an individual step can run before the execution of the Composed task is failed (Integer, default: 0).
Determines the maximum time each child task is allowed to run before the CTR ends with a failure. The default of `0` indicates no timeout.
* `split-thread-allow-core-thread-timeout`Specifies whether to allow split core threads to timeout. (Boolean, default: `false`)
Sets the policy governing whether core threads may timeout and terminate if no tasks arrive within the keep-alive time, being replaced if needed when new tasks arrive.
* `split-thread-core-pool-size`Split’s core pool size. (Integer, default: `1`)
Each child task contained in a split requires a thread in order to execute. So, for example, a definition such as ` && ` would require a `split-thread-core-pool-size` of `3`.
This is because the largest split contains three child tasks. A count of `2` would mean that `AAA` and `BBB` would run in parallel, but CCC would wait until either `AAA` or `BBB` finish in order to run.
Then `DDD` and `EEE` would run in parallel.
* `split-thread-keep-alive-seconds`Split’s thread keep alive seconds. (Integer, default: `60`)
If the pool currently has more than `corePoolSize` threads, excess threads are stopped if they have been idle for more than the `keepAliveTime`.
* `split-thread-max-pool-size`Split’s maximum pool size. (Integer, default: `Integer.MAX_VALUE`).
Establish the maximum number of threads allowed for the thread pool.
* **split-thread-queue-capacity**Capacity for Split’s `BlockingQueue`. (Integer, default: `Integer.MAX_VALUE`)
* If fewer than `corePoolSize` threads are running, the `Executor` always prefers adding a new thread rather than queuing.
* If `corePoolSize` or more threads are running, the `Executor` always prefers queuing a request rather than adding a new thread.
* If a request cannot be queued, a new thread is created unless this would exceed `maximumPoolSize`. In that case, the task is rejected.
* `split-thread-wait-for-tasks-to-complete-on-shutdown`Whether to wait for scheduled tasks to complete on shutdown, not interrupting running tasks and running all tasks in the queue. (Boolean, default: `false`)
* `dataflow-server-uri`The URI for the Data Flow server that receives task launch requests. (String, default: `[localhost:9393](http://localhost:9393)`)
* `dataflow-server-username`The optional username for the Data Flow server that receives task launch requests.
Used to access the the Data Flow server by using Basic Authentication. Not used if `dataflow-server-access-token` is set.
* `dataflow-server-password`The optional password for the Data Flow server that receives task launch requests.
Used to access the the Data Flow server by using Basic Authentication. Not used if `dataflow-server-access-token` is set.
* `dataflow-server-access-token`This property sets an optional OAuth2 Access Token.
Typically, the value is automatically set by using the token from the currently logged-in user, if available.
However, for special use-cases, this value can also be set explicitly.
A special boolean property, `dataflow-server-use-user-access-token`, exists for when you want to use the access token of the currently logged-in user and propagate it to the Composed Task Runner. This property is used
by Spring Cloud Data Flow and, if set to `true`, auto-populates the `dataflow-server-access-token` property. When using `dataflow-server-use-user-access-token`, it must be passed for each task execution.
In some cases, it may be preferred that the user’s `dataflow-server-access-token` must be passed for each composed task launch by default.
In this case, set the Spring Cloud Data Flow `spring.cloud.dataflow.task.useUserAccessToken` property to `true`.
To set a property for Composed Task Runner you will need to prefix the property with `app.composed-task-runner.`.
For example to set the `dataflow-server-uri` property the property will look like `app.composed-task-runner.dataflow-server-uri`.
### 28.2. The Lifecycle of a Composed Task
The lifecycle of a composed task has three parts:
* [Creating a Composed Task](#spring-cloud-data-flow-composed-task-creating)
* [Stopping a Composed Task](#spring-cloud-data-flow-composed-task-stopping)
* [Restarting a Composed Task](#spring-cloud-data-flow-composed-task-restarting)
#### 28.2.1. Creating a Composed Task
The DSL for the composed tasks is used when creating a task definition through the task create command, as shown in the following example:
```
dataflow:> app register --name timestamp --type task --uri maven://org.springframework.cloud.task.app:timestamp-task:
dataflow:> app register --name mytaskapp --type task --uri file:///home/tasks/mytask.jar
dataflow:> task create my-composed-task --definition "mytaskapp && timestamp"
dataflow:> task launch my-composed-task
```
In the preceding example, we assume that the applications to be used by our composed task have not yet been registered.
Consequently, in the first two steps, we register two task applications.
We then create our composed task definition by using the `task create` command.
The composed task DSL in the preceding example, when launched, runs `mytaskapp` and then runs the timestamp application.
But before we launch the `my-composed-task` definition, we can view what Spring Cloud Data Flow generated for us.
This can be done by using the task list command, as shown (including its output) in the following example:
```
dataflow:>task list
╔══════════════════════════╤══════════════════════╤═══════════╗
║ Task Name │ Task Definition │Task Status║
╠══════════════════════════╪══════════════════════╪═══════════╣
║my-composed-task │mytaskapp && timestamp│unknown ║
║my-composed-task-mytaskapp│mytaskapp │unknown ║
║my-composed-task-timestamp│timestamp │unknown ║
╚══════════════════════════╧══════════════════════╧═══════════╝
```
In the example, Spring Cloud Data Flow created three task definitions, one for each of the applications that makes up our composed task (`my-composed-task-mytaskapp` and `my-composed-task-timestamp`) as well as the composed task (`my-composed-task`) definition.
We also see that each of the generated names for the child tasks is made up of the name of the composed task and the name of the application, separated by a hyphen `-` (as in *my-composed-task* `-` *mytaskapp*).
##### Task Application Parameters
The task applications that make up the composed task definition can also contain parameters, as shown in the following example:
```
dataflow:> task create my-composed-task --definition "mytaskapp --displayMessage=hello && timestamp --format=YYYY"
```
#### 28.2.2. Launching a Composed Task
Launching a composed task is done in the same way as launching a stand-alone task, as follows:
```
task launch my-composed-task
```
Once the task is launched, and assuming all the tasks complete successfully, you can see three task executions when you run a `task execution list`, as shown in the following example:
```
dataflow:>task execution list
╔══════════════════════════╤═══╤════════════════════════════╤════════════════════════════╤═════════╗
║ Task Name │ID │ Start Time │ End Time │Exit Code║
╠══════════════════════════╪═══╪════════════════════════════╪════════════════════════════╪═════════╣
║my-composed-task-timestamp│713│Wed Apr 12 16:43:07 EDT 2017│Wed Apr 12 16:43:07 EDT 2017│0 ║
║my-composed-task-mytaskapp│712│Wed Apr 12 16:42:57 EDT 2017│Wed Apr 12 16:42:57 EDT 2017│0 ║
║my-composed-task │711│Wed Apr 12 16:42:55 EDT 2017│Wed Apr 12 16:43:15 EDT 2017│0 ║
╚══════════════════════════╧═══╧════════════════════════════╧════════════════════════════╧═════════╝
```
In the preceding example, we see that `my-compose-task` launched and that the other tasks were also launched in sequential order.
Each of them ran successfully with an `Exit Code` as `0`.
##### Passing Properties to the Child Tasks
To set the properties for child tasks in a composed task graph at task launch time,
use the following format: `app...`.
The following listing shows a composed task definition as an example:
```
dataflow:> task create my-composed-task --definition "mytaskapp && mytimestamp"
```
To have `mytaskapp` display 'HELLO' and set the `mytimestamp` timestamp format to `YYYY` for the composed task definition, use the following task launch format:
```
task launch my-composed-task --properties "app.my-composed-task.mytaskapp.displayMessage=HELLO,app.my-composed-task.mytimestamp.timestamp.format=YYYY"
```
Similar to application properties, you can also set the `deployer` properties for child tasks by using the following format: `deployer...`:
```
task launch my-composed-task --properties "deployer.my-composed-task.mytaskapp.memory=2048m,app.my-composed-task.mytimestamp.timestamp.format=HH:mm:ss"
Launched task 'a1'
```
##### Passing Arguments to the Composed Task Runner
You can pass command-line arguments for the composed task runner by using the `--arguments` option:
```
dataflow:>task create my-composed-task --definition ""
Created new task 'my-composed-task'
dataflow:>task launch my-composed-task --arguments "--increment-instance-enabled=true --max-wait-time=50000 --split-thread-core-pool-size=4" --properties "app.my-composed-task.bbb.timestamp.format=dd/MM/yyyy HH:mm:ss"
Launched task 'my-composed-task'
```
##### Exit Statuses
The following list shows how the exit status is set for each step (task) contained in the composed task following each step execution:
* If the `TaskExecution` has an `ExitMessage`, that is used as the `ExitStatus`.
* If no `ExitMessage` is present and the `ExitCode` is set to zero, the `ExitStatus` for the step is `COMPLETED`.
* If no `ExitMessage` is present and the `ExitCode` is set to any non-zero number, the `ExitStatus` for the step is `FAILED`.
#### 28.2.3. Destroying a Composed Task
The command used to destroy a stand-alone task is the same as the command used to destroy a composed task.
The only difference is that destroying a composed task also destroys the child tasks associated with it.
The following example shows the task list before and after using the `destroy` command:
```
dataflow:>task list
╔══════════════════════════╤══════════════════════╤═══════════╗
║ Task Name │ Task Definition │Task Status║
╠══════════════════════════╪══════════════════════╪═══════════╣
║my-composed-task │mytaskapp && timestamp│COMPLETED ║
║my-composed-task-mytaskapp│mytaskapp │COMPLETED ║
║my-composed-task-timestamp│timestamp │COMPLETED ║
╚══════════════════════════╧══════════════════════╧═══════════╝
...
dataflow:>task destroy my-composed-task
dataflow:>task list
╔═════════╤═══════════════╤═══════════╗
║Task Name│Task Definition│Task Status║
╚═════════╧═══════════════╧═══════════╝
```
#### 28.2.4. Stopping a Composed Task
In cases where a composed task execution needs to be stopped, you can do so through the:
* RESTful API
* Spring Cloud Data Flow Dashboard
To stop a composed task through the dashboard, select the **Jobs** tab and click the \*Stop() button next to the job execution that you want to stop.
The composed task run is stopped when the currently running child task completes.
The step associated with the child task that was running at the time that the composed task was stopped is marked as `STOPPED` as well as the composed task job execution.
#### 28.2.5. Restarting a Composed Task
In cases where a composed task fails during execution and the status of the composed task is `FAILED`, the task can be restarted.
You can do so through the:
* RESTful API
* The shell
* Spring Cloud Data Flow Dashboard
To restart a composed task through the shell, launch the task with the same parameters.
To restart a composed task through the dashboard, select the **Jobs** tab and click the **Restart** button next to the job execution that you want to restart.
| |Restarting a composed task job that has been stopped (through the Spring Cloud Data Flow Dashboard or RESTful API) relaunches the `STOPPED` child task and then launches the remaining (unlaunched) child tasks in the specified order.|
|---|---------------------------------------------------------------------------------------------------------------------------------------------------------------------------------------------------------------------------------------|
## 29. Composed Tasks DSL
Composed tasks can be run in three ways:
* [Conditional Execution](#spring-cloud-data-flow-conditional-execution)
* [Transitional Execution](#spring-cloud-data-flow-transitional-execution)
* [Split Execution](#spring-cloud-data-flow-split-execution)
### 29.1. Conditional Execution
Conditional execution is expressed by using a double ampersand symbol (`&&`).
This lets each task in the sequence be launched only if the previous task
successfully completed, as shown in the following example:
```
task create my-composed-task --definition "task1 && task2"
```
When the composed task called `my-composed-task` is launched, it launches the task called `task1` and, if `task1` completes successfully, the task called `task2` is launched.
If `task1` fails, `task2` does not launch.
You can also use the Spring Cloud Data Flow Dashboard to create your conditional execution, by using the designer to drag and drop applications that are required and connecting them together to create your directed graph, as shown in the following image:
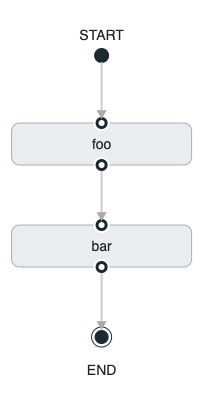
Figure 2. Conditional Execution
The preceding diagram is a screen capture of the directed graph as it being created by using the Spring Cloud Data Flow Dashboard.
You can see that four components in the diagram comprise a conditional execution:
* **Start** icon: All directed graphs start from this symbol. There is only one.
* **Task** icon: Represents each task in the directed graph.
* **End** icon: Represents the end of a directed graph.
* Solid line arrow: Represents the flow conditional execution flow between:
* Two applications.
* The start control node and an application.
* An application and the end control node.
* **End** icon: All directed graphs end at this symbol.
| |You can view a diagram of your directed graph by clicking the **Detail** button next to the composed task definition on the Definitions tab.|
|---|--------------------------------------------------------------------------------------------------------------------------------------------|
### 29.2. Transitional Execution
The DSL supports fine-grained control over the transitions taken during the execution of the directed graph.
Transitions are specified by providing a condition for equality that is based on the exit status of the previous task.
A task transition is represented by the following symbol `->`.
#### 29.2.1. Basic Transition
A basic transition would look like the following:
```
task create my-transition-composed-task --definition "foo 'FAILED' -> bar 'COMPLETED' -> baz"
```
In the preceding example, `foo` would launch, and, if it had an exit status of `FAILED`, the `bar` task would launch.
If the exit status of `foo` was `COMPLETED`, `baz` would launch.
All other statuses returned by `cat` have no effect, and the task would end normally.
Using the Spring Cloud Data Flow Dashboard to create the same “basic transition” would resemble the following image:
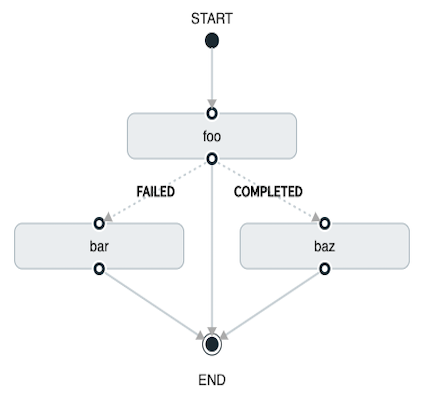
Figure 3. Basic Transition
The preceding diagram is a screen capture of the directed graph as it being created in the Spring Cloud Data Flow Dashboard.
Notice that there are two different types of connectors:
* Dashed line: Represents transitions from the application to one of the possible destination applications.
* Solid line: Connects applications in a conditional execution or a connection between the application and a control node (start or end).
To create a transitional connector:
1. When creating a transition, link the application to each possible destination by using the connector.
2. Once complete, go to each connection and select it by clicking it.
3. A bolt icon appears.
4. Click that icon.
5. Enter the exit status required for that connector.
6. The solid line for that connector turns to a dashed line.
#### 29.2.2. Transition With a Wildcard
Wildcards are supported for transitions by the DSL, as shown in the following example:
```
task create my-transition-composed-task --definition "foo 'FAILED' -> bar '*' -> baz"
```
In the preceding example, `foo` would launch, and, if it had an exit status of `FAILED`, `bar` task would launch.
For any exit status of `cat` other than `FAILED`, `baz` would launch.
Using the Spring Cloud Data Flow Dashboard to create the same “transition with wildcard” would resemble the following image:
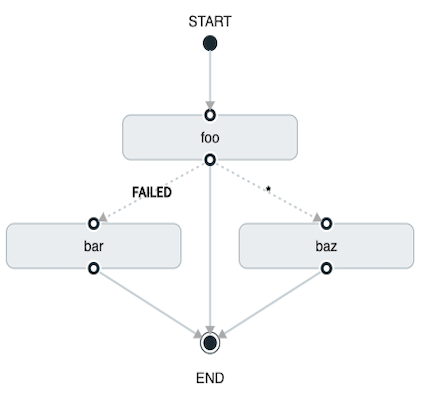
Figure 4. Basic Transition With Wildcard
#### 29.2.3. Transition With a Following Conditional Execution
A transition can be followed by a conditional execution, so long as the wildcard
is not used, as shown in the following example:
```
task create my-transition-conditional-execution-task --definition "foo 'FAILED' -> bar 'UNKNOWN' -> baz && qux && quux"
```
In the preceding example, `foo` would launch, and, if it had an exit status of `FAILED`, the `bar` task would launch.
If `foo` had an exit status of `UNKNOWN`, `baz` would launch.
For any exit status of `foo` other than `FAILED` or `UNKNOWN`, `qux` would launch and, upon successful completion, `quux` would launch.
Using the Spring Cloud Data Flow Dashboard to create the same “transition with conditional execution” would resemble the following image:
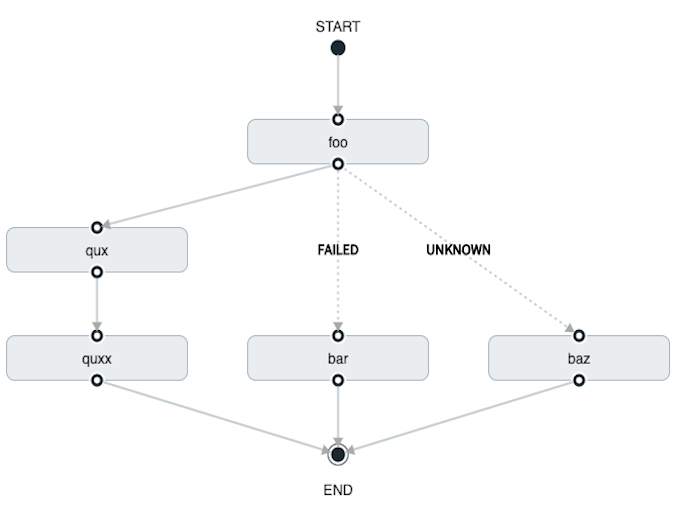
Figure 5. Transition With Conditional Execution
| |In this diagram, the dashed line (transition) connects the `foo` application to the target applications, but a solid line connects the conditional executions between `foo`, `qux`, and `quux`.|
|---|-----------------------------------------------------------------------------------------------------------------------------------------------------------------------------------------------|
### 29.3. Split Execution
Splits let multiple tasks within a composed task be run in parallel.
It is denoted by using angle brackets (`<>`) to group tasks and flows that are to be run in parallel.
These tasks and flows are separated by the double pipe `||` symbol, as shown in the following example:
```
task create my-split-task --definition ""
```
The preceding example launches tasks `foo`, `bar` and `baz` in parallel.
Using the Spring Cloud Data Flow Dashboard to create the same “split execution” would resemble the following image:

Figure 6. Split
With the task DSL, you can also run multiple split groups in succession, as shown in the following example:
```
task create my-split-task --definition " && "
```
In the preceding example, the `foo`, `bar`, and `baz` tasks are launched in parallel.
Once they all complete, then the `qux` and `quux` tasks are launched in parallel.
Once they complete, the composed task ends.
However, if `foo`, `bar`, or `baz` fails, the split containing `qux` and `quux` does not launch.
Using the Spring Cloud Data Flow Dashboard to create the same “split with multiple groups” would resemble the following image:
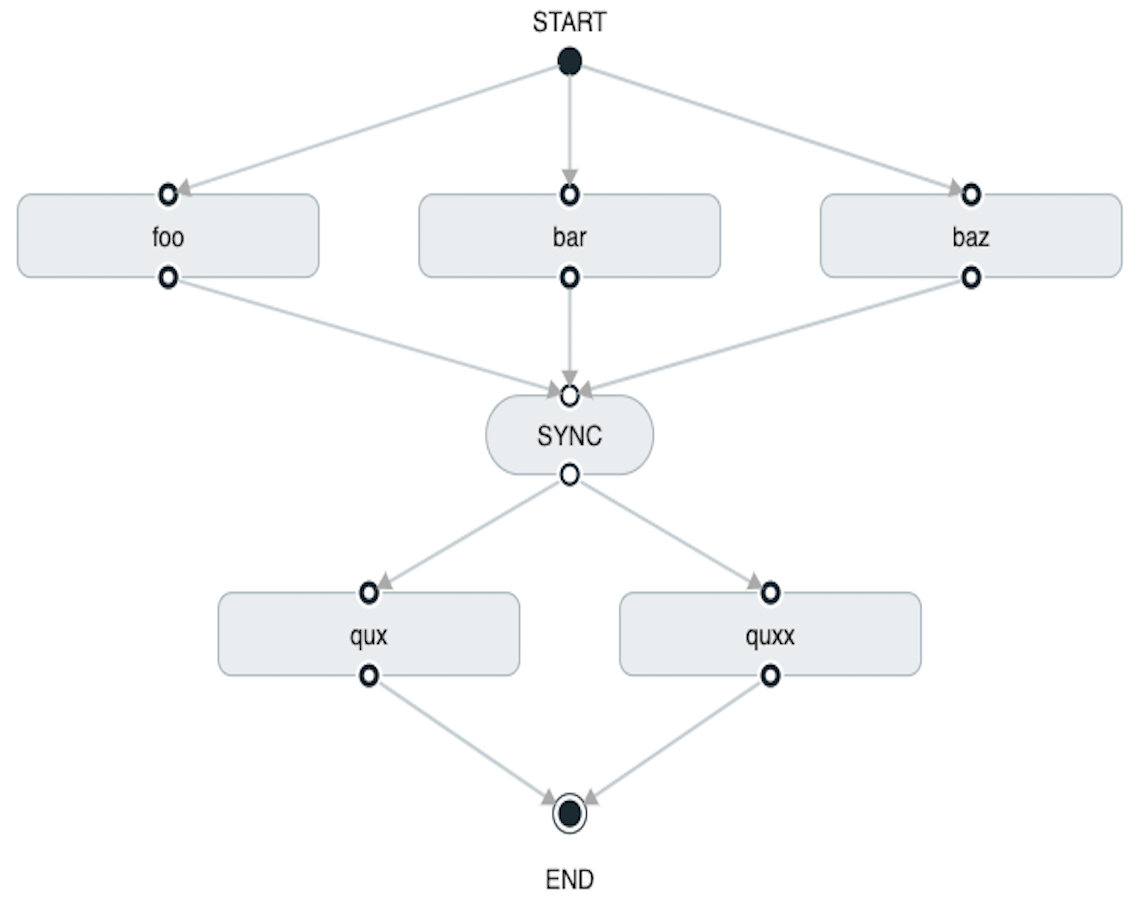
Figure 7. Split as a part of a conditional execution
Notice that there is a `SYNC` control node that is inserted by the designer when
connecting two consecutive splits.
| |Tasks that are used in a split should not set the their `ExitMessage`. Setting the `ExitMessage` is only to be used
with [transitions](#spring-cloud-data-flow-transitional-execution).|
|---|-------------------------------------------------------------------------------------------------------------------------------------------------------------------------------------------|
#### 29.3.1. Split Containing Conditional Execution
A split can also have a conditional execution within the angle brackets, as shown in the following example:
```
task create my-split-task --definition ""
```
In the preceding example, we see that `foo` and `baz` are launched in parallel.
However, `bar` does not launch until `foo` completes successfully.
Using the Spring Cloud Data Flow Dashboard to create the same " `split containing conditional execution` " resembles the following image:
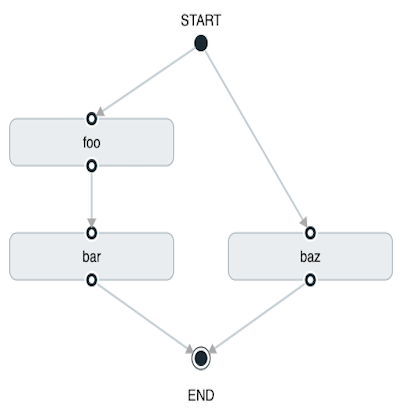
Figure 8. Split with conditional execution
#### 29.3.2. Establishing the Proper Thread Count for Splits
Each child task contained in a split requires a thread in order to run. To set this properly, you want to look at your graph and find the split that has the largest number of child tasks. The number of child tasks in that split is the number of threads you need.
To set the thread count, use the `split-thread-core-pool-size property` (defaults to `1`). So, for example, a definition such as ` && ` requires a `split-thread-core-pool-size` of `3`.
This is because the largest split contains three child tasks. A count of two would mean that `AAA` and `BBB` would run in parallel but CCC would wait for either `AAA` or `BBB` to finish in order to run.
Then `DDD` and `EEE` would run in parallel.
## 30. Launching Tasks from a Stream
You can launch a task from a stream by using the [`task-launcher-dataflow`](https://github.com/spring-cloud-stream-app-starters/tasklauncher-dataflow/blob/master/spring-cloud-starter-stream-sink-task-launcher-dataflow/README.adoc) sink.
The sink connects to a Data Flow server and uses its REST API to launch any defined task.
The sink accepts a [JSON payload](https://github.com/spring-cloud-stream-app-starters/tasklauncher-dataflow/blob/master/spring-cloud-starter-stream-sink-task-launcher-dataflow/README.adoc#payload) representing a `task launch request`, which provides the name of the task to launch and may include command line arguments and deployment properties.
The [`app-starters-task-launch-request-common`](https://github.com/spring-cloud-stream-app-starters/core/blob/master/common/app-starters-task-launch-request-common/README.adoc) component, in conjunction with Spring Cloud Stream [functional composition](https://docs.spring.io/spring-cloud-stream/docs/current-snapshot/reference/htmlsingle/#_functional_composition), can transform the output of any source or processor to a task launch request.
Adding a dependency to `app-starters-task-launch-request-common` auto-configures a `java.util.function.Function` implementation, registered through [Spring Cloud Function](https://cloud.spring.io/spring-cloud-function/) as a `taskLaunchRequest`.
For example, you can start with the [time](https://github.com/spring-cloud-stream-app-starters/time/tree/master/spring-cloud-starter-stream-source-time) source, add the following dependency, build it, and register it as a custom source. We call it `time-tlr` in this example:
```
org.springframework.cloud.stream.app
app-starters-task-launch-request-common
```
| |[Spring Cloud Stream Initializr](https://start-scs.cfapps.io/) provides a great starting point for creating stream applications.|
|---|--------------------------------------------------------------------------------------------------------------------------------|
Next, [register](#applications) the `task-launcher-dataflow` sink and create a task (we use the provided timestamp task):
```
stream create --name task-every-minute --definition "time-tlr --trigger.fixed-delay=60 --spring.cloud.stream.function.definition=taskLaunchRequest --task.launch.request.task-name=timestamp-task | task-launcher-dataflow" --deploy
```
The preceding stream produces a task launch request every minute. The request provides the name of the task to launch: `{"name":"timestamp-task"}`.
The following stream definition illustrates the use of command line arguments. It produces messages such as `{"args":["foo=bar","time=12/03/18 17:44:12"],"deploymentProps":{},"name":"timestamp-task"}` to provide command-line arguments to the task:
```
stream create --name task-every-second --definition "time-tlr --spring.cloud.stream.function.definition=taskLaunchRequest --task.launch.request.task-name=timestamp-task --task.launch.request.args=foo=bar --task.launch.request.arg-expressions=time=payload | task-launcher-dataflow" --deploy
```
Note the use of SpEL expressions to map each message payload to the `time` command-line argument, along with a static argument (`foo=bar`).
You can then see the list of task executions by using the shell command `task execution list`, as shown (with its output) in the following example:
```
dataflow:>task execution list
╔════════════════════╤══╤════════════════════════════╤════════════════════════════╤═════════╗
║ Task Name │ID│ Start Time │ End Time │Exit Code║
╠════════════════════╪══╪════════════════════════════╪════════════════════════════╪═════════╣
║timestamp-task_26176│4 │Tue May 02 12:13:49 EDT 2017│Tue May 02 12:13:49 EDT 2017│0 ║
║timestamp-task_32996│3 │Tue May 02 12:12:49 EDT 2017│Tue May 02 12:12:49 EDT 2017│0 ║
║timestamp-task_58971│2 │Tue May 02 12:11:50 EDT 2017│Tue May 02 12:11:50 EDT 2017│0 ║
║timestamp-task_13467│1 │Tue May 02 12:10:50 EDT 2017│Tue May 02 12:10:50 EDT 2017│0 ║
╚════════════════════╧══╧════════════════════════════╧════════════════════════════╧═════════╝
```
In this example, we have shown how to use the `time` source to launch a task at a fixed rate.
This pattern may be applied to any source to launch a task in response to any event.
### 30.1. Launching a Composed Task From a Stream
A composed task can be launched with the `task-launcher-dataflow` sink, as discussed [here](#spring-cloud-dataflow-launch-tasks-from-stream).
Since we use the `ComposedTaskRunner` directly, we need to set up the task definitions for the composed task runner itself, along with the composed tasks, prior to the creation of the composed task launching stream.
Suppose we wanted to create the following composed task definition: `AAA && BBB`.
The first step would be to create the task definitions, as shown in the following example:
```
task create composed-task-runner --definition "composed-task-runner"
task create AAA --definition "timestamp"
task create BBB --definition "timestamp"
```
| |Releases of `ComposedTaskRunner` can be found[here](https://github.com/spring-cloud-task-app-starters/composed-task-runner/releases).|
|---|-------------------------------------------------------------------------------------------------------------------------------------|
Now that the task definitions we need for composed task definition are ready, we need to create a stream that launches `ComposedTaskRunner`.
So, in this case, we create a stream with:
* The `time` source customized to emit task launch requests, as shown [earlier](#spring-cloud-dataflow-launch-tasks-from-stream).
* The `task-launcher-dataflow` sink that launches the `ComposedTaskRunner`
The stream should resemble the following:
```
stream create ctr-stream --definition "time --fixed-delay=30 --task.launch.request.task-name=composed-task-launcher --task.launch.request.args=--graph=AAA&&BBB,--increment-instance-enabled=true | task-launcher-dataflow"
```
For now, we focus on the configuration that is required to launch the `ComposedTaskRunner`:
* `graph`: This is the graph that is to be executed by the `ComposedTaskRunner`.
In this case it is `AAA&&BBB`.
* `increment-instance-enabled`: This lets each execution of `ComposedTaskRunner` be unique.`ComposedTaskRunner` is built by using [Spring Batch](https://projects.spring.io/spring-batch/).
Thus, we want a new Job Instance for each launch of the `ComposedTaskRunner`.
To do this, we set `increment-instance-enabled` to be `true`.
## 31. Sharing Spring Cloud Data Flow’s Datastore with Tasks
As discussed in the [Tasks](#spring-cloud-dataflow-task) documentation, Spring
Cloud Data Flow lets you view Spring Cloud Task application executions. So, in
this section, we discuss what is required for a task application and Spring
Cloud Data Flow to share the task execution information.
### 31.1. A Common DataStore Dependency
Spring Cloud Data Flow supports many databases out-of-the-box,
so all you typically need to do is declare the `spring_datasource_*` environment variables
to establish what data store Spring Cloud Data Flow needs.
Regardless of which database you decide to use for Spring Cloud Data Flow, make sure that your task also
includes that database dependency in its `pom.xml` or `gradle.build` file. If the database dependency
that is used by Spring Cloud Data Flow is not present in the Task Application, the task fails
and the task execution is not recorded.
### 31.2. A Common Data Store
Spring Cloud Data Flow and your task application must access the same datastore instance.
This is so that the task executions recorded by the task application can be read by Spring Cloud Data Flow to list them in the Shell and Dashboard views.
Also, the task application must have read and write privileges to the task data tables that are used by Spring Cloud Data Flow.
Given this understanding of the datasource dependency between Task applications and Spring Cloud Data Flow, you can now review how to apply them in various Task orchestration scenarios.
#### 31.2.1. Simple Task Launch
When launching a task from Spring Cloud Data Flow, Data Flow adds its datasource
properties (`spring.datasource.url`, `spring.datasource.driverClassName`, `spring.datasource.username`, `spring.datasource.password`)
to the application properties of the task being launched. Thus, a task application
records its task execution information to the Spring Cloud Data Flow repository.
#### 31.2.2. Composed Task Runner
Spring Cloud Data Flow lets you create a directed graph where each node
of the graph is a task application. This is done through the[composed task runner](https://github.com/spring-cloud-task-app-starters/composed-task-runner/blob/master/spring-cloud-starter-task-composedtaskrunner/README.adoc).
In this case, the rules that applied to a [simple task launch](#datasource-simple-task-launch)or task launcher sink apply to the composed task runner as well.
All child applications must also have access to the datastore that is being used by the composed task runner.
Also, all child applications must have the same database dependency as the composed task runner enumerated in their `pom.xml` or `gradle.build` file.
#### 31.2.3. Launching a Task Externally from Spring Cloud Data Flow
You can launch Spring Cloud Task applications by using another method (scheduler, for example) but still track the task execution in Spring Cloud Data Flow.
You can do so, provided the task applications observe the rules specified [here](#a-common-datastore-dependency) and [here](#a-common-datastore).
| |If you want to use Spring Cloud Data Flow to view your[Spring Batch](https://projects.spring.io/spring-batch/) jobs, make sure that
your batch application uses the `@EnableTask` annotation and follow the rules enumerated [here](#a-common-datastore-dependency) and [here](#a-common-datastore).
More information is available [here](https://github.com/spring-projects/spring-batch-admin/blob/master/MIGRATION.md).|
|---|----------------------------------------------------------------------------------------------------------------------------------------------------------------------------------------------------------------------------------------------------------------------------------------------------------------------------------------------------------------------------------------------------------------------------------|
## 32. Scheduling Tasks
Spring Cloud Data Flow lets you schedule the execution of tasks with a `cron` expression.
You can create a schedule through the RESTful API or the Spring Cloud Data Flow UI.
### 32.1. The Scheduler
Spring Cloud Data Flow schedules the execution of its tasks through a scheduling agent that is available on the cloud platform.
When using the Cloud Foundry platform, Spring Cloud Data Flow uses the [PCF Scheduler](https://www.cloudfoundry.org/the-foundry/scheduler/).
When using Kubernetes, a [CronJob](https://kubernetes.io/docs/concepts/workloads/controllers/cron-jobs/) will be used.
| |Scheduled tasks do not implement the continuous deployment feature. Any changes to application version or properties for a task definition in Spring Cloud Data Flow will not affect scheduled tasks.|
|---|-----------------------------------------------------------------------------------------------------------------------------------------------------------------------------------------------------|
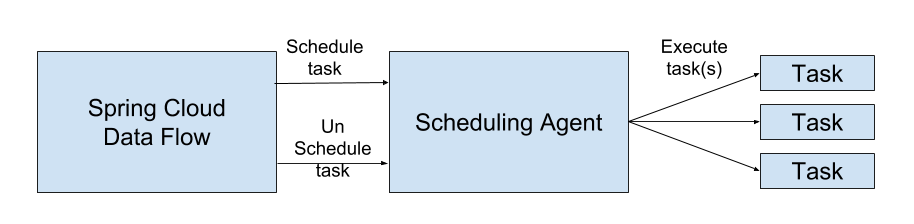
Figure 9. Architectural Overview
### 32.2. Enabling Scheduling
By default, Spring Cloud Data Flow leaves the scheduling feature disabled. To enable the scheduling feature, set the following feature properties to `true`:
* `spring.cloud.dataflow.features.schedules-enabled`
* `spring.cloud.dataflow.features.tasks-enabled`
### 32.3. The Lifecycle of a Schedule
The lifecycle of a schedule has three parts:
* [Scheduling a Task Execution](#spring-cloud-data-flow-schedule-scheduling)
* [Deleting a Schedule](#spring-cloud-data-flow-schedule-unscheduling)
* [Listing Schedules](#spring-cloud-data-flow-schedule-list)
#### 32.3.1. Scheduling a Task Execution
You can schedule a task execution via the:
* Spring Cloud Data Flow Shell
* Spring Cloud Data Flow Dashboard
* Spring Cloud Data Flow RESTful API
#### 32.3.2. Scheduling a Task
To schedule a task using the shell, use the `task schedule create` command to create the schedule, as shown in the following example:
```
dataflow:>task schedule create --definitionName mytask --name mytaskschedule --expression '*/1 * * * *'
Created schedule 'mytaskschedule'
```
In the earlier example, we created a schedule called `mytaskschedule` for the task definition called `mytask`. This schedule launches `mytask` once a minute.
| |If using Cloud Foundry, the `cron` expression above would be: `*/1 * ? * *`. This is because Cloud Foundry uses the Quartz `cron` expression format.|
|---|----------------------------------------------------------------------------------------------------------------------------------------------------|
##### Maximum Length for a Schedule Name
The maximum character length of a schedule name is dependent on the platform.
|Kubernetes|Cloud Foundry|Local|
|----------|-------------|-----|
| 52 | 63 | N/A |
#### 32.3.3. Deleting a Schedule
You can delete a schedule by using the:
* Spring Cloud Data Flow Shell
* Spring Cloud Data Flow Dashboard
* Spring Cloud Data Flow RESTful API
To delete a task schedule by using the shell, use the `task schedule destroy` command, as shown in the following example:
```
dataflow:>task schedule destroy --name mytaskschedule
Deleted task schedule 'mytaskschedule'
```
#### 32.3.4. Listing Schedules
You can view the available schedules by using the:
* Spring Cloud Data Flow Shell
* Spring Cloud Data Flow Dashboard
* Spring Cloud Data Flow RESTful API
To view your schedules from the shell, use the `task schedule list` command, as shown in the following example:
```
dataflow:>task schedule list
╔══════════════════════════╤════════════════════╤════════════════════════════════════════════════════╗
║ Schedule Name │Task Definition Name│ Properties ║
╠══════════════════════════╪════════════════════╪════════════════════════════════════════════════════╣
║mytaskschedule │mytask │spring.cloud.scheduler.cron.expression = */1 * * * *║
╚══════════════════════════╧════════════════════╧════════════════════════════════════════════════════╝
```
| |Instructions to create, delete, and list schedules by using the Spring Cloud Data Flow UI can be found [here](https://dataflow.spring.io/docs/feature-guides/batch/scheduling/).|
|---|--------------------------------------------------------------------------------------------------------------------------------------------------------------------------------|
## 33. Continuous Deployment
As task applications evolve, you want to get your updates to production. This section walks through the capabilities that Spring Cloud Data Flow provides around being able to update task applications.
When a task application is registered (see [Registering a Task Application](#spring-cloud-dataflow-register-task-apps)), a version is associated with it. A task application can have multiple versions associated with it, with one selected as the default. The following image illustrates an application with multiple versions associated with it (see the timestamp entry).
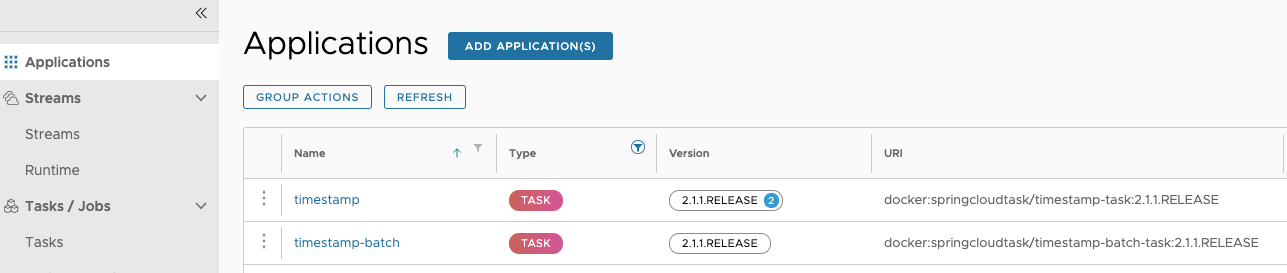
Versions of an application are managed by registering multiple applications with the same name and coordinates, *except* the version. For example, if you were to register an application with the following values, you would get one application registered with two versions (2.1.0.RELEASE and 2.1.1.RELEASE):
* Application 1
* Name: `timestamp`
* Type: `task`
* URI: `maven://org.springframework.cloud.task.app:timestamp-task:2.1.0.RELEASE`
* Application 2
* Name: `timestamp`
* Type: `task`
* URI: `maven://org.springframework.cloud.task.app:timestamp-task:2.1.1.RELEASE`
Besides having multiple versions, Spring Cloud Data Flow needs to know which version to run on the next launch. This is indicated by setting a version to be the default version. Whatever version of a task application is configured as the default version is the one to be run on the next launch request. You can see which version is the default in the UI, as this image shows:

### 33.1. Task Launch Lifecycle
In previous versions of Spring Cloud Data Flow, when the request to launch a task was received, Spring Cloud Data Flow would deploy the application (if needed) and run it. If the application was being run on a platform that did not need to have the application deployed every time (CloudFoundry, for example), the previously deployed application was used. This flow has changed in 2.3. The following image shows what happens when a task launch request comes in now:

There are three main flows to consider in the preceding diagram. Launching the first time or launching with no changes is one. The other two are launching when there are changes but the appliction is not currently and launching when there are changes and the application is running. We look at the flow with no changes first.
#### 33.1.1. Launching a Task With No Changes
1. A launch request comes into Data Flow. Data Flow determines that an upgrade is not required, since nothing has changed (no properties, deployment properties, or versions have changed since the last execution).
1. On platforms that cache a deployed artifact (CloudFoundry, at this writing), Data Flow checks whether the application was previously deployed.
2. If the application needs to be deployed, Data Flow deploys the task application.
3. Data Flow launches the application.
This flow is the default behavior and, if nothing has changed, occurs every time a request comes in. Note that this is the same flow that Data Flow has always use for launching tasks.
#### 33.1.2. Launching a Task With Changes That Is Not Currently Running
The second flow to consider when launching a task is when a task is not running but there is a change in any of the task application version, application properties, or deployment properties. In this case, the following flow is executed:
1. A launch request comes into Data Flow. Data Flow determines that an upgrade is required, since there was a change in the task application version, the application properties, or the deployment properties.
2. Data Flow checks to see whether another instance of the task definition is currently running.
1. If there is no other instance of the task definition currently running, the old deployment is deleted.
2. On platforms that cache a deployed artifact (CloudFoundry, at this writing), Data Flow checks whether the application was previously deployed (this check evaluates to `false` in this flow, since the old deployment was deleted).
3. Data Flow does the deployment of the task application with the updated values (new application version, new merged properties, and new merged deployment properties).
4. Data Flow launches the application.
This flow is what fundamentally enables continuous deployment for Spring Cloud Data Flow.
#### 33.1.3. Launch a Task With Changes While Another Instance Is Running
The last main flow is when a launch request comes to Spring Cloud Data Flow to do an upgrade but the task definition is currently running. In this case, the launch is blocked due to the requirement to delete the current application. On some platforms (CloudFoundry, at this writing), deleting the application causes all currently running applications to be shut down. This feature prevents that from happening. The following process describes what happens when a task changes while another instance is running:
1. A launch request comes into Data Flow. Data Flow determines that an upgrade is required, since there was a change in the task application version, the application properties, or the deployment properties.
2. Data Flow checks to see whether another instance of the task definition is currently running.
3. Data Flow prevents the launch from happening, because other instances of the task definition are running.
| |Any launch that requires an upgrade of a task definition that is running at the time of the request is blocked from running due to the need to delete any currently running tasks.|
|---|----------------------------------------------------------------------------------------------------------------------------------------------------------------------------------|
# Task Developer Guide
See the [Batch Developer](https://dataflow.spring.io/docs/batch-developer-guides/) section of the microsite for more about how to create, test, and run Spring Cloud Task applications on your local machine.
# Task Monitoring
See the [Task Monitoring](https://dataflow.spring.io/docs/feature-guides/batch/monitoring/) Guide of the microsite for more about how to monitor the applications that were deployed as part of a task.
# Dashboard
This section describes how to use the dashboard of Spring Cloud Data Flow.
## 34. Introduction
Spring Cloud Data Flow provides a browser-based GUI called the Dashboard to manage the following information:
* **Apps**: The **Apps** tab lists all available applications and provides the controls to register and unregister them.
* **Runtime**: The **Runtime** tab provides the list of all running applications.
* **Streams**: The **Streams** tab lets you list, design, create, deploy, and destroy Stream Definitions.
* **Tasks**: The **Tasks** tab lets you list, create, launch, schedule, and destroy Task Definitions.
* **Jobs**: The **Jobs** tab lets you perform batch job related functions.
Upon starting Spring Cloud Data Flow, the dashboard is available at:
`[:/dashboard](http://:/dashboard)`
For example, if Spring Cloud Data Flow is running locally, the dashboard is available at `[localhost:9393/dashboard](http://localhost:9393/dashboard)`.
If you have enabled HTTPS, the dashboard is available at `[localhost:9393/dashboard](https://localhost:9393/dashboard)`.
If you have enabled security, a login form is available at `[localhost:9393/dashboard/#/login](http://localhost:9393/dashboard/#/login)`.
| |The default Dashboard server port is `9393`.|
|---|--------------------------------------------|
The following image shows the opening page of the Spring Cloud Data Flow dashboard:
Figure 10. The Spring Cloud Data Flow Dashboard
## 35. Apps
The **Applications** tab of the dashboard lists all the available applications and provides the controls to register and unregister them (if applicable).
You can import a number of applications at once by using the Bulk Import Applications action.
The following image shows a typical list of available applications within the dashboard:
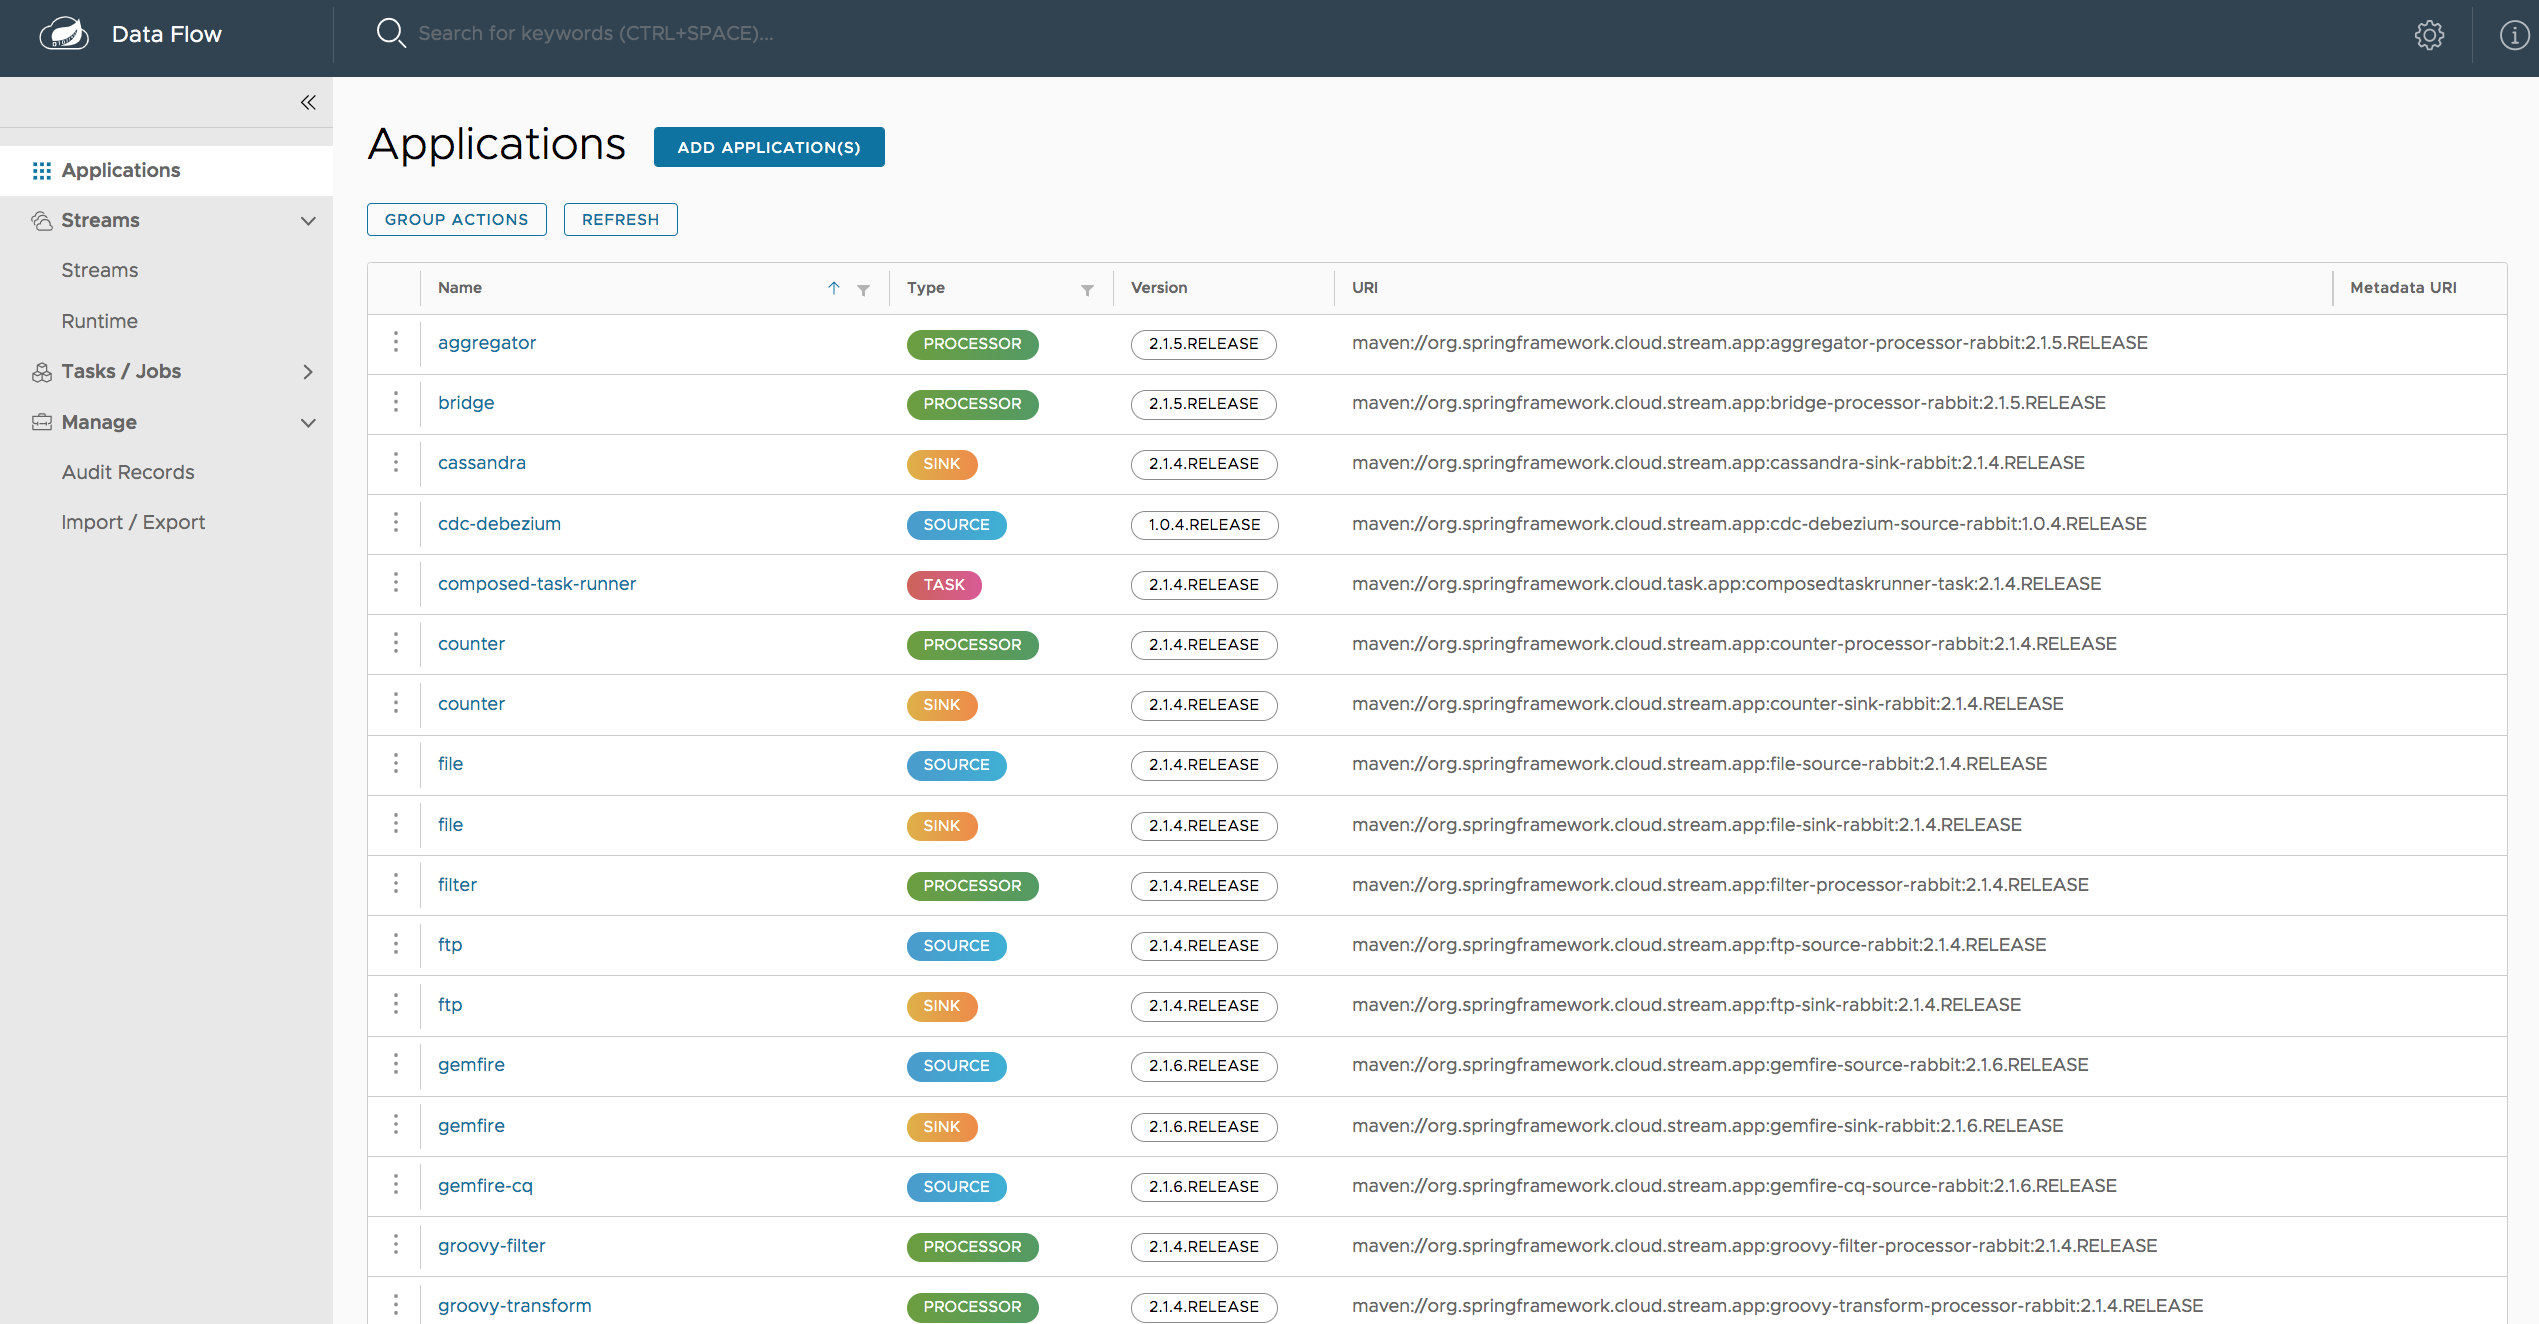
Figure 11. List of Available Applications
### 35.1. Bulk Import of Applications
Applications can be imported in numerous ways which are available on the "Applications" page.
For bulk import, the application definitions are expected to be expressed in a properties style, as follows:
```
. =
```
The following examples show typical application definitions:
```
task.timestamp=maven://org.springframework.cloud.task.app:timestamp-task:1.2.0.RELEASE
processor.transform=maven://org.springframework.cloud.stream.app:transform-processor-rabbit:1.2.0.RELEASE
```
In the "Import application coordinates from an HTTP URI location" section, you can specify a URI that points to a properties file stored elsewhere, it should contain properties formatted as shown in the previous example.
Alternatively, by using the **Apps as Properties** textbox in the "Import application coordinates from a properties file" section , you can directly list each property string. Finally, if the properties are stored in a local file, the **Import a File** option opens a local file browser to select the file.
After setting your definitions through one of these routes, click **Import Application(s)**.
The following image shows an example page of one way to bulk import applications:
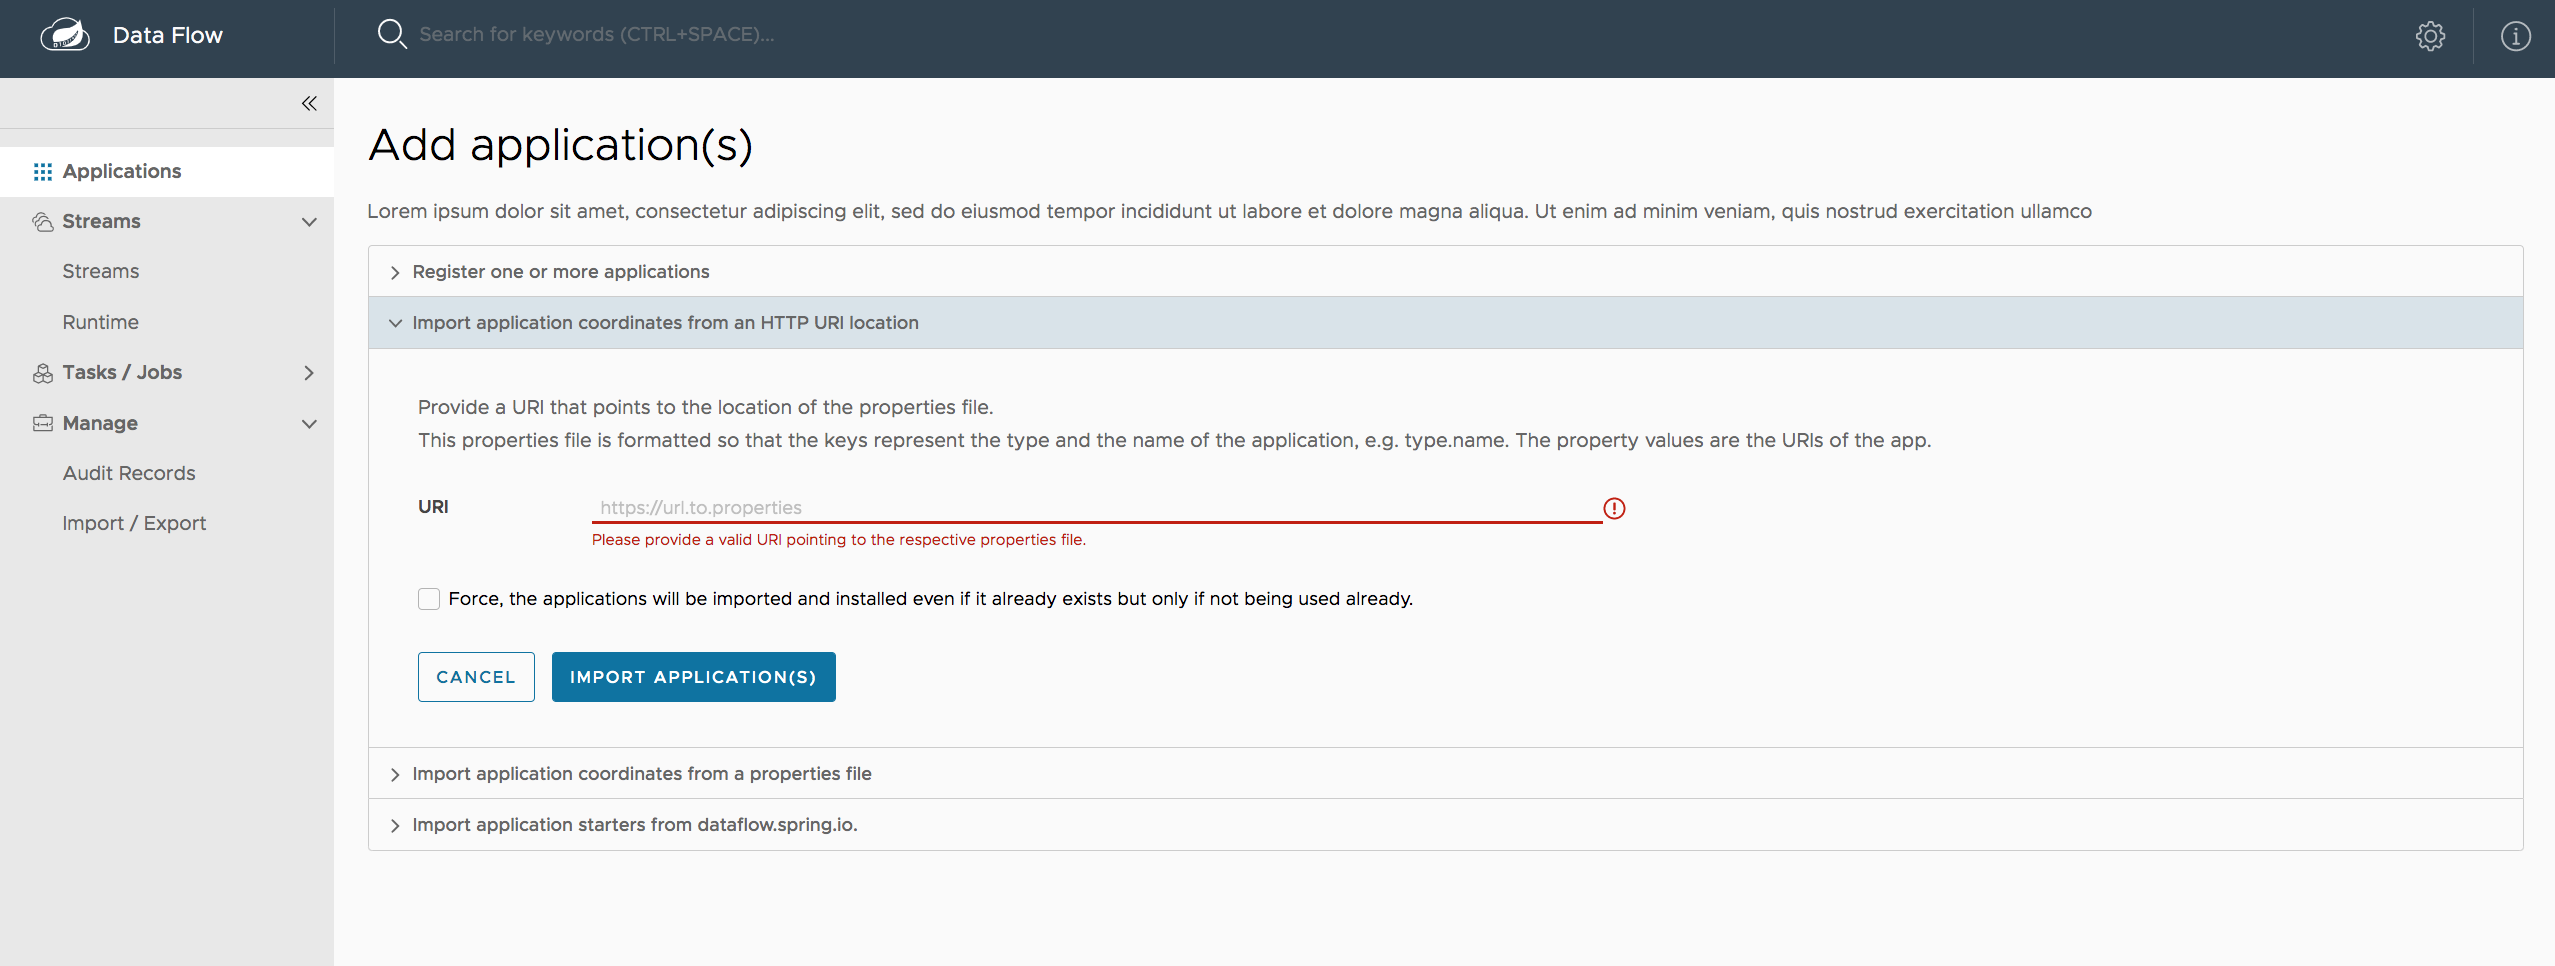
Figure 12. Bulk Import Applications
## 36. Runtime
The **Runtime** tab of the Dashboard application shows the list of all running applications.
For each runtime applicaiton, the state of the deployment and the number of deployed instances is shown.
A list of the used deployment properties is available by clicking on the application ID.
The following image shows an example of the **Runtime** tab in use:
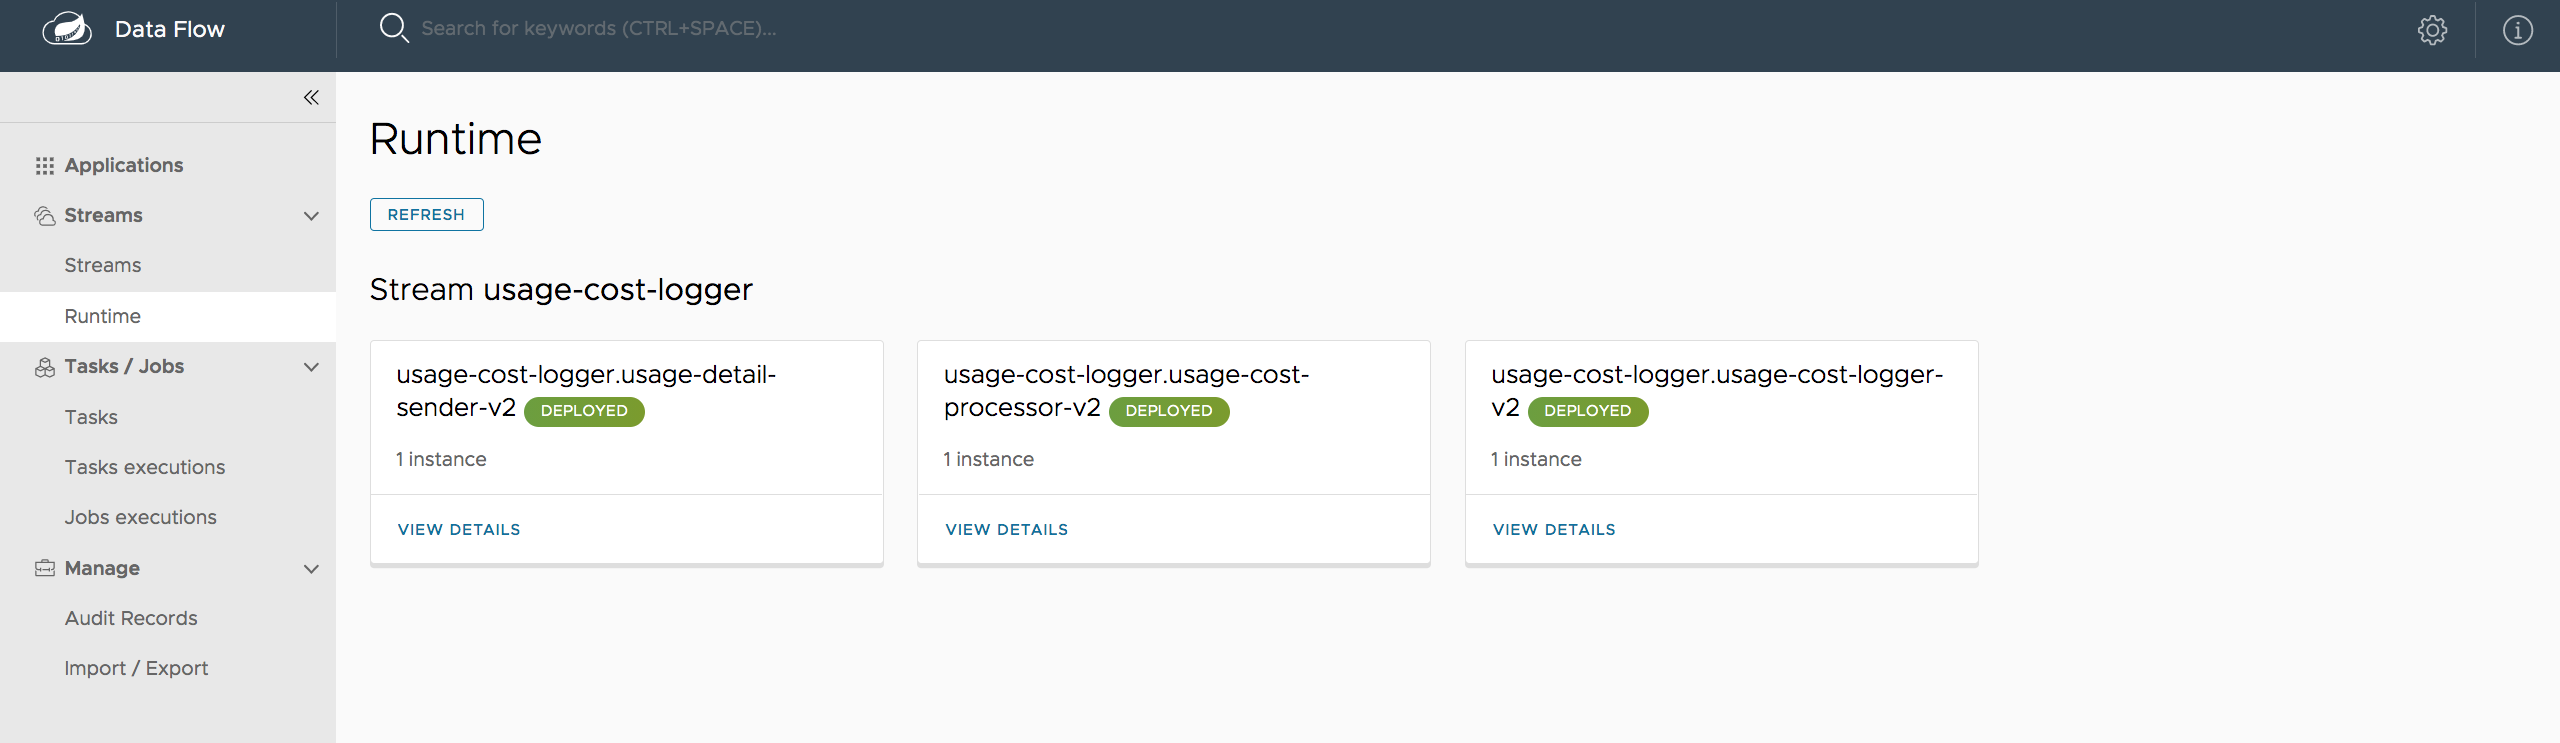
Figure 13. List of Running Applications
## 37. Streams
The **Streams** tab has two child tabs: **Definitions** and **Create Stream**. The following topics describe how to work with each one:
* [Working with Stream Definitions](#dashboard-stream-definitions)
* [Creating a Stream](#dashboard-flo-streams-designer)
* [Deploying a Stream](#dashboard-stream-deploy)
* [Accessing Stream Logs](#dashboard-stream-logs)
### 37.1. Working with Stream Definitions
The **Streams** section of the Dashboard includes the **Definitions** tab that provides a listing of stream definitions.
There you have the option to deploy or undeploy those stream definitions.
Additionally, you can remove the definition by clicking on **Destroy**.
Each row includes an arrow on the left, which you can click to see a visual representation of the definition.
Hovering over the boxes in the visual representation shows more details about the applications, including any options passed to them.
In the following screenshot, the `timer` stream has been expanded to show the visual representation:
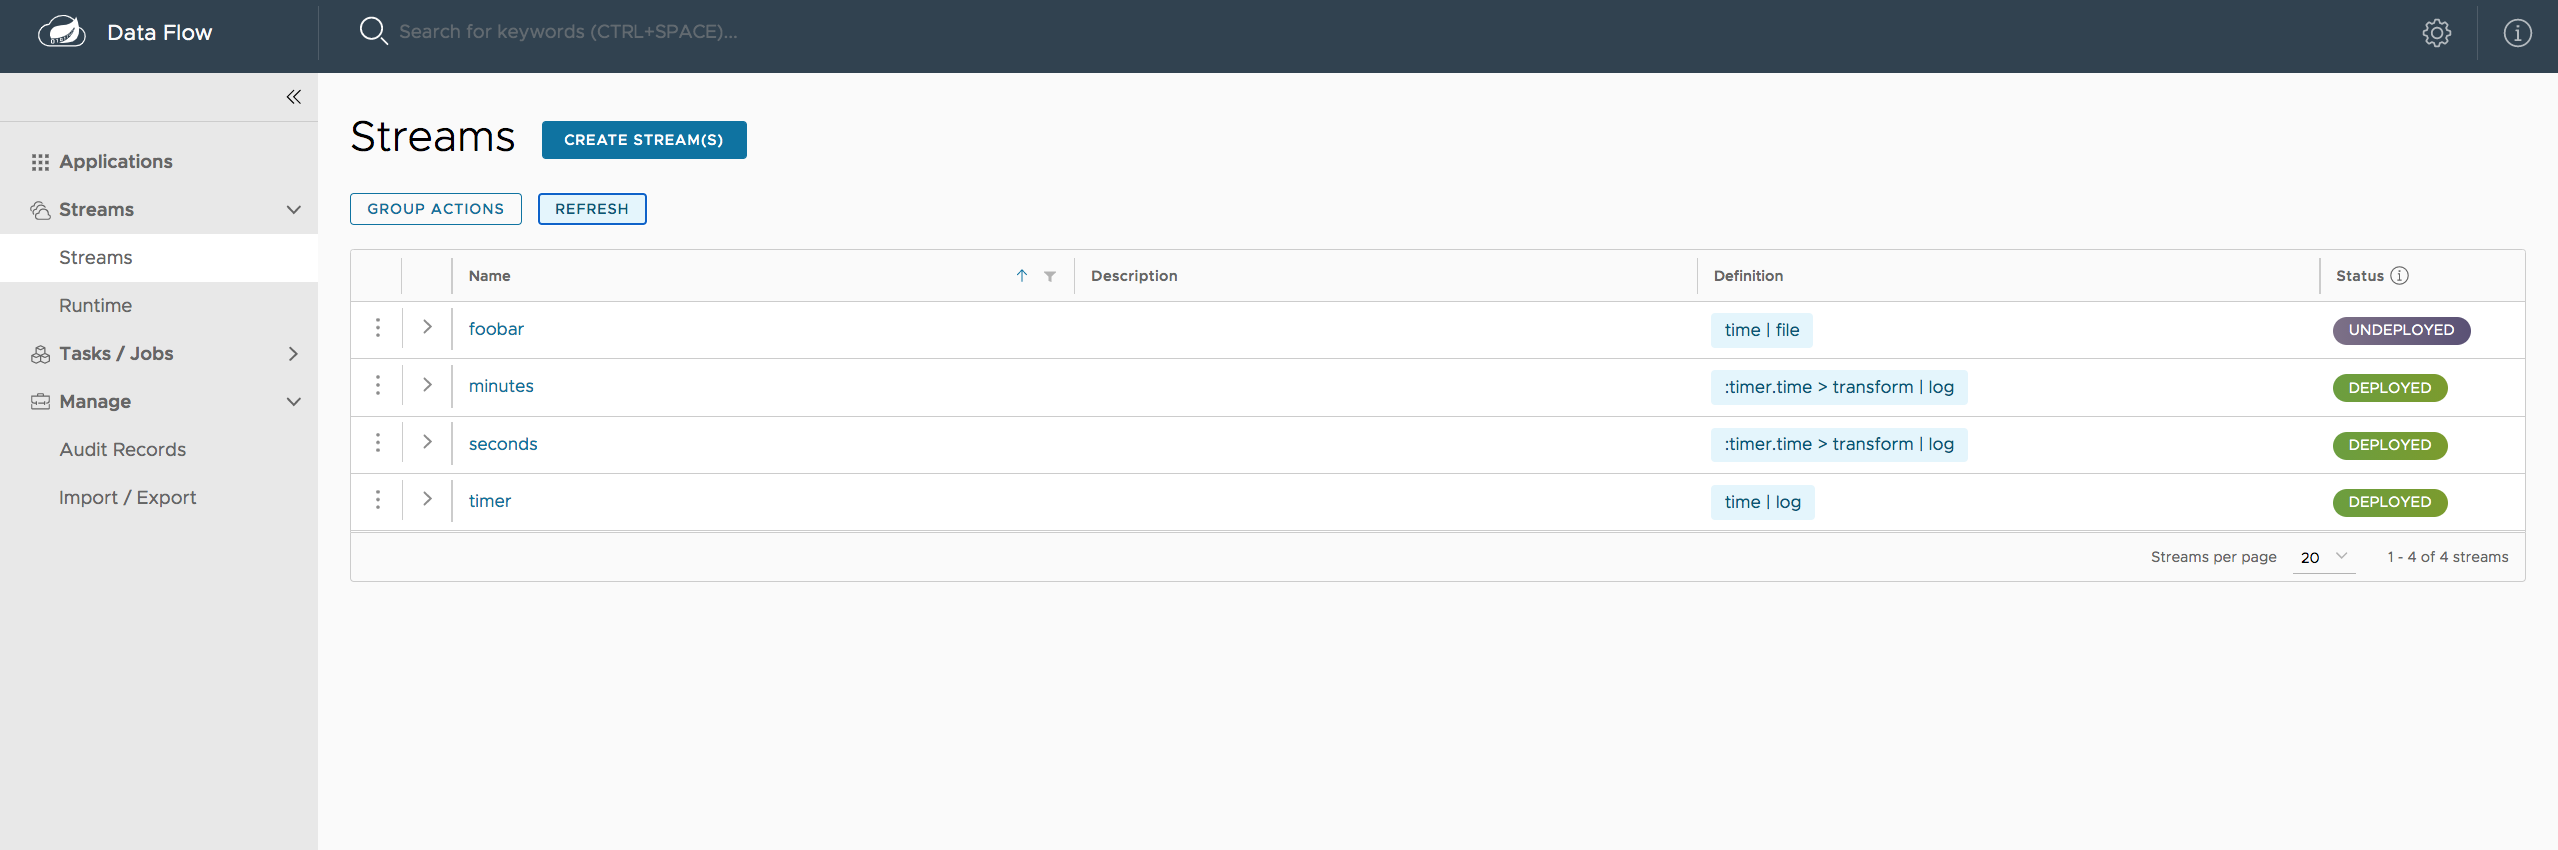
Figure 14. List of Stream Definitions
If you click the details button, the view changes to show a visual representation of that stream and any related streams.
In the preceding example, if you click details for the `timer` stream, the view changes to the following view, which clearly shows the relationship between the three streams (two of them are tapping into the `timer` stream):
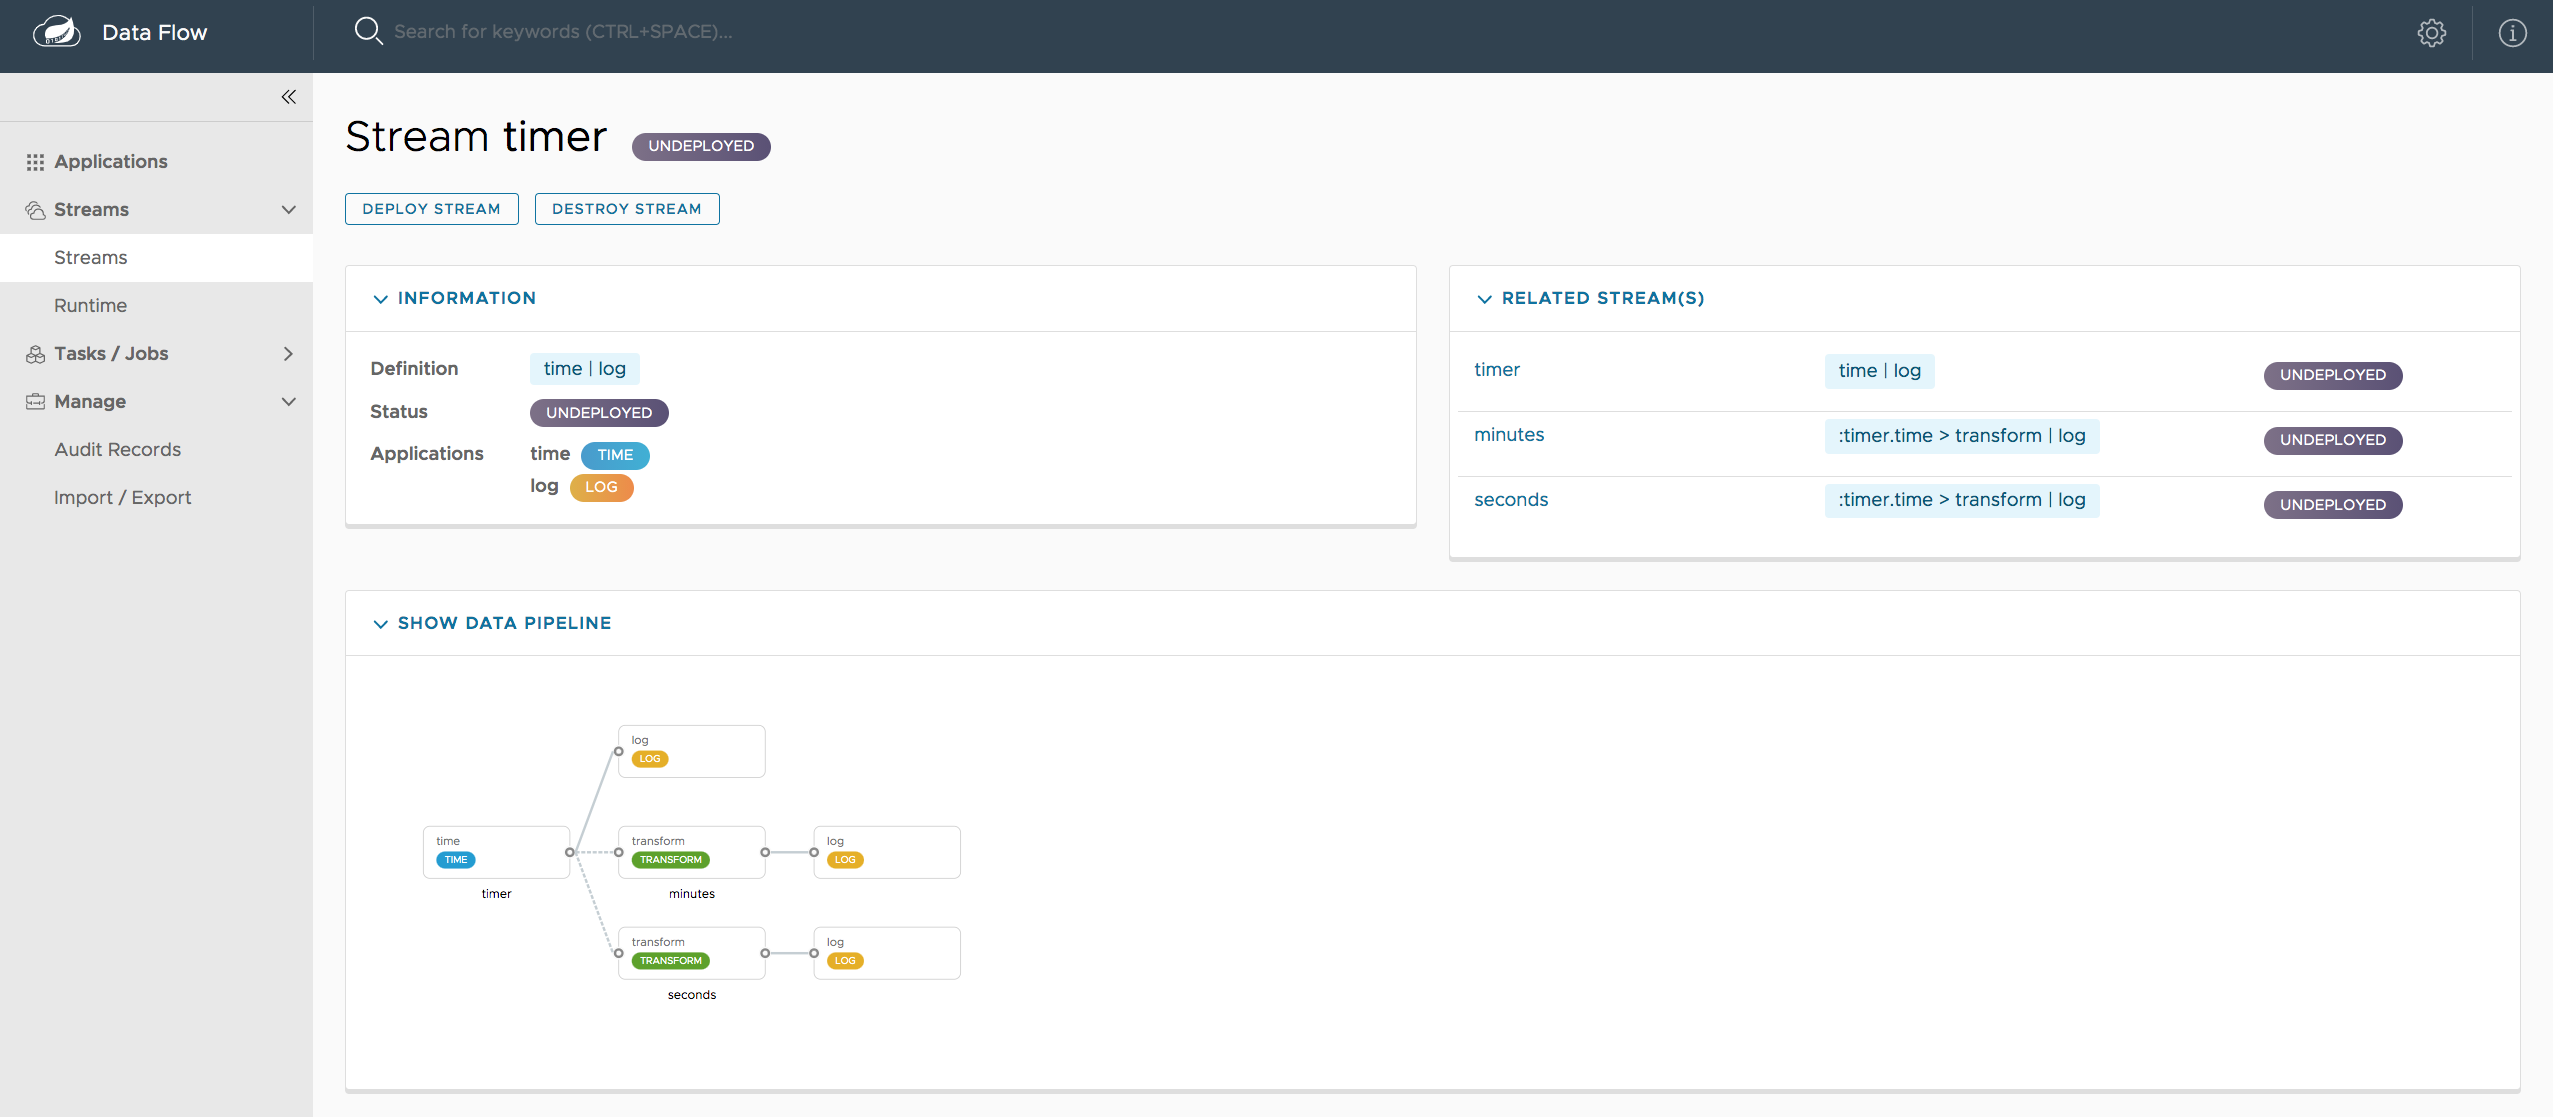
Figure 15. Stream Details Page
### 37.2. Creating a Stream
The **Streams** section of the Dashboard includes the **Create Stream** tab, which makes the [Spring Flo](https://github.com/spring-projects/spring-flo) designer available. The designer is a canvas application that offers an interactive graphical interface for creating data pipelines.
In this tab, you can:
* Create, manage, and visualize stream pipelines by using DSL, a graphical canvas, or both
* Write pipelines by using DSL with content-assist and auto-complete
* Use auto-adjustment and grid-layout capabilities in the GUI for simpler and interactive organization of pipelines
You should watch this [screencast](https://www.youtube.com/watch?v=78CgV46OstI) that highlights some of the "Flo for Spring Cloud Data Flow" capabilities.
The Spring Flo [wiki](https://github.com/spring-projects/spring-flo/wiki) includes more detailed content on core Flo capabilities.
The following image shows the Flo designer in use:
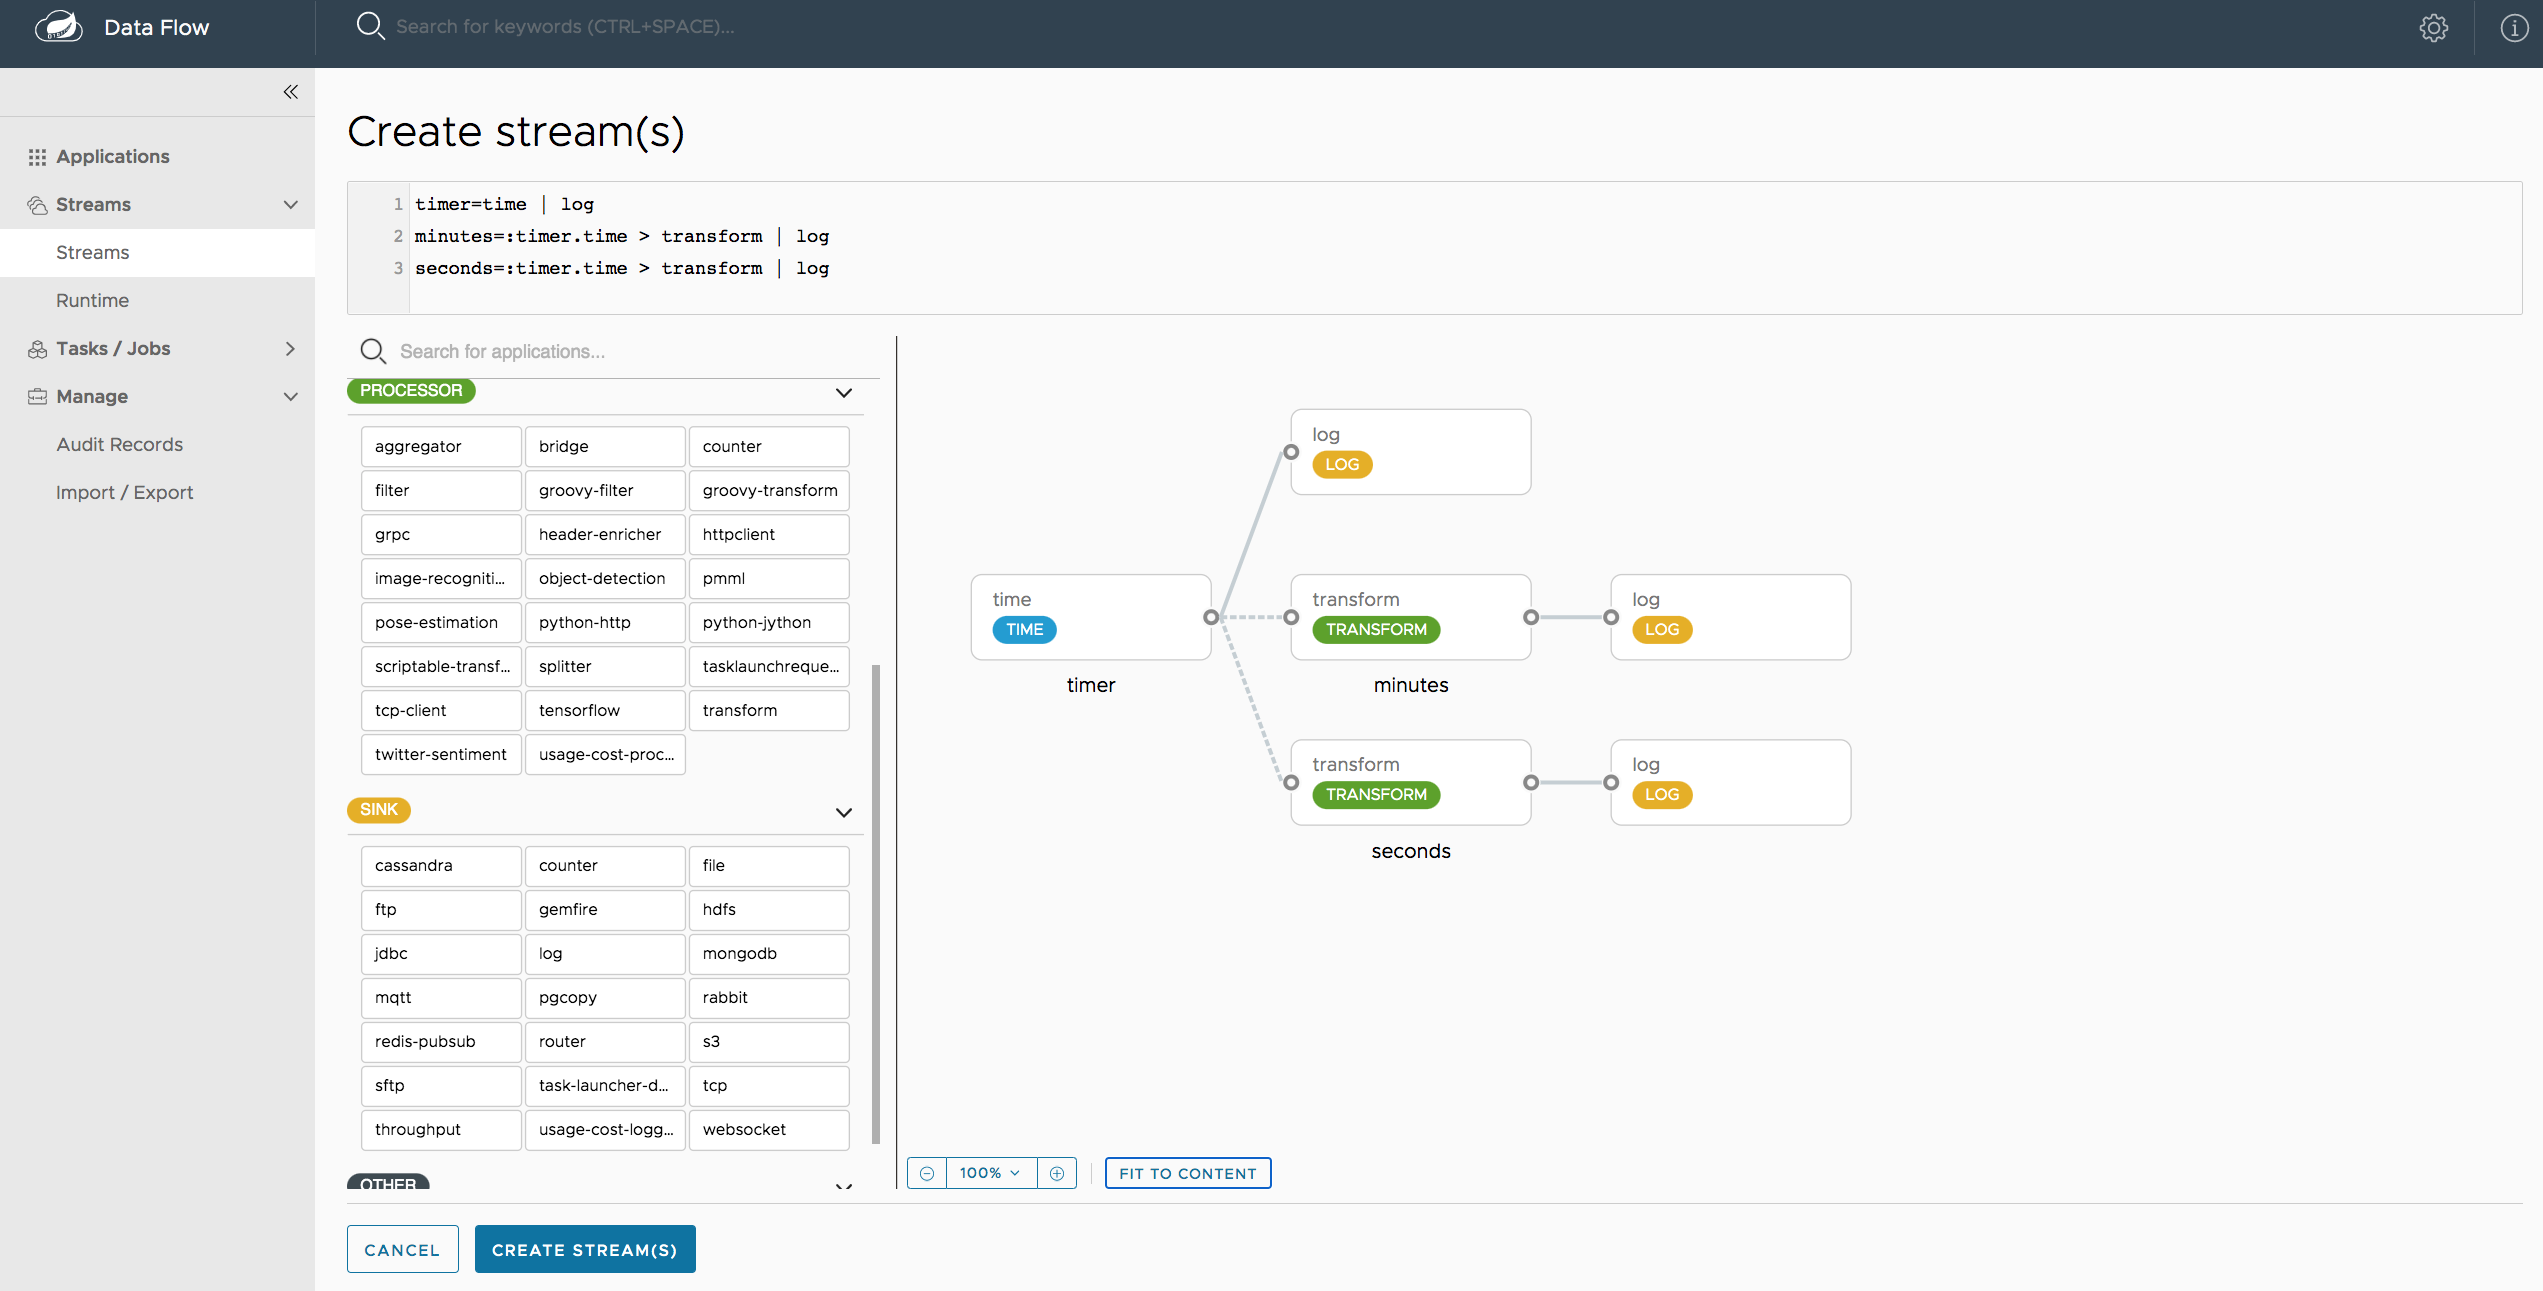
Figure 16. Flo for Spring Cloud Data Flow
### 37.3. Deploying a Stream
The stream deploy page includes tabs that provide different ways to set up the deployment properties and deploy the stream.
The following screenshots show the stream deploy page for `foobar` (`time | log`).
You can define deployments properties by using:
* Form builder tab: a builder that helps you to define deployment properties (deployer, application properties, and so on)
* Free text tab: a free text area (for key-value pairs)
You can switch between both views.
| |The form builder offers stronger validation of the inputs.|
|---|----------------------------------------------------------|
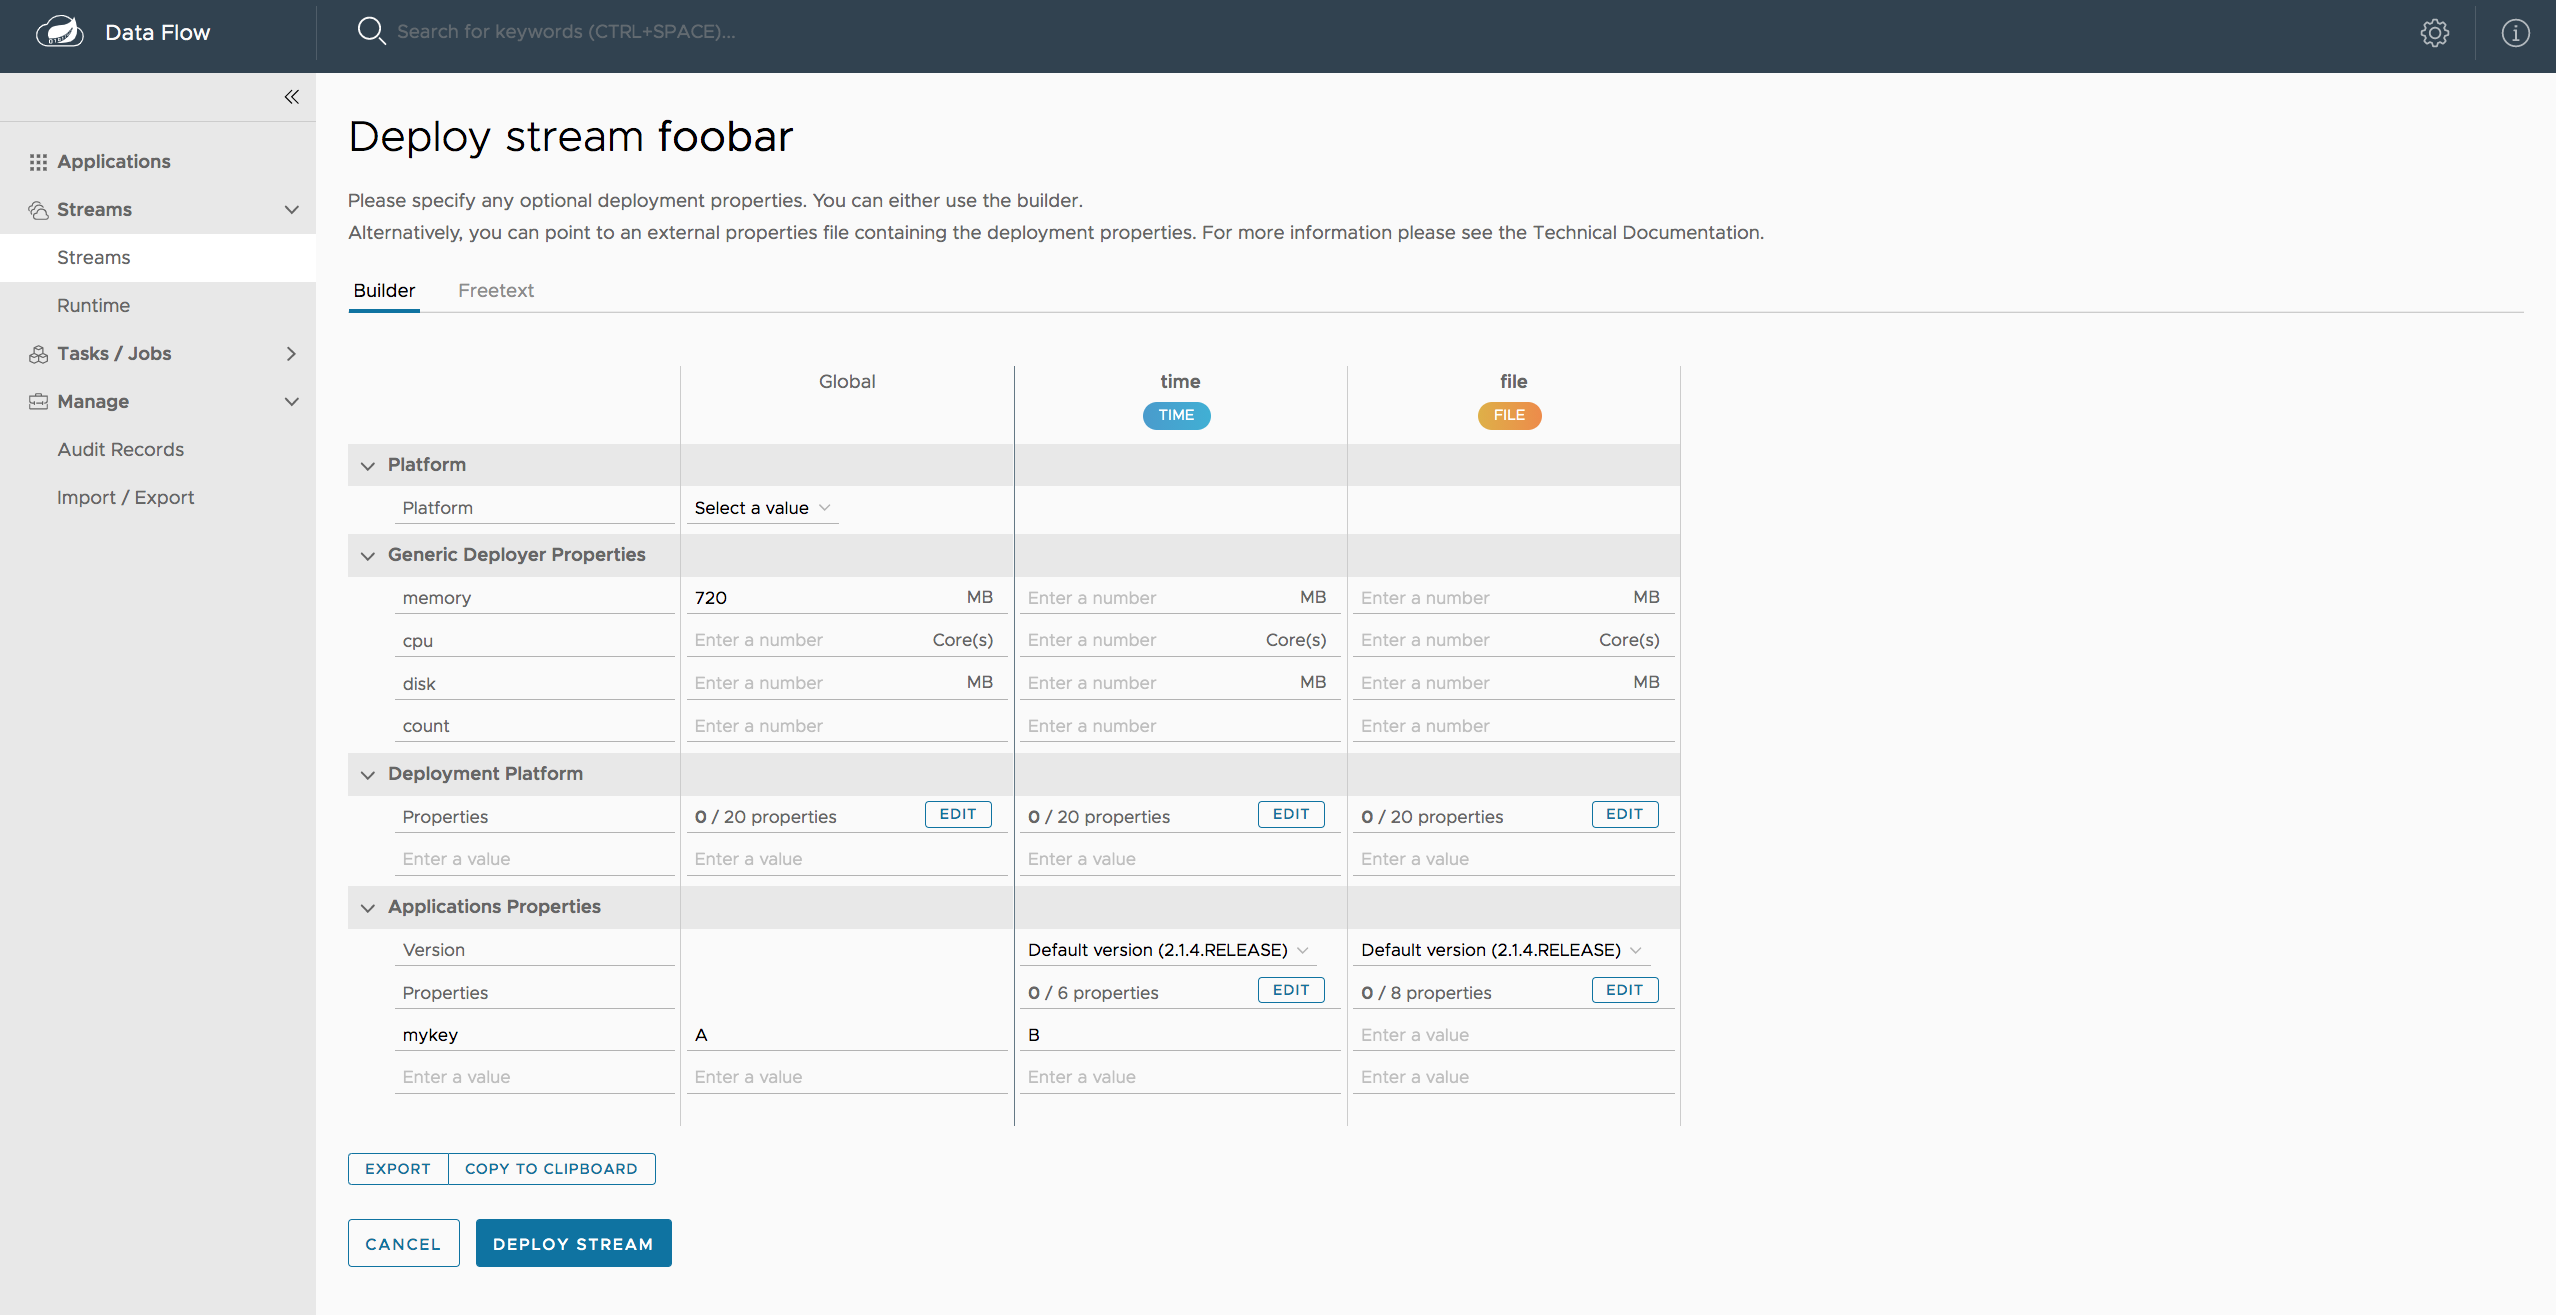
Figure 17. The following image shows the form builder
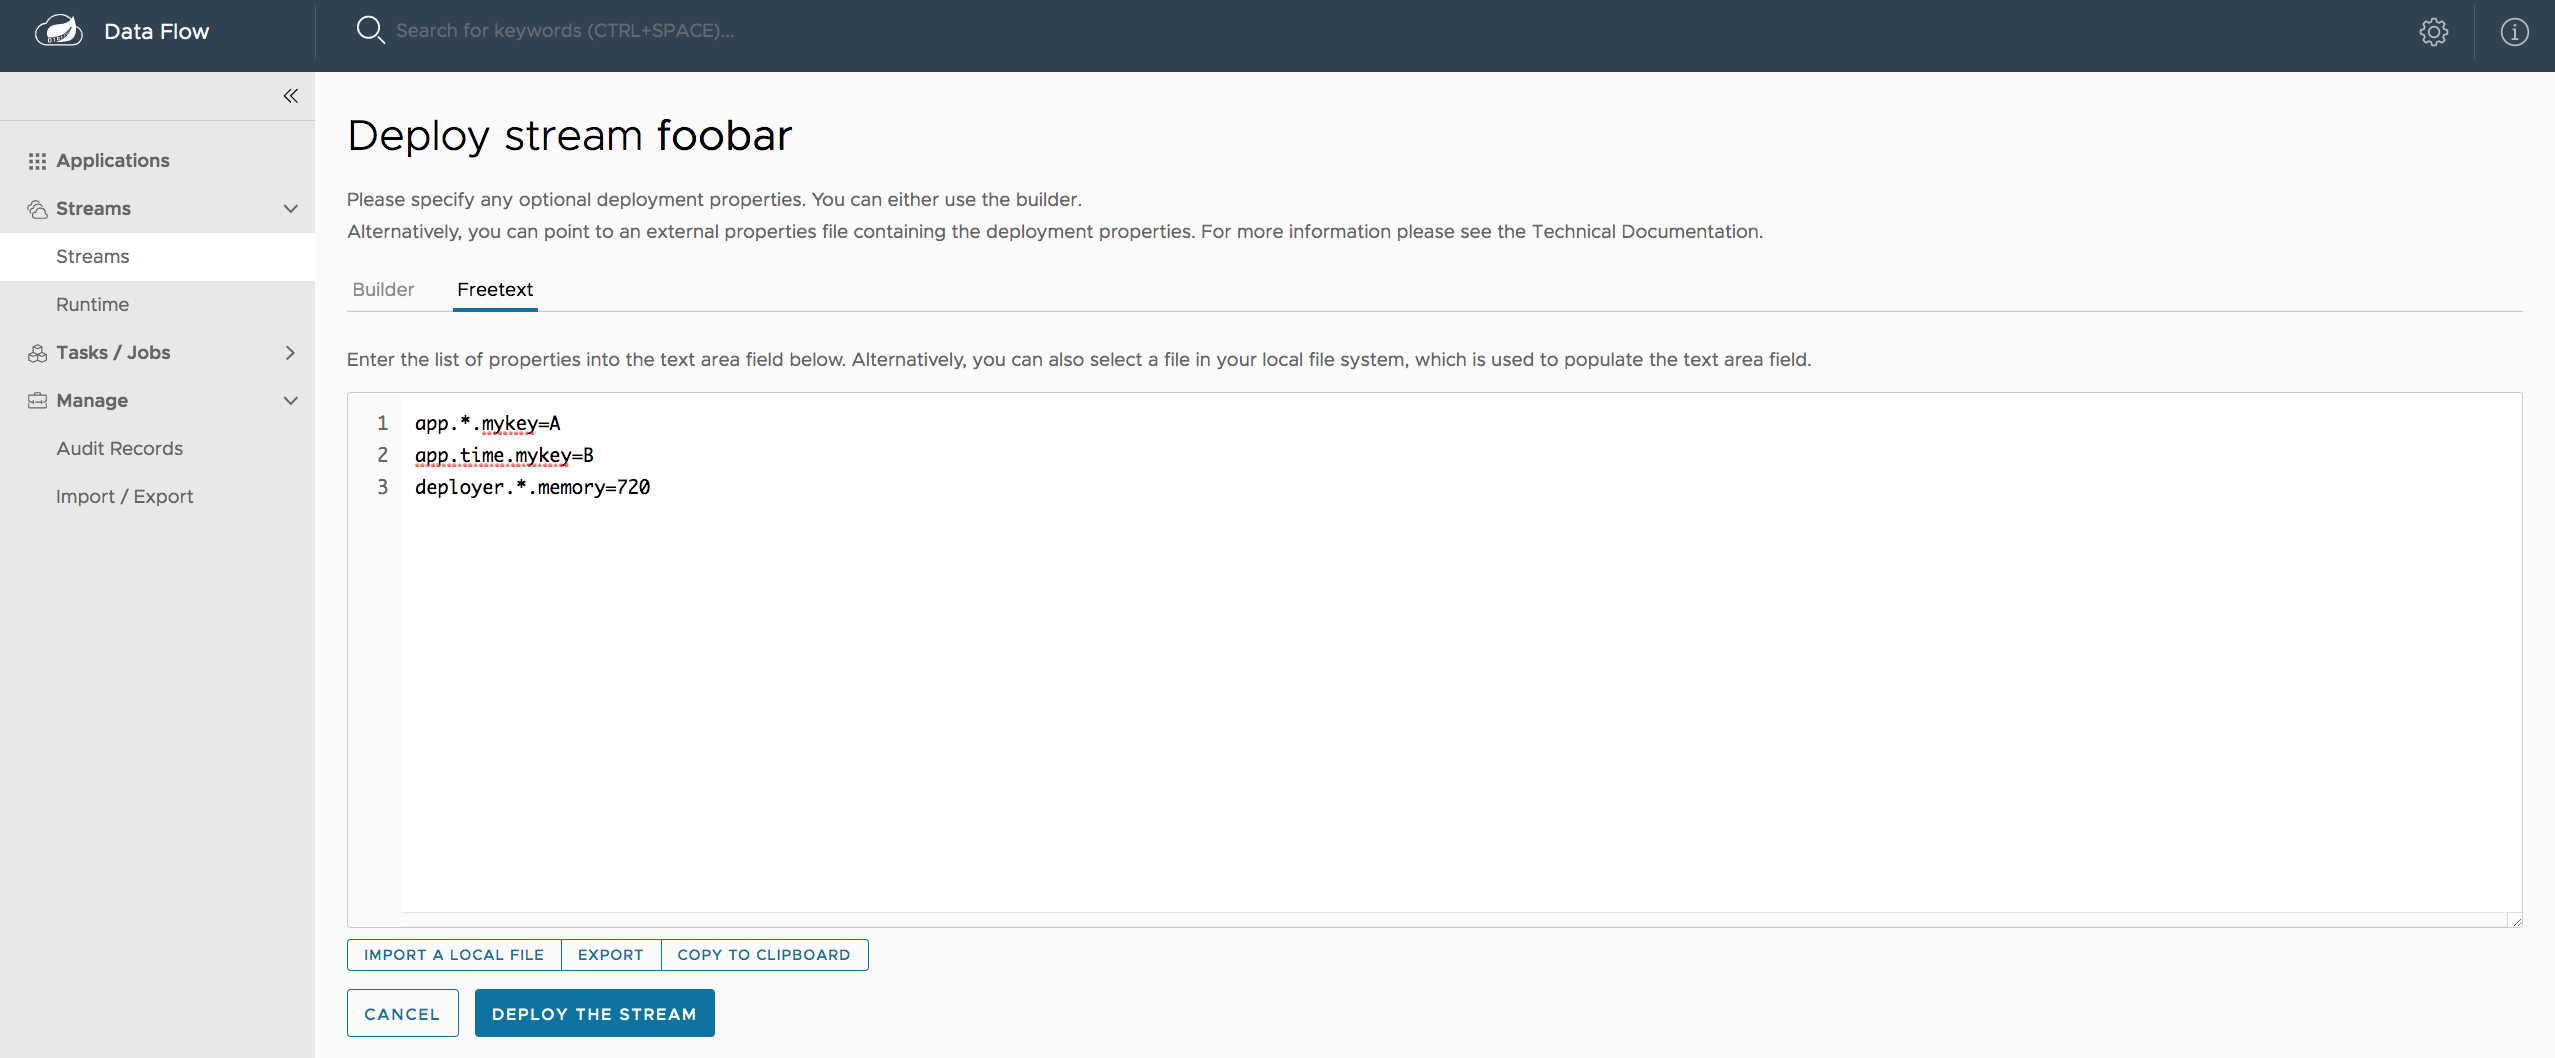
Figure 18. The following image shows the same properties in the free text
### 37.4. Accessing Stream Logs
Once the stream applications are deployed, their logs can be accessed from the Stream `summary` page, as the following image shows:
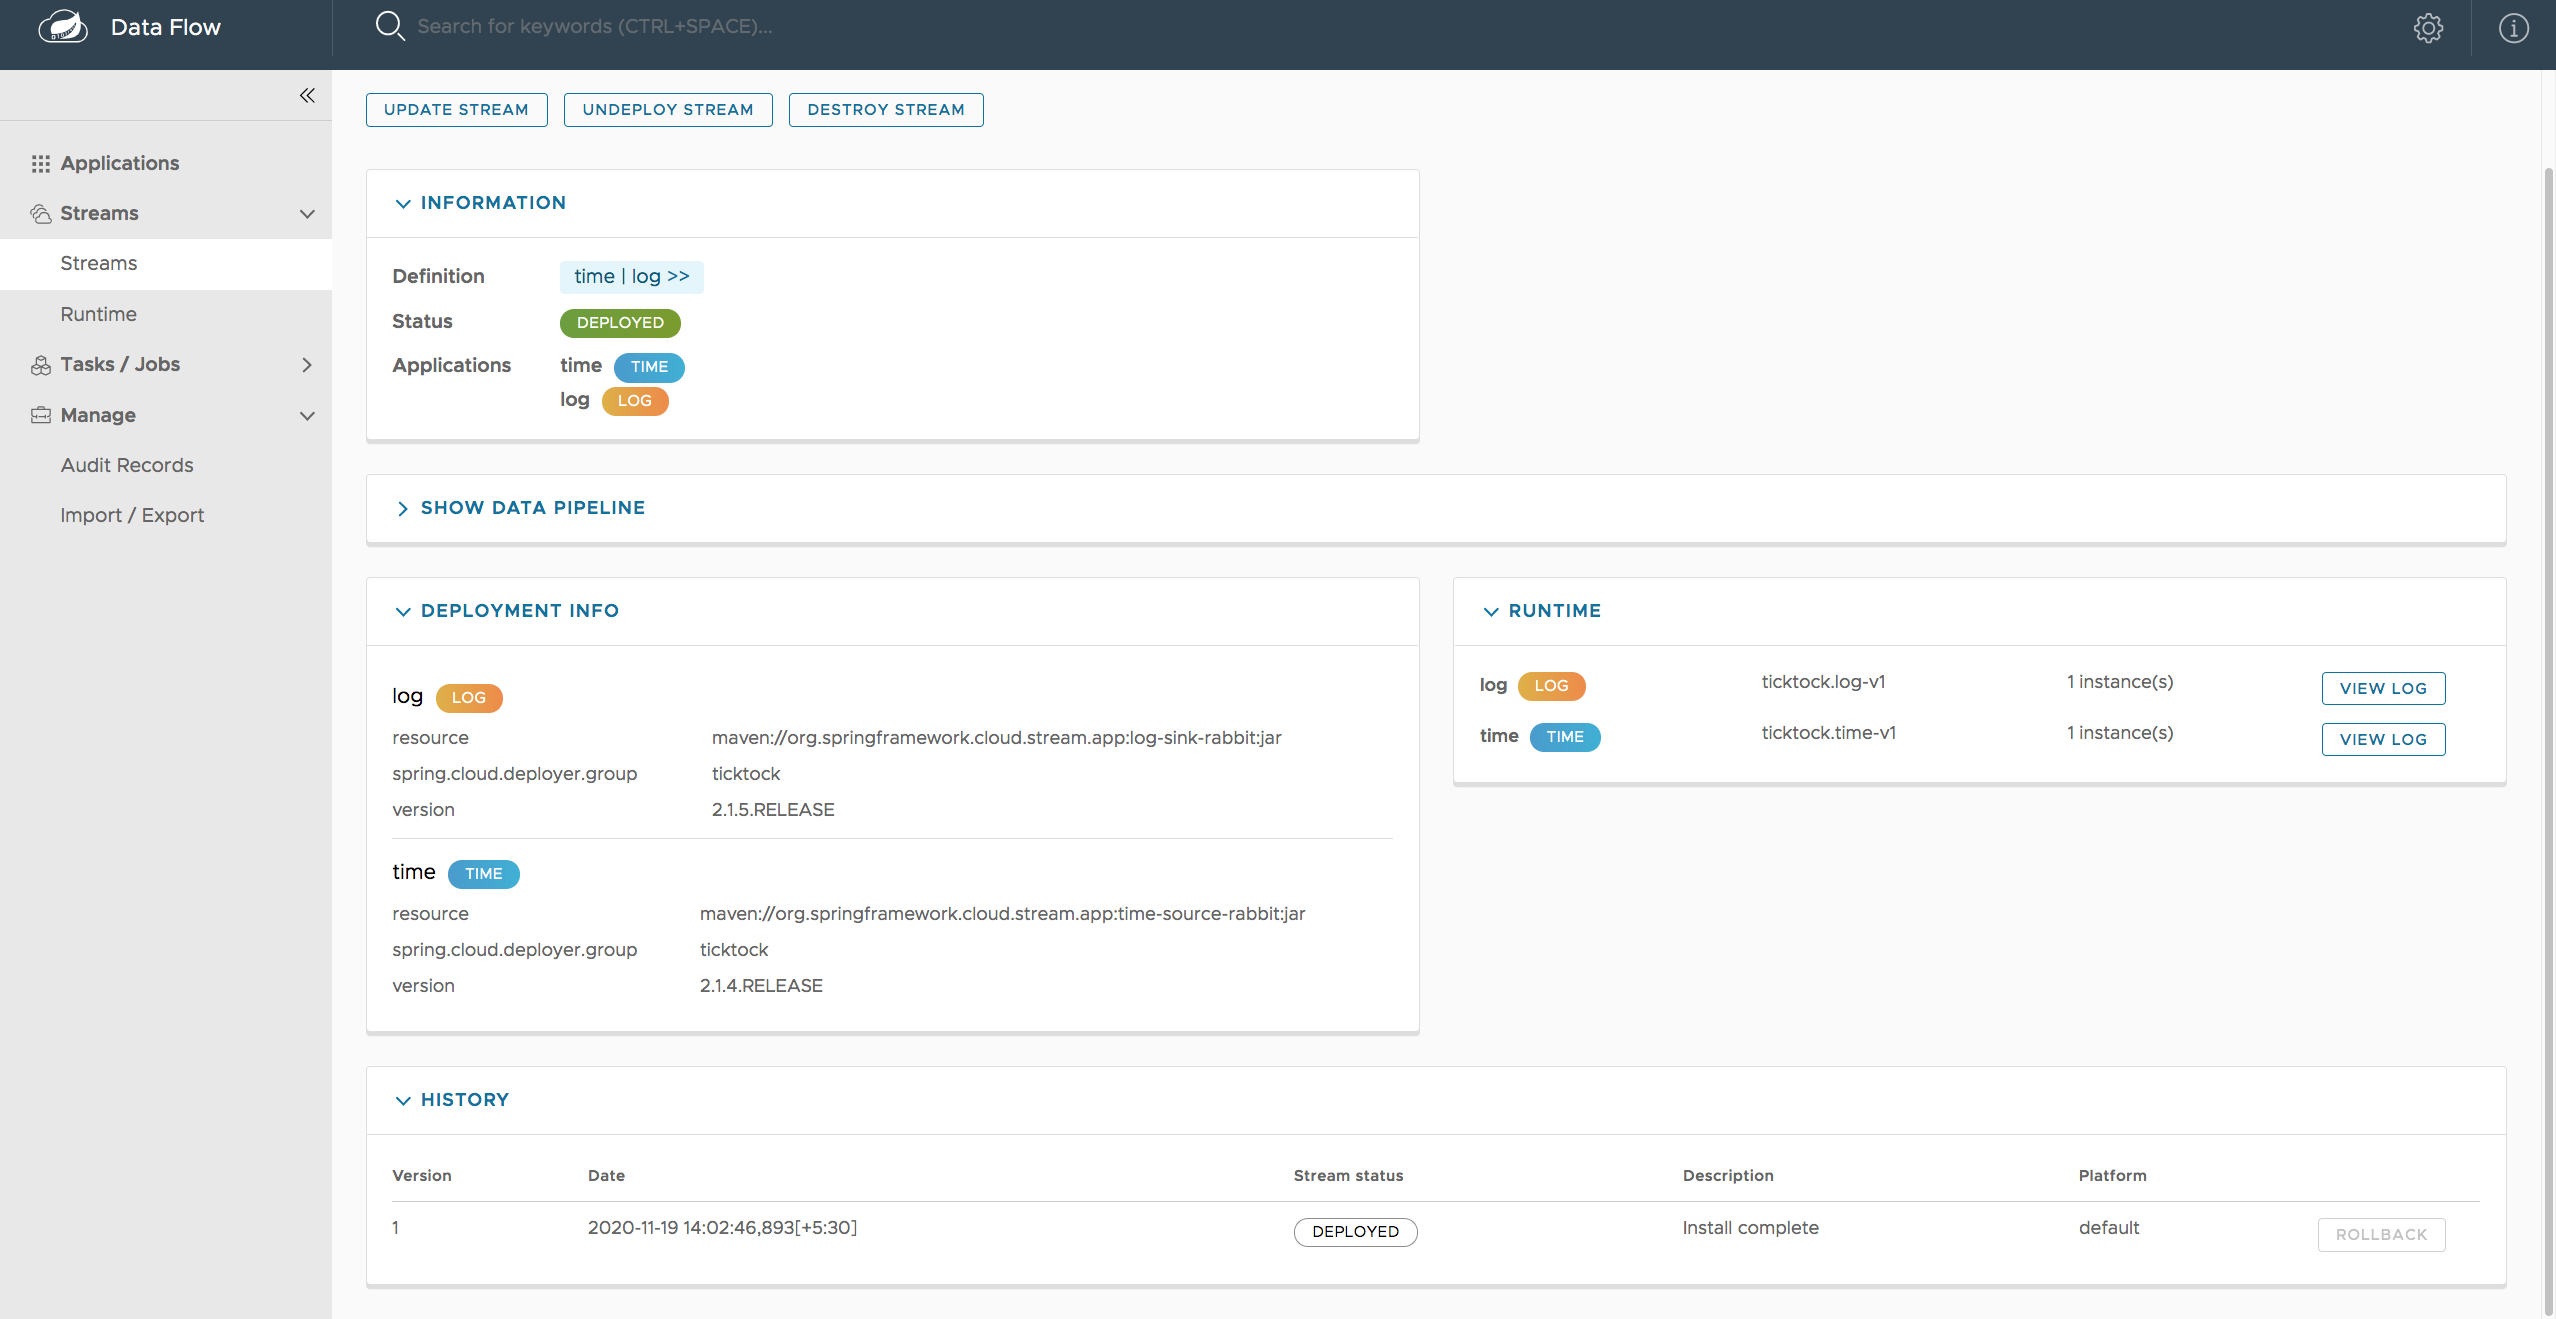
### 37.5. Creating Fan-In and Fan-Out Streams
In the [Fan-in and Fan-out](#spring-cloud-dataflow-stream-dsl-fanin-fanout) chapter, you can learn how to support fan-in and fan-out use cases by using [named destinations](#spring-cloud-dataflow-stream-dsl-named-destinations).
The UI provides dedicated support for named destinations as well:
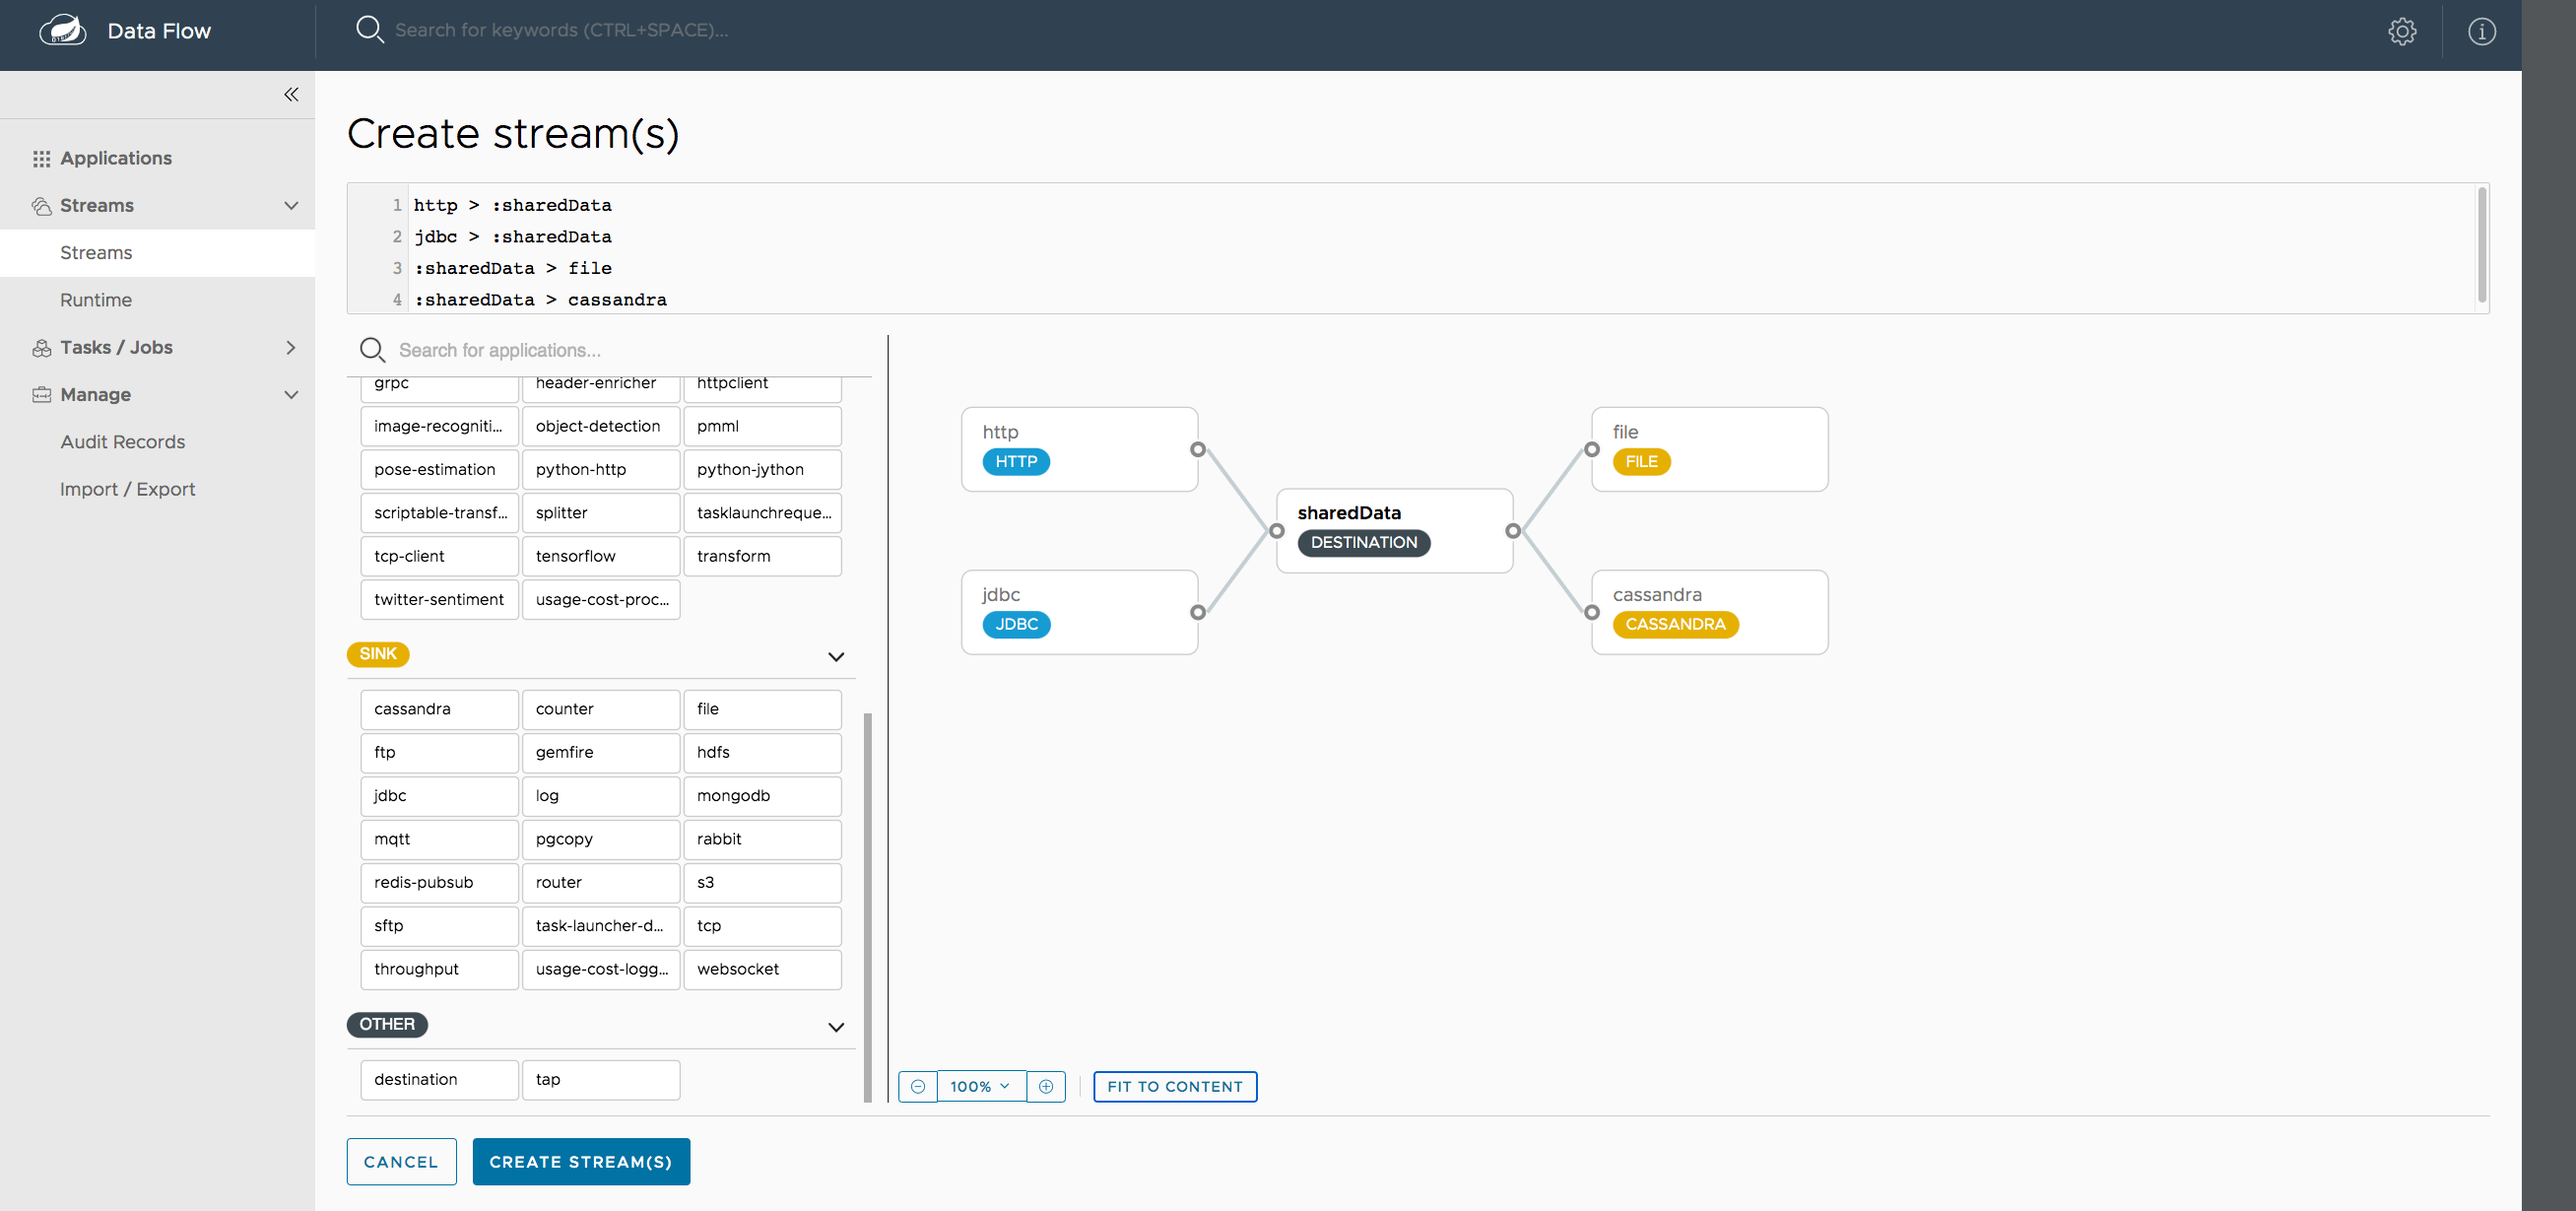
Figure 19. Flo for Spring Cloud Data Flow
In this example, we have data from an *HTTP Source* and a *JDBC Source* that is being sent to the*sharedData* channel, which represents a fan-in use case.
On the other end we have a *Cassandra Sink* and a *File Sink* subscribed to the *sharedData* channel, which represents a fan-out use case.
### 37.6. Creating a Tap Stream
Creating taps by using the Dashboard is straightforward.
Suppose you have a stream consisting of an *HTTP Source* and a *File Sink* and you would like to tap into the stream
to also send data to a *JDBC Sink*.
To create the tap stream, connect the output connector of the *HTTP Source* to the *JDBC Sink*.
The connection is displayed as a dotted line, indicating that you created a tap stream.
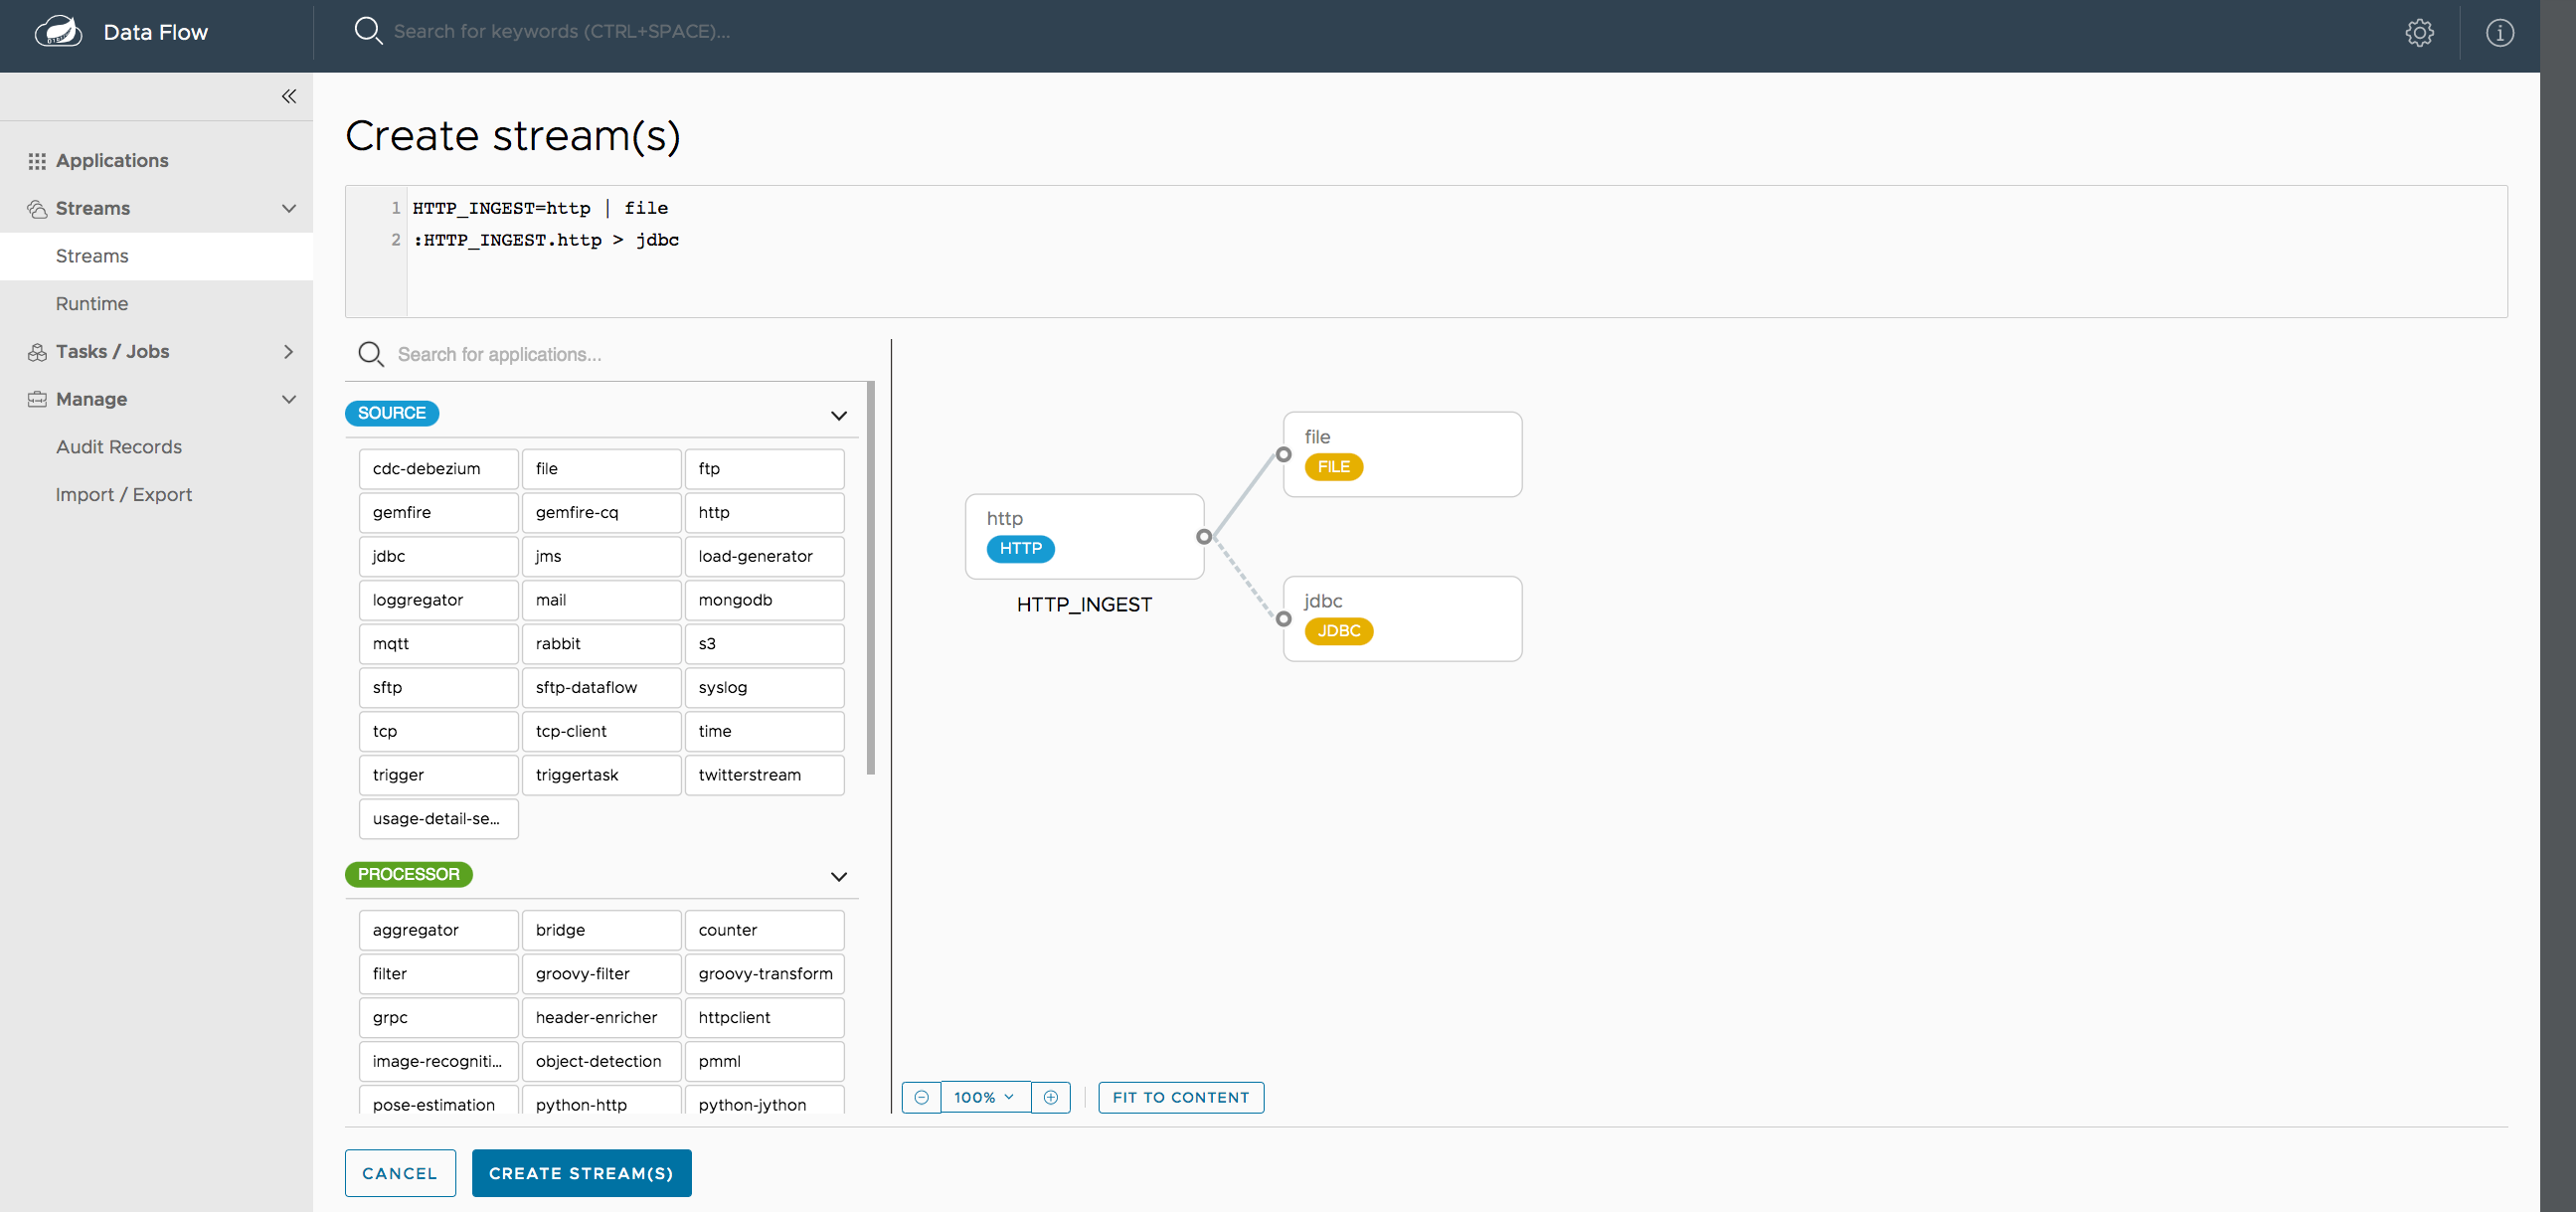
Figure 20. Creating a Tap Stream
The primary stream (*HTTP Source* to *File Sink*) will be automatically named, in case you did not provide a name for the stream, yet.
When creating tap streams, the primary stream must always be explicitly named.
In the preceding image, the primary stream was named *HTTP\_INGEST*.
By using the Dashboard, you can also switch the primary stream so that it becomes the secondary tap stream.
Figure 21. Change Primary Stream to Secondary Tap Stream
Hover over the existing primary stream, the line between *HTTP Source* and *File Sink*.
Several control icons appear, and, by clicking on the icon labeled *Switch to/from tap*,
you change the primary stream into a tap stream.
Do the same for the tap stream and switch it to a primary stream.
Figure 22. End Result of Switching the Primary Stream
| |When interacting directly with [named destinations](#spring-cloud-dataflow-stream-dsl-named-destinations),