# uni-push
uni-push是DCloud与合作伙伴个推共同推出的统一推送服务。用于从服务器端推送消息到客户端。
它包括在线推送、离线推送,聚合了Apple、华为、小米、OPPO、VIVO、魅族、荣耀(3.99+)、Google等多个手机厂商的推送通道。
若不使用服务器推送,仅想创建手机通知栏本地消息,也需要使用本模块的API。
它是一个云端一体的业务,涉及多份文档:
1. 业务介绍:对于未使用过uni-push的新用户,本文必读:[uni-push业务介绍](https://uniapp.dcloud.net.cn/unipush-v2.html)
2. 客户端API,即本文
3. 服务器API,[另见](https://doc.dcloud.net.cn/uniCloud/uni-cloud-push/api)
## 注意事项
* Android离线推送消息,需要开通厂商通道,在UniPush2.0中进行配置 [文档](https://uniapp.dcloud.net.cn/unipush-v2.html#%E7%AC%AC%E4%BA%8C%E6%AD%A5-%E9%85%8D%E7%BD%AE)
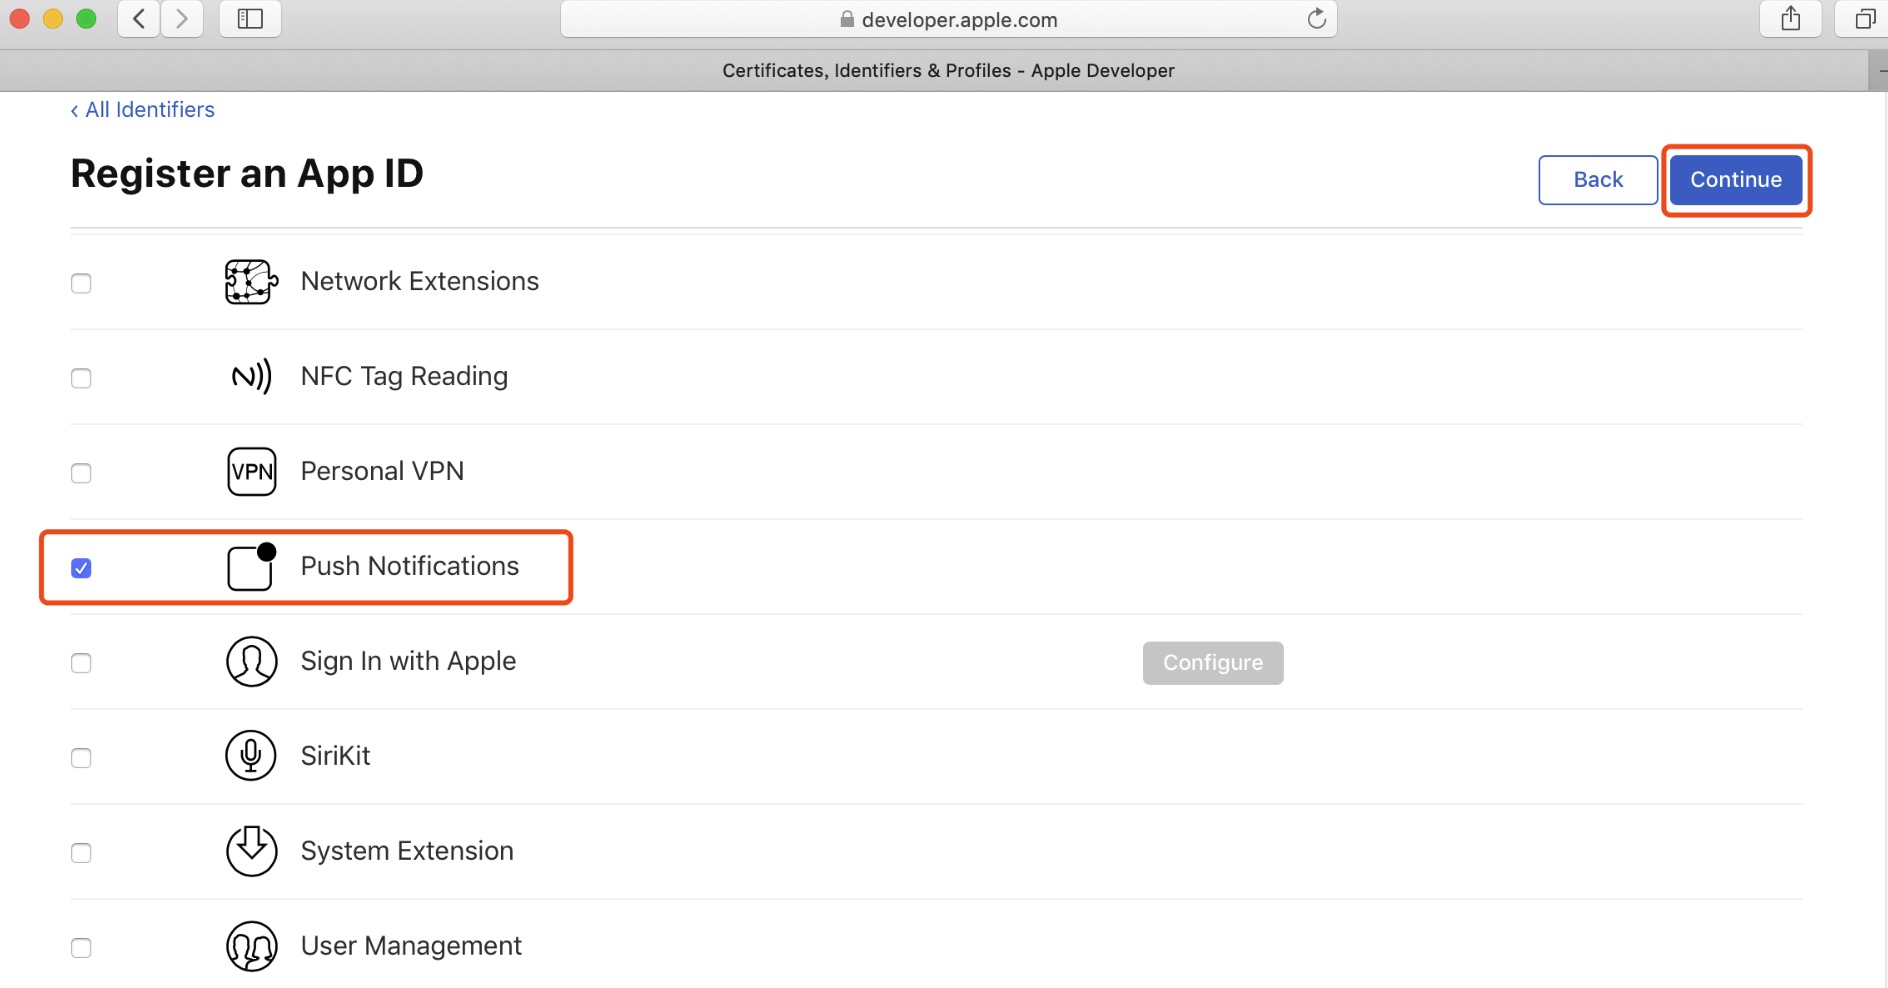
* iOS平台配置证书时,请注意开通推送能力,否则云打包会报错,配置如下图:

## uni.getPushClientId(options) @getpushclientid
<!-- UTSAPIJSON.getPushClientId.description -->
<!-- UTSAPIJSON.getPushClientId.compatibility -->
<!-- UTSAPIJSON.getPushClientId.param -->
<!-- UTSAPIJSON.getPushClientId.returnValue -->
<!-- UTSAPIJSON.getPushClientId.tutorial -->
## uni.onPushMessage(callback) @onpushmessage
<!-- UTSAPIJSON.onPushMessage.description -->
<!-- UTSAPIJSON.onPushMessage.compatibility -->
<!-- UTSAPIJSON.onPushMessage.param -->
<!-- UTSAPIJSON.onPushMessage.returnValue -->
<!-- UTSAPIJSON.onPushMessage.tutorial -->
### 注意事项
* 如果多次监听`onPushMessage`,那么事件也会多次触发,所以当不需要监听的时候需要`offPushMessage`。
## uni.offPushMessage(callback) @offpushmessage
<!-- UTSAPIJSON.offPushMessage.description -->
<!-- UTSAPIJSON.offPushMessage.compatibility -->
<!-- UTSAPIJSON.offPushMessage.param -->
<!-- UTSAPIJSON.offPushMessage.returnValue -->
<!-- UTSAPIJSON.offPushMessage.tutorial -->
## uni.getChannelManager() @getchannelmanager
<!-- UTSAPIJSON.getChannelManager.description -->
<!-- UTSAPIJSON.getChannelManager.compatibility -->
<!-- UTSAPIJSON.getChannelManager.param -->
<!-- UTSAPIJSON.getChannelManager.returnValue -->
<!-- UTSAPIJSON.getChannelManager.tutorial -->
### 注意事项
* 由于各大厂商限制推送频次,当使用厂商离线推送的时,需要在不同品牌手机后台开通自分类权益,[限制数量说明](https://docs.getui.com/getui/mobile/vendor/qps/)
- [华为](https://developer.huawei.com/consumer/cn/doc/HMSCore-Guides/message-classification-0000001149358835)
- [小米](https://dev.mi.com/console/doc/detail?pId=2422)
- [oppo](https://open.oppomobile.com/new/developmentDoc/info?id=11227)
- [vivo](https://dev.vivo.com.cn/documentCenter/doc/359)
- [honor](https://developer.hihonor.com/cn/kitdoc?category=%E5%9F%BA%E7%A1%80%E6%9C%8D%E5%8A%A1&kitId=11002&navigation=guides&docId=notification-class.html)
uni-push从HBuilderX 3.99起支持荣耀推送
开通自分类权益后,需要客户端创建channel,因此客户端提供了`setPushChannel`来进行channel的创建,通过此Api来创建渠道进行推送。
客户端创建渠道成功后,即可通过云函数进行推送,[uni-push2服务端文档](https://doc.dcloud.net.cn/uniCloud/uni-cloud-push/api.html)。
* 由于Android通知渠道的机制问题,一旦通知渠道建立,便不能修改此渠道的配置,即使删除渠道后再次创建同channelId名称的渠道,也不会改变原先渠道的配置(除非删除应用),最明显的现象就是铃声动态修改失败,比如调用`setPushChannel`时,第一次的设置参数是`{"channelId":"test","soundName":"pushsound"}` , 这时你想切换铃音,你的channelId就不能再叫test了,而应该为`{"channelId":"test2","soundName":"ring"}` ,此时会新建一个渠道。
## uni.createPushMessage(options) @createpushmessage
<!-- UTSAPIJSON.createPushMessage.description -->
<!-- UTSAPIJSON.createPushMessage.compatibility -->
<!-- UTSAPIJSON.createPushMessage.param -->
<!-- UTSAPIJSON.createPushMessage.returnValue -->
<!-- UTSAPIJSON.createPushMessage.tutorial -->
<!-- UTSAPIJSON.general_type.name -->
<!-- UTSAPIJSON.general_type.param -->
## uni.getPushChannelManager() @getpushchannelmanager
<!-- UTSAPIJSON.getPushChannelManager.description -->
<!-- UTSAPIJSON.getPushChannelManager.compatibility -->
<!-- UTSAPIJSON.getPushChannelManager.param -->
<!-- UTSAPIJSON.getPushChannelManager.returnValue -->
<!-- UTSAPIJSON.getPushChannelManager.example -->
<!-- UTSAPIJSON.getPushChannelManager.tutorial -->
## uni.setAppBadgeNumber(num, options?) @setappbadgenumber
<!-- UTSAPIJSON.setAppBadgeNumber.description -->
<!-- UTSAPIJSON.setAppBadgeNumber.compatibility -->
<!-- UTSAPIJSON.setAppBadgeNumber.param -->
<!-- UTSAPIJSON.setAppBadgeNumber.returnValue -->
<!-- UTSAPIJSON.setAppBadgeNumber.example -->
<!-- UTSAPIJSON.setAppBadgeNumber.tutorial -->
<!-- UTSAPIJSON.uni-push.example -->
<!-- UTSAPIJSON.general_type.name -->
<!-- UTSAPIJSON.general_type.param -->
## 示例代码
hello uni-push是可跑通、同时包含客户端和服务器完整流程的代码。[https://gitcode.net/dcloud/hello-uni-push](https://gitcode.net/dcloud/hello-uni-push)
在业务开通、配置正确的情况下,执行项目下的云函数,即可给客户端发送消息。
## app-android平台高级场景用途
在[nativeResources/android](https://uniapp.dcloud.net.cn/tutorial/app-nativeresource-android.html#%E5%BA%94%E7%94%A8%E8%B5%84%E6%BA%90)目录可以配置图片和声音的二进制文件资源。
### 通知栏显示图标自定义
关于图标的配置,需要创建[nativeResources](https://uniapp.dcloud.net.cn/tutorial/app-nativeresource-android.html#%E5%BA%94%E7%94%A8%E8%B5%84%E6%BA%90)目录,
放置对应分辨率的图片资源即可(打包后生效),目录配置如下
```
├── nativeResources
│ └── android
│ └── res
│ ├── drawable-ldpi
│ │ ├── push.png // 分辨率要求48x48
│ │ └── push_small.png // 分辨率要求18x18
│ ├── drawable-mdpi
│ │ ├── push.png // 分辨率要求64x64
│ │ └── push_small.png // 分辨率要求24x24
│ ├── drawable-hdpi
│ │ ├── push.png // 分辨率要求96x96
│ │ └── push_small.png // 分辨率要求36x36
│ ├── drawable-xhdpi
│ │ ├── push.png // 分辨率要求128x128
│ │ └── push_small.png // 分辨率要求48x48
│ ├── drawable-xxhdpi
│ │ ├── push.png // 分辨率要求192x192
│ │ └── push_small.png // 分辨率要求72x72
│ ├── drawable-xxxhdpi
│ │ └── push_small.png // 分辨率要求96x96
│ └── raw
│ └── pushsound.mp3 // 声音文件, 自定义推送铃音时使用
```
### 通知声音自定义
有些场景,如到账提醒,需要自定义通知声音。
`setPushChannel`设置新建渠道时,`soundName`字段的值为目录nativeResources->android->res->raw中存放的音频文件名称,(打包后生效)
注意不要带文件的后缀,比如`pushsound.mp3`文件,例:
```ts
const channelManager = getChannelManager()
channelManager.setPushChannel({
channelId: "test1",
channelDesc: "test1 desc",
soundName: "pushsound"
})
```
### 在通知栏显示App下载进度
很多Android应用升级下载apk时会在通知栏显示下载进度。
该功能已经内置到[uni升级中心](https://doc.dcloud.net.cn/uniCloud/upgrade-center.html)中,此开源模板可直接使用。
### 在通知栏显示音乐播放条
需要使用uts插件,[见插件市场](https://ext.dcloud.net.cn/search?q=%E9%80%9A%E7%9F%A5%E6%A0%8F&orderBy=Relevance&uni-appx=1)
## 注意事项
* 关于隐私安全问题,由于在调用`getPushClientId`或者`onPushMessage`时,才会初始化个推SDK,所以开发者要确保**弹出隐私框之前不调用此两项API**。
* 获取手机端app是否拥有push权限,请使用API [uni.getAppAuthorizeSetting](get-app-authorize-setting.md)
* uni-app x 的push模块仅支持uni-push2,不再支持uni-push1。但不要误会这不是强绑uniCloud的付费行为。而是DCloud的所有云服务都将统一纳入到uniCloud体系管理,开发者在开通uni-push2后,也可以拿到mastersecret,然后在自己的服务器去直接连接个推服务器。另外uniCloud的免费版也足够很多开发者使用。
* uni-push是一个独立的模块,在标准基座中并不包含。开发push需要首先编写push相关代码,然后打包自定义基座,根据摇树规则,打出的自定义基座才会包含push模块。详见[摇树](../collocation/manifest-modules.md#treeshaking)
* 创建本地通知栏,理论上可以和个推的服务无关。但目前也都包含在push模块里了。如果您不需要服务器推送,只需要本地创建通知栏,也需要打包push模块才行。
* 部分手机创建本地通知时,App如果在后台状态,点击通知消息并不会拉起App,原因是厂商增加了后台弹窗权限,需要用户手动打开此权限。