# 使用JS语言开发
- [编写第一个页面](#section17436202895811)
- [创建另一个页面](#section944219415598)
- [实现页面跳转](#section126857614017)
## 编写第一个页面
1. 第一个页面内有一个文本和一个按钮,通过text和button组件来实现。
在“Project“窗口,选择“entry \> src \> main \> js \> default \> pages.index“,打开“index.hml“文件,添加一个文本和一个按钮,示例代码如下:
```
Hello World
```
2. 打开“index.css“文件,设置文本和按钮的样式,示例代码如下:
```
/* index.css */
.container {
flex-direction: column; /* 设置容器内的项目纵向排列 */
justify-content: center; /* 设置项目位于容器主轴的中心 */
align-items: center; /* 项目在交叉轴居中 */
}
/* 对class="text"的组件设置样式 */
.text{
font-size: 42px;
}
/* 对class="button"的组件设置样式 */
.button {
width: 240px;
height: 60px;
background-color: #007dff;
font-size: 30px;
text-color: white;
margin-top: 20px;
}
```
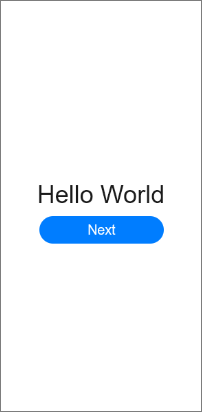
3. 使用[预览器](https://developer.harmonyos.com/cn/docs/documentation/doc-guides/previewer-0000001054328973#ZH-CN_TOPIC_0000001056725592__section16523172216252)或[模拟器](https://developer.harmonyos.com/cn/docs/documentation/doc-guides/run_simulator-0000001053303709)运行项目,效果如下图所示:
## 创建另一个页面
1. 在“Project“窗口,打开“entry \> src \> main \> js \> default“,右键点击“pages.index“文件夹,选择“New \> JS Page“,命名为“details“,单击回车键。
创建完成后,可以看到“pages.index“文件夹下的文件目录结构如:

2. 打开“details.hml“文件,添加一个文本,示例代码如下:
```
Hi there
```
3. 打开“details.css“文件,设置文本的样式,示例代码如下:
```
/* details.css */
.container {
flex-direction: column;
justify-content: center;
align-items: center;
}
.text {
font-size: 42px;
text-align: center;
}
```
## 实现页面跳转
1. 打开第一个页面的“index.js“文件,导入router模块,页面路由router根据页面的uri来找到目标页面,从而实现跳转。示例代码如下:
```
// index.js
import router from '@system.router';
export default {
launch() {
router.push ({
uri:'pages/index/details/details', // 指定要跳转的页面
})
}
}
```
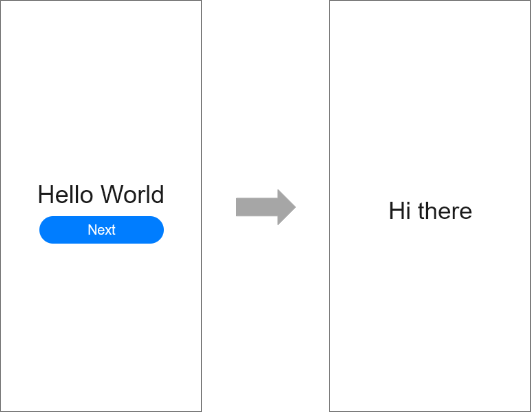
2. 再次使用[预览器](https://developer.harmonyos.com/cn/docs/documentation/doc-guides/previewer-0000001054328973#ZH-CN_TOPIC_0000001056725592__section16523172216252)或[模拟器](https://developer.harmonyos.com/cn/docs/documentation/doc-guides/run_simulator-0000001053303709)运行项目,效果如下图所示:
恭喜你,至此已成功完成HarmonyOS快速入门-使用JS语言开发。